The tables consist of chains. The chains in different tables can be different. We will see why later. Our Filter table has three chains:
Basic Firewall Setup in Microtic
Today I would like to tell you more about protection of routers of a popular Latvian brand. We will talk about the basic configuration of Firewall in Mikrotik for security and convenience. Article on this topic has been written a long time ago, but I decided to completely redo and update it.
For a long time, I had published an article about simple firewall configuration on a microtik. It listed some basic rules to limit access to the router and yet the article collected over 200 thousand hits.
So, let's assume that you have already set up your router about the same way I described in my article. There is a local network that will access the internet through the microtic. And there is the microtic itself, which we want to protect by limiting access to everything unnecessary, allowing only what we need.
| 192.168.88.1 | microtic local address |
| bridge | the name of the bridge, where all interfaces for the local network are connected |
| ether1 | interface for the external WAN connection |
| 192.168.88.0/24 | the local network served by the microtic |
Default firewall in a Mikrotik
If you are using a default router configuration, it will have default firewall rules. Here is the list of default rules with comments. Recall that you can export firewall rules to mikrotik with the following command:
/ip firewall filter add action=accept chain=input comment="defconf: accept established,related,untracked" connection-state=established,related,untracked add action=drop chain=input comment="defconf: drop invalid" connection-state=invalid add action=accept chain=input comment="defconf: accept ICMP" protocol=icmp add action=drop chain=input comment="defconf: drop all not coming from LAN" in-interface-list=!LAN add action=accept chain=forward comment="defconf: accept in ipsec policy" ipsec-policy=in,ipsec add action=accept chain=forward comment="defconf: accept out ipsec policy" ipsec-policy=out,ipsec add action=fasttrack-connection chain=forward comment="defconf: fasttrack" connection-state=established,related add action=accept chain=forward comment="defconf: accept established,related, untracked" connection-state=established,related,untracked add action=drop chain=forward comment="defconf: drop invalid" connection-state=invalid add action=drop chain=forward comment="defconf: drop all from WAN not DSTNATed" connection-nat-state=!dstnat connection-state=new in-interface-list=WAN /ip firewall nat add action=masquerade chain=srcnat comment="defconf: masquerade" ipsec-policy=out,none out-interface-list=WAN
Basically, it's clear from these comments what's going on here. All incoming and transit connections not from the local network are dropped, ping – icmp is allowed, ipsec is allowed, established connections are allowed. Everything. Well and configured NAT through the WAN interface.
In many cases these default rules may be enough for a regular user who has just set up a router at home to connect to the Internet. Take it as a rule of thumb if you don't need anything else from your router.
Why do I need a firewall on my router?
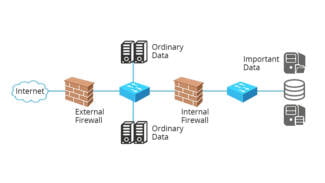
With firewalls, we can allow or block incoming and outgoing traffic through the various interfaces of the router, both on the WAN and on the LAN. However, the vast majority of users want a firewall on the WAN to control traffic from outside the router itself.
The firewall in the router, will allow us to block any attempt to access a certain port on the router, that is, if we have TCP port 22 SSH open, we can limit the number of simultaneous connections, the number of connections at a certain time, and we can even allow only a certain IP address to access the SSH server of our router.
A very important aspect of router firewalls is that, by default, all connections that start behind the border (on the Internet) are denied (DROP) unless they have been specifically allowed before, so a "deny all" policy is the most recommended.
Computers on the LAN are always behind NAT
Nowadays in IPv4 networks we use NAT / PAT, so with the same public IP address all computers in the local network can go to the Internet. The important detail is that all connections from the LAN equipment to the Internet are allowed, i.e. a socket is opened on the PC and it is routed to the destination and in the NAT table we will get the translation done. from private IP to public IP so that when the packet returns it can be correctly redirected to the destination.
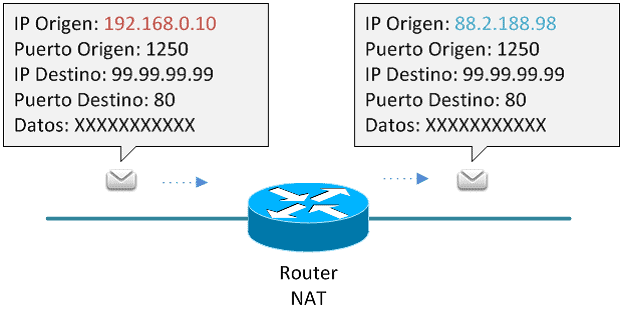
If from the Internet we try to establish a connection with the local network computer, we cannot directly if:
Therefore, any communication from the Internet to the LAN is blocked by default. In addition, it is highly recommended to always disable the UPnP protocol so that devices cannot open a port on the router's NAT themselves and are more secure. There are certain devices that constantly open a port on the router, such as some IP cameras, which will be easily accessible via the Internet.
Configuration tips
Let's move on to the practice of setting up. In this article I will talk about the Filter table, the one that handles traffic filtering. As we found out a little bit above, the input chain is responsible for the traffic to the router itself, and the forward chain is responsible for the traffic that goes through the router. Now let's start protecting the router itself.
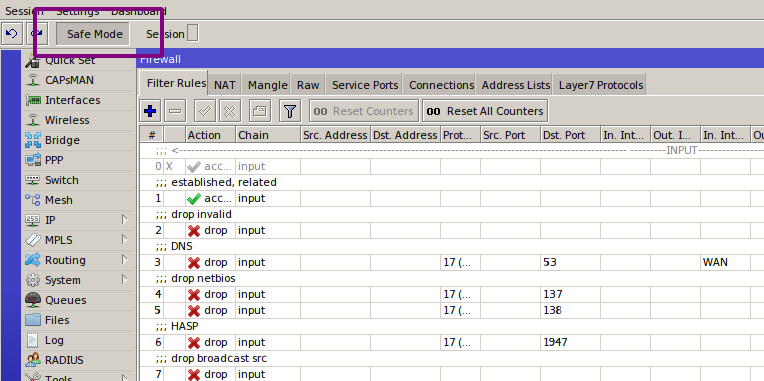
The first and most important thing to remember when working with a firewall was described back in the lost chapter of The Tale of Igor's Campaign: "remote configuration of the firewall is for the long haul". So respect your ancestors and use Safe Mode.
The way this mode works is that you press the Safe Mode button in the interface, and it stays pressed. From there you do whatever you were going to do, but the changes will only apply when you click the button again. If they cause the router and WinBox configurator to stop communicating (for example, if you have filtered your own packets or disabled the interface), the router will return to the state it had before you entered Safe Mode.
Only 100 actions are memorized, but that's enough for most cases. There will be no reboot – the rollback is instantaneous. From the console, this mode is activated by Ctrl-X.
Neither of them can be called unequivocally correct. I am a follower of the second approach, but in unfamiliar networks, I use the first.
In order to allow the desired traffic, you need to define the traffic. In the case of input, this is quite easy. Here is what you need for the router to work properly.
- Management: WinBox, SSH, in some cases WebFig, for example to view load graphs.
- If the ISP gives an address via DHCP, then enable this protocol on the external interface.
- If the router is a DHCP server, enable it on the internal interfaces.
- This is the same for DNS.
- If you want to bring up tunnels, enable them.
- OSPF.
- ICMP.
- NTP.
- Neighbor Discovery.
- SNMP.
- Other services.
INFO
Address List is a RouterOS feature that lets you combine IP addresses, subnets and DNS names into one entry.
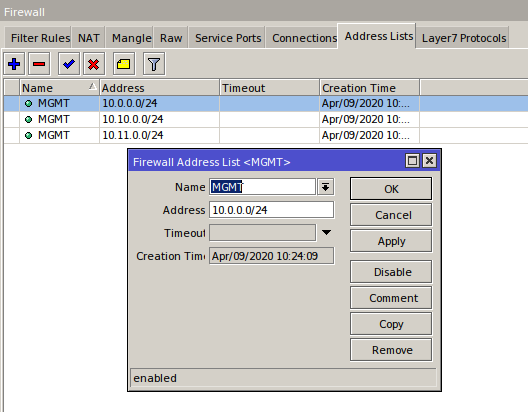
/ip firewall address-list add address=10.0.0.0/24 list=MGMT add address=10.10.0.0/24 list=MGMT add address=10.11.0.0/24 list=MGMT 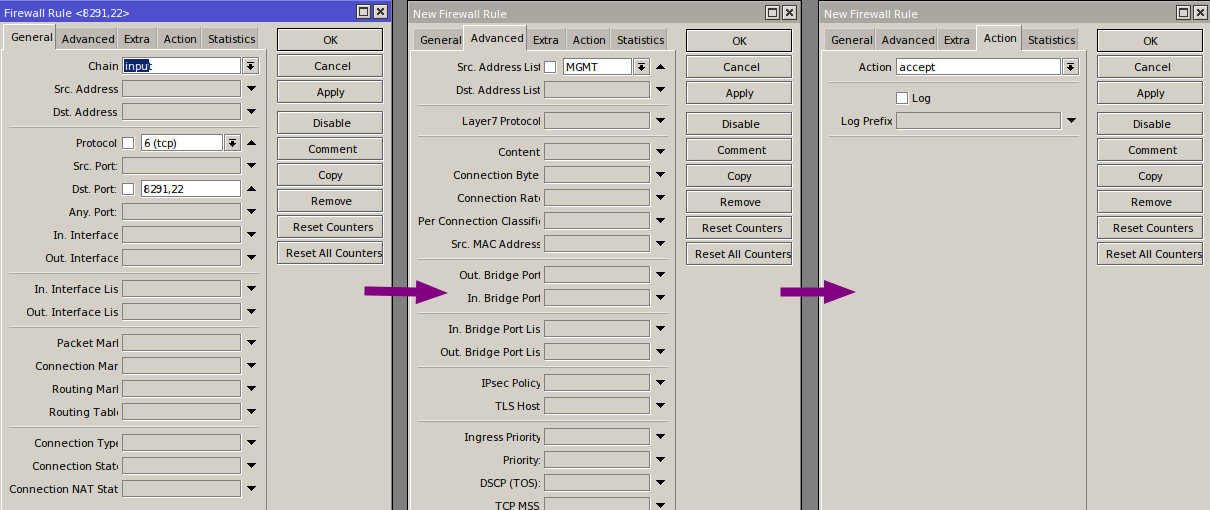
/ip firewall filter add action=accept chain=input dst-port=8291,22 protocol=tcp src-address-list=MGMT add action=drop chain=input So out of seven rules we got two and got rid of unnecessary load. By analogy with the address lists, interface lists work (I saw them in the previous article, "Protecting MikroTik"): we combine the interfaces of different providers into one interface list and put the rules not on the interfaces themselves, but on the lists. Thus we not only reduce the load, but also make life easier for the administrator: the fewer rules, the more convenient it is to maintain the system.
Another way to make the firewall's job easier is to use ConnTrack. It is clear that there will be much more established-packets than new, related and invalid all together. Since we allowed the first packet from the stream, all other packets in the stream can be considered legitimate. So just create a "allow established" rule and put it at the top.
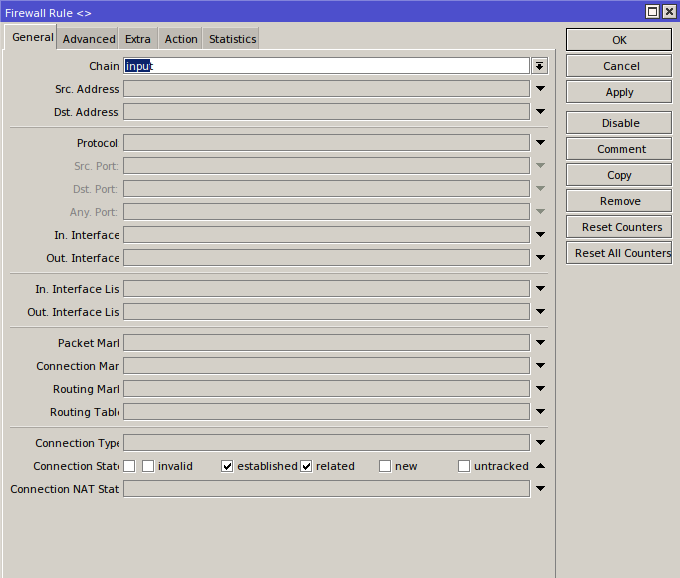
Select the protocols and ports you want and create appropriate lists of addresses and interfaces. Open everything you need and put the last rule drop all. This completes the basic setup of the input chain.
By the way, the default configuration of the firewall is quite strong – it is enough to make a network of almost any size work properly. But there are always some peculiarities and any configuration can be improved to suit your own conditions.
Standard LAN, WAN and guest rules
Standard LAN rules allow you to use all traffic everywhere, without restrictions: LANs to other LANs, LANs to the Internet, everything is allowed. Standard GUEST rules allow DNS, ping and traffic directed to the redirector in the USG itself via GUEST and LOCAL. GUEST IN allows the traffic necessary for the guest portal; but will block traffic destined for corporate networks, all restricted networks defined in guest management, remote user VPN subnets. This will allow everything else (for Internet traffic). By default, WAN IN only allows established/connected response traffic (for example, responses to traffic initiated from the internal network). Rules are automatically added to WAN_IN to allow traffic according to the configured port.
When you create a new rule, you must decide whether to place it before or after the predefined rules. Keep in mind that the first matching rule wins. If you create a rule and place it after predefined rules that you intend to apply to traffic that matches predefined rules, that rule will never be matched. With this in mind, "block" or "drop" rules in LAN IN must always exceed the predefined rules for matching, because the predefined "allow" rules will match everything.
If you want to configure firewall rules to block routing between VLANs, check out our article UniFi – How to Disable InterVLAN USG UniFi Routing.
Deny Faulty Connections
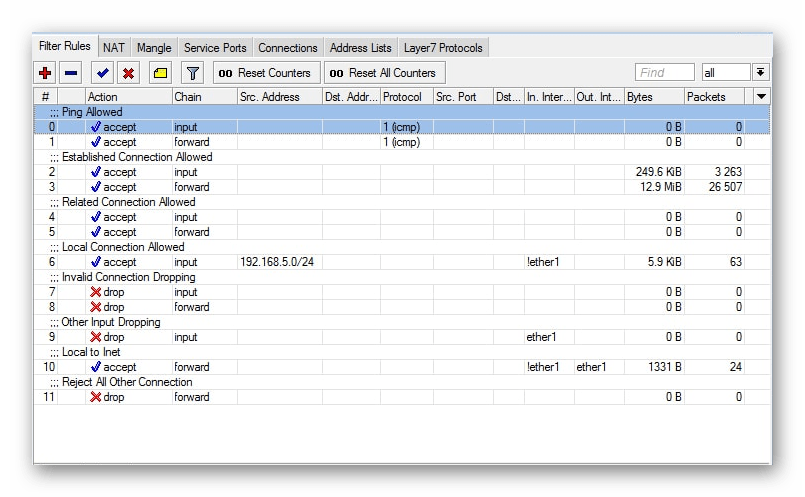
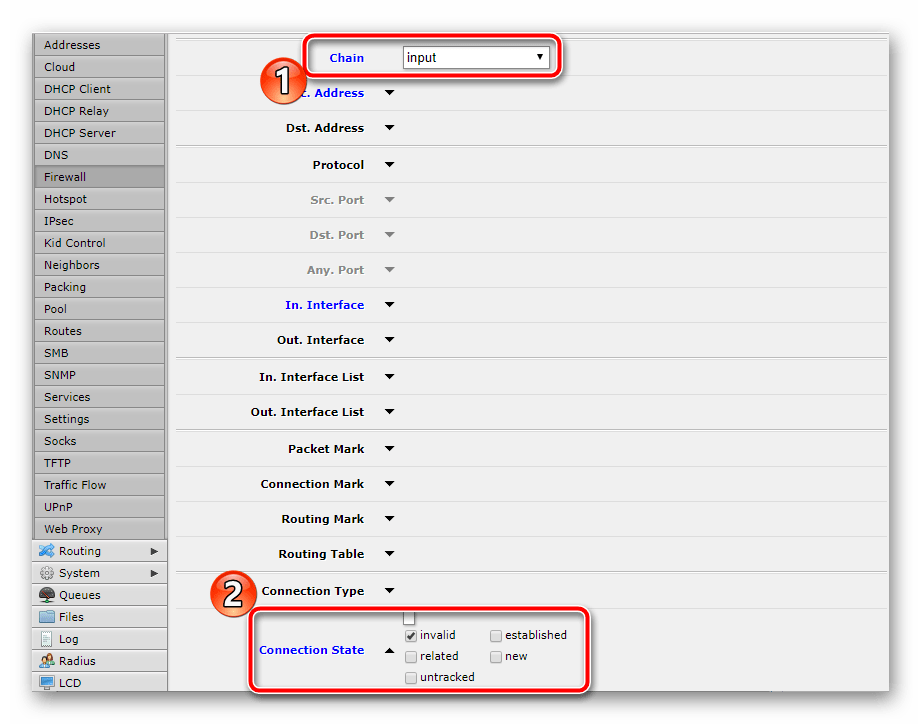
Creating this rule will help you prevent erroneous connections. It automatically detects invalid connections based on certain factors and then resets them and does not give them access. You need to create two parameters. This is done as follows:
- As with some of the previous rules, first specify "Input"Then you have to go down and check the option "invalid" next to "Connection State".
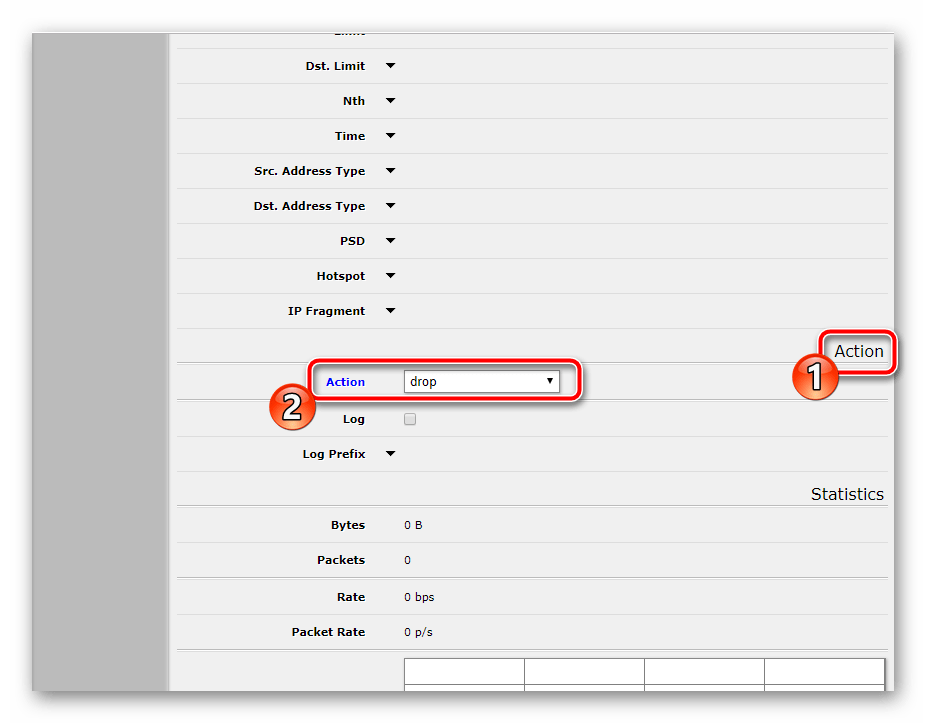
- Go to the tab or section "Action" and set the value "Drop"which means to drop this type of connection.
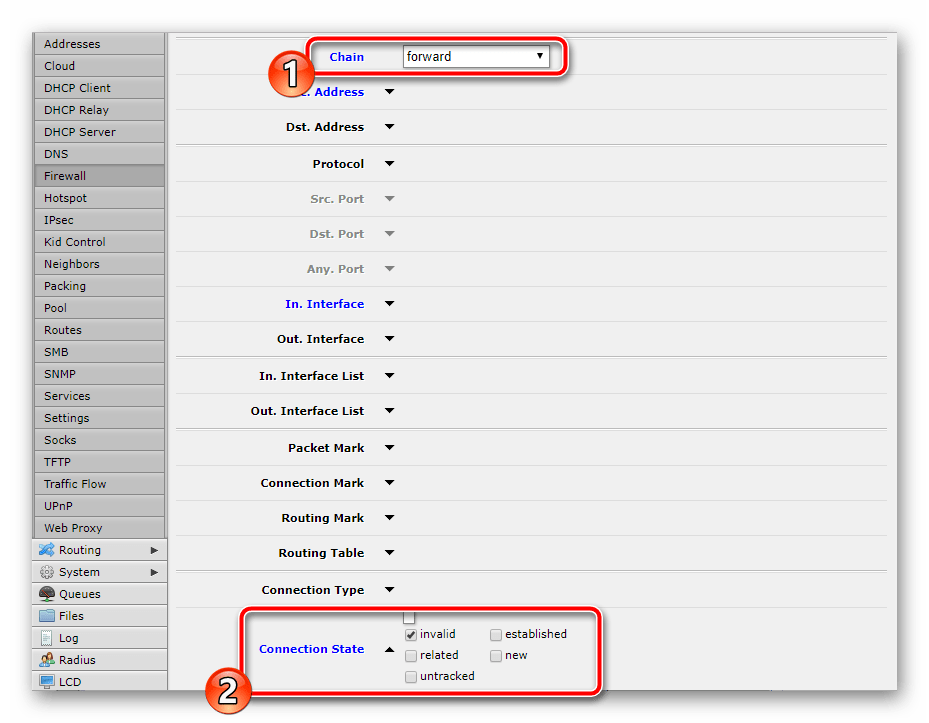
- In the new window change only "Chain" to "Forward", set the rest in the same way as in the previous one, including the action "Drop".
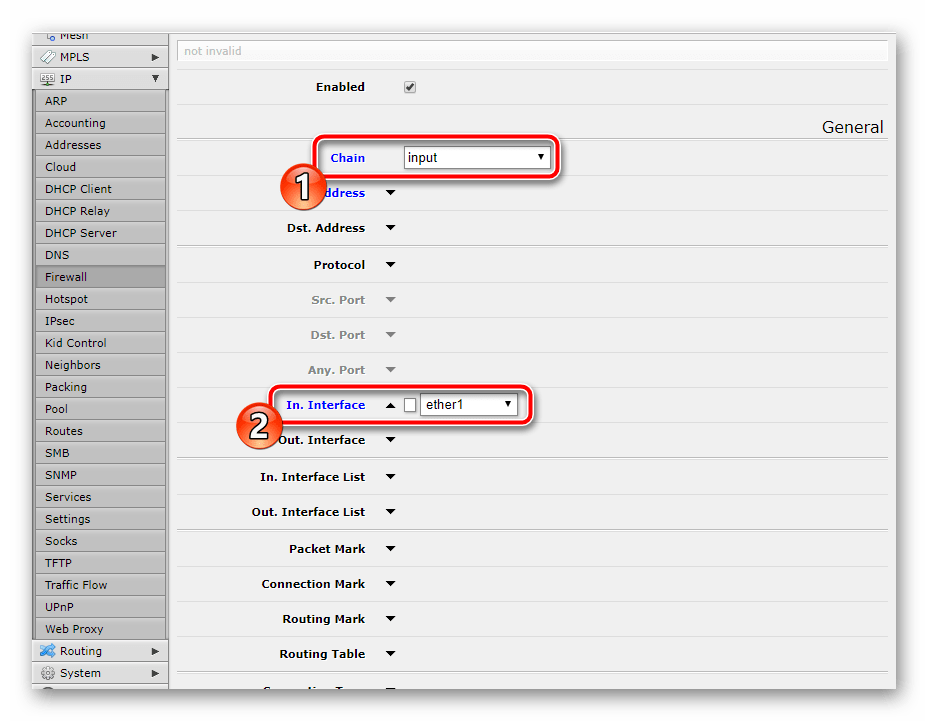
You can also disallow other connection attempts from external sources. This is done by configuring just one rule. After "Chain" — "Input" put "In. Interface" — "Ether1" и "Action" — "Drop"..
Allowing traffic to pass from the LAN to the Internet
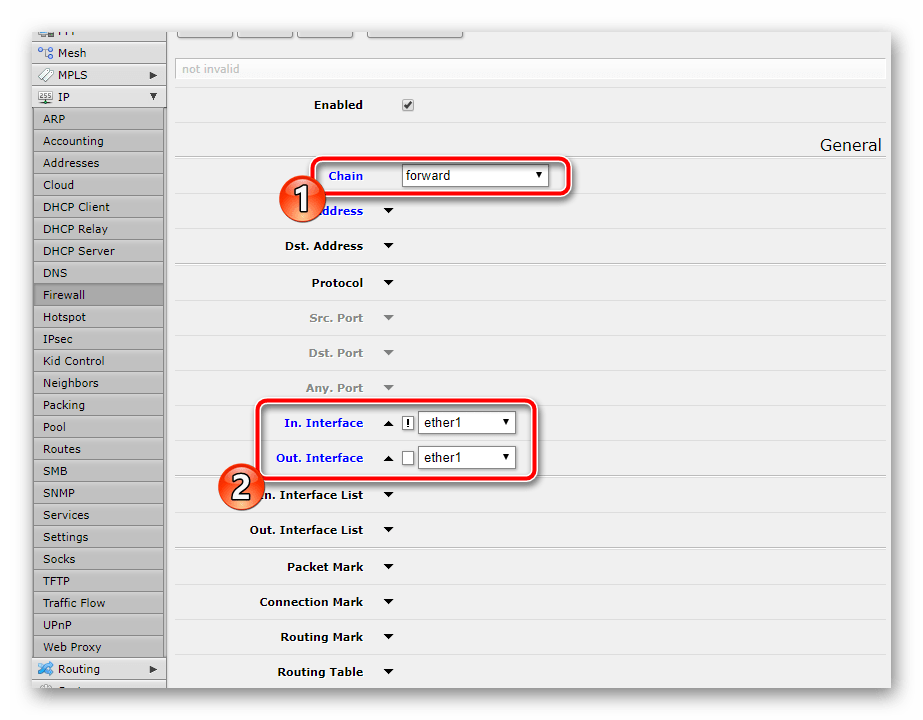
Working in RouterOS operating system allows to develop a lot of configurations of traffic passing through. We are not going to dwell on this, because ordinary users won't need such knowledge. Let's consider only one firewall rule allowing traffic from LAN to the Internet:
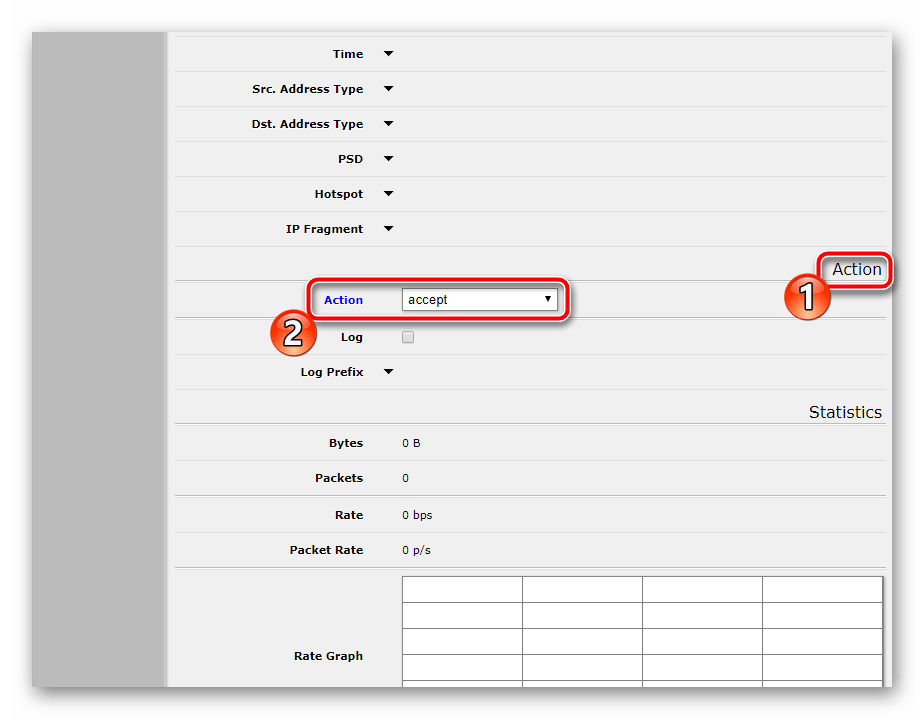
- Select "Chain" — "Forward". Set . "In. Interface" и "Out. Interface" values "Ether1", followed by an exclamation mark. "In. Interface".
- Under "Action" select the action "Accept"..
You can forbid the rest of the connections with just one rule, too:
- Select only network "Forward".without selecting anything else.
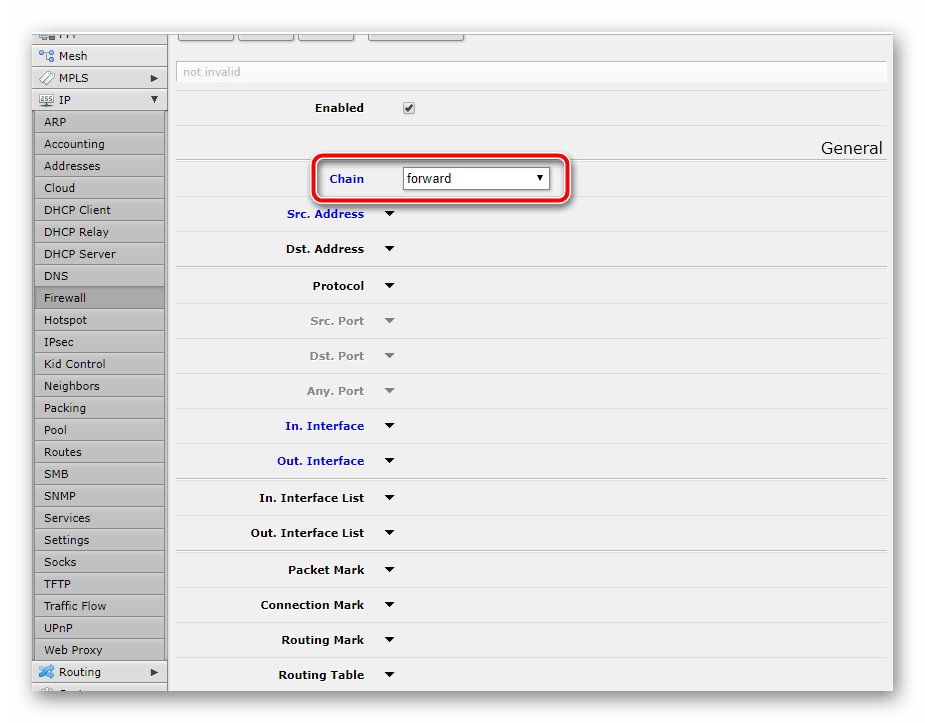
- В "Action." make sure that it is "Drop"..

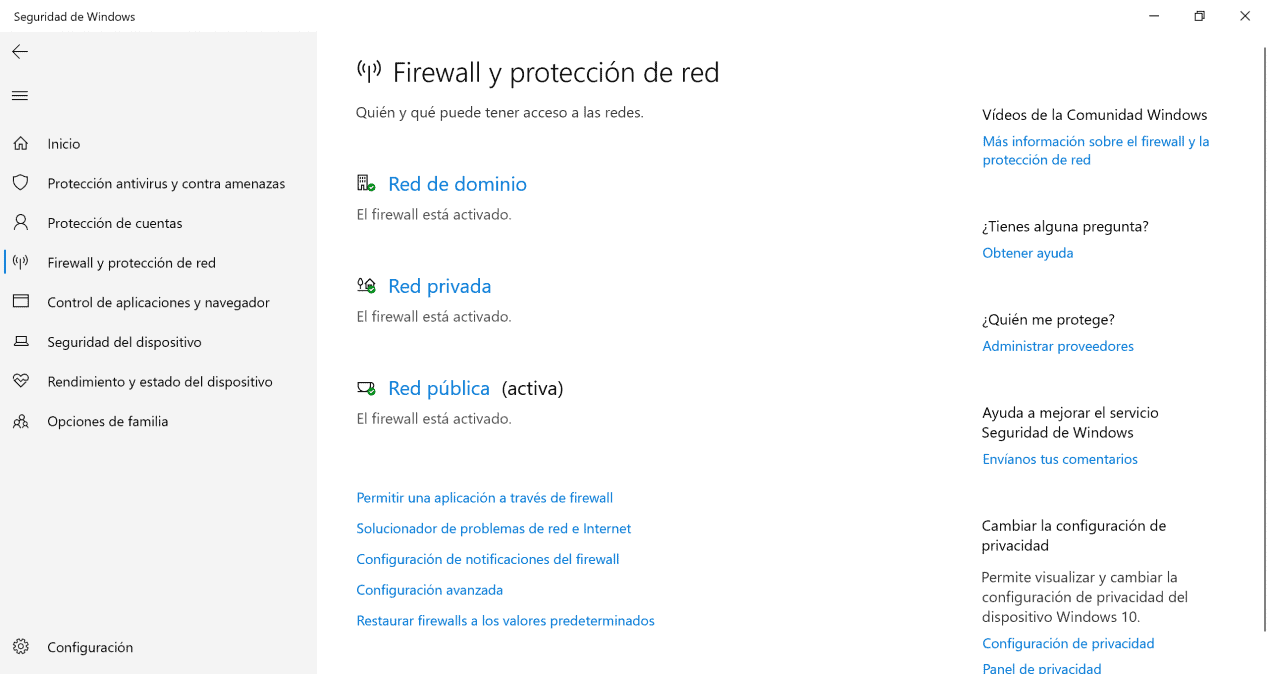
At the end of the configuration you should have a firewall scheme like the one in the screenshot below.
