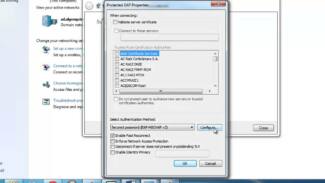
It is important to check that the DHCP + automatic obtaining of IP address is enabled.
- Creating a home network on Windows 10 via a router with your own hands
- The preparatory stage: what is needed for a local wireless network
- Why do I need it?
- Preparing
- Methods to fight for quality of communication
- Organizing an internal local network
- Let's start with the wires
- Change the name of the PC
- Connecting to a home group
- For multiple devices
- Granting access to folders and files
- Disabling code
- Access
- Setting up network sharing for printers and files
- Conclusion
- Connecting all devices to the network
- Troubleshooting the wireless network bottleneck
- Home LAN: with or without wires
- Organization of a workgroup
- Basic configuration of the WiFi home network on the router
- How to connect?
Creating a home network on Windows 10 via a router with your own hands
The Windows 10 operating system is optimized to work with local networks. Users can in it without much difficulty unite several computers, using the wireless protocol Wi-Fi. In addition to PCs, other devices, such as printers, MFPs, projectors and others, can also be connected through the router. Let's consider in this article, what benefits opens the home network created via a router in Windows 10 and find out how you can configure it yourself without the help of third-party specialists.
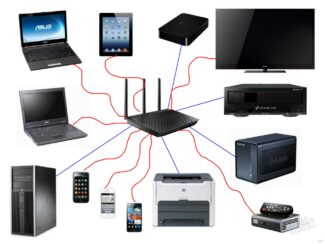
A home network is a number of computers, combined with other peripherals that are combined into a single system. Previously, a cable connection was used to create such systems. PCs and other devices were connected via a LAN cable. Later, wireless connection via Wi-Fi was used to connect several computers into a single local system. At the moment, this method is considered the easiest and most effective. What the local network in Windows 10 is used for:
- Fast transfer of files, documents between individual PCs;
- Communication with printers, MFPs and other peripherals;
- creation of shared storage with access to it for all PCs of the system;
- remote computer management;
- shared access to the Internet;
- launching games in multiplayer mode.
One of the main advantages of using a local network in Windows 10 via a router is that it will function fully even if there is no internet connection. At the same time, each element of the system remains independent, as it is not tied by the LAN cable to neighboring devices. It is worth noting that the presented technology has certain disadvantages:
- low speed of data exchange when using outdated equipment;
- relatively small coverage area, if there are no auxiliary means;
- the quality of the connection depends on physical obstacles and interference;
- higher power consumption.
The preparatory stage: what is needed for a local wireless network
To create a local network via Wi-Fi router, it is enough to form a so-called home group. One of the computers in this case performs the function of the central link in the system. The other PCs and devices join the network using a special password.
A home network can only be created if a few conditions are met:
- all devices are connected to the same router;
- All devices must have a Windows operating system:
- Wi-Fi must be private, not public;
- homegroup access and network discovery must be configured on each PC;
- the date and time must be the same on all devices.
All computers that will be part of the home network must be connected to the same Wi-Fi. This should be taken into account if you have a router that simultaneously distributes Internet in the 2.4 and 5 GHz bands.
It is recommended to connect the central PC to the router via cable. A standard LAN cord with an RJ-45 type connector is used. The other PCs can be added to the group without a cable connection.
Why do I need it?

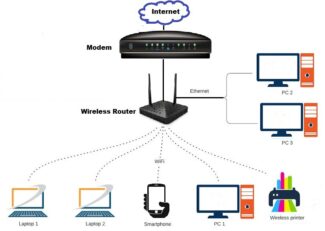
When you have several devices in your home that share the same Internet access method, you may need a home network. The task of creating such a network can be accomplished with a router that makes several points for connecting other devices. Then it will be possible to do away with wires and quickly connect all the devices to one router.
A home network via Wi-Fi router has a number of advantages:
To set up a home network, you'll need a router and the right connection for each device. The key information on how to do this is described below.
Preparing
Setting up a local network at home is easy. You need to perform the following sequence of actions:
- Choose a suitable router. It is advisable to choose a device that supports the 802.11n standard. It provides better coverage and overall performance.
- Choose a connection type that suits your ISP and does not create conflicts. If you are not familiar with the issue, contact your ISP or look at your contract.
- Configure your router to access the World Wide Web.
- Connect all necessary devices.
Methods to fight for quality of communication
As we wrote in the article LTE as a symbol of independence, working through a local provider in a small town is a pain in the ass. Often you get a situation like in the song about "Island of Bad Luck: "No crocodile, no coconut grows." If you have a local Internet service provider in your suburban village providing a decent level of service – surely luck is on your side.
In many places outside the urban infrastructure you can get Internet access only through a mobile operator. And that's where the factors of a stable mobile connection, among others, come into play:
Unfortunately, something can only be influenced on its own under point 1, and that's pretty relative. We cannot force the cellular operator to buy a couple of base stations to improve coverage, but we can buy more sensitive reception equipment and place it in the most favorable location.
Simply put, a wireless device: a 3G/LTE/4G router must be placed in an area with the strongest signal reception. First of all it is necessary to avoid wasting time and resources on fixing errors related to low signal level. One of the easiest solutions is to raise the receiver (transmitter), antenna or all together so that the surrounding landscape does not block the signal path.
If that's not enough, there are a few other options.
For example, check the sensitivity settings when receiving a signal. In the case of a router and similar "smart device" this can be done through the built-in web interface.
You can try another option – to connect an external antenna to "catch" more energy from the radio waves. Simply put, when an electrical conductor is encountered in the path of a radio wave, the amount of electromagnetic energy converted into electrical energy depends on the size, shape and material of the conductor. Therefore, the use of specialized external antennas can in principle help.
Organizing an internal local network
If people come to small country houses to escape from city life, work and the abundance of information for a short time, the communications in country cottages have more serious requirements. People who live in such houses want to have reliable communication, for example, in order to keep up with current events, to work remotely, in general, to keep a hand on the pulse of life. That requires a more serious infrastructure than a single WiFi router.
Tip. To get rid of most of the problems associated with selecting and matching equipment, use a comprehensive solution from a single vendor.
Let's start with the wires
"Why is it with wires?" – asks the inquisitive reader. It would seem that everything could be done easier – put WiFi access points and go! But there are nuances everywhere.
Of course, it is possible to build an entire network solely on wireless equipment. This organization of the network is called Mesh. But then, first of all, part of the receiving and transmitting resources will be spent on communication of access points and router with each other, and not only for data transfer, but also for exchange of service information.
For example, if an access point has two radios, then if the density of devices (consoles, tablets, smartphones, TVs, etc.) is high enough-if one of the radios is used for both Mesh and clients, then there will be a performance loss in this range.
If you have two radios (2.4GHz and 5GHz), you could, for example, give the 5GHz radio module to Mesh only and the 2.4GHz to clients only. There would be no problem with 2.4GHz reception, but the 5GHz channel would be lost. Wouldn't it be easier to plug the access points and firewall into the switch?
Second, some devices are preferably used in a wired LAN, such as a desktop computer, a network printer, and so on.
Third, there are also surveillance cameras. A wired connection is much better for transmitting a good steady picture.
Change the name of the PC
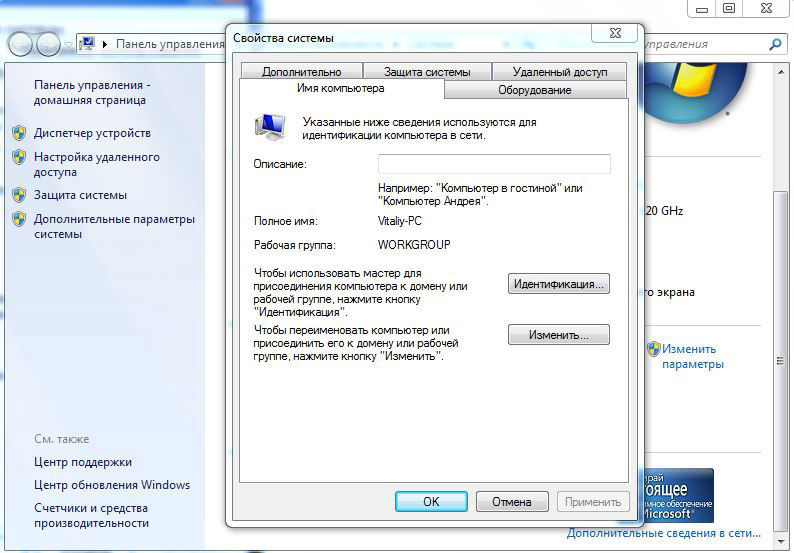
This item is optional, but it is better to change the name of the PC, as it is automatically assigned as an alphanumeric code, then you will be difficult to navigate in the names. To configure the name of the laptop, do the following steps:
- Click on the icon "My Computer" on the desktop with the right mouse button (Windows 7) or run Explorer – My Computer (on Windows 8-10).
- System Properties – Advanced System Settings – Computer Name – Change.
- Give it a convenient name – OK – Apply, and then reboot Windows.
- Repeat the procedure on each device.
- Creating a homegroup
- Go to the Network Control Center.
- On the "Homegroup" line, select "Ready to create".
- Create a homegroup – Next – Select files and devices to share – Next.
- Make a note of the password, and click "Done."
Group with the ability to access through the router is ready. You can connect other devices.
Connecting to a home group
To add other devices to the newly created group via Wi-Fi, in the Network Control Center in the bottom left corner click "Homegroup" – Join. Enter the password and specify the shared folders. Restart all connected devices.
To make sure that the connection between laptops in your home is working, go into Explorer, the "Network" tab will show all available devices. If you have a printer at home, you can even print documents from any connected device.
For multiple devices
The configuration follows a similar pattern, one PC must be the master and have working drivers. To create a new homegroup, go to the network control center and select the computer-to-computer wireless configuration. Next, as described above, set the name, security key and save the settings. The device is rebooted, after which other devices will be able to connect to the network.
The code is the password that you must enter each time you connect to a new computer. This section will also help you find out the network password from your computer. The first thing you do is to press Win + R on your keyboard, and in the line that opens enter the word netplwiz. The window that opens will tell you about the accounts, it is required to go to "Advanced". After that, just select "Password Management", where you will have access to the existing codes. They can be deleted, changed and added.
Granting access to folders and files
The level of file access for members of the homegroup can be the same. The same applies to information whose permissions are granted from the master device.
Disabling code
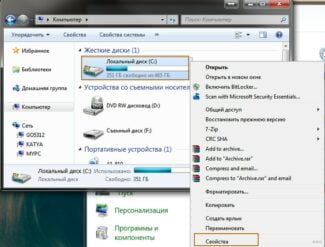
- Right-click on the desired folder and go to "Properties".
- Go to the "Access" section, where you will find the "advanced sharing settings" key.
- In the window that appears, check the "Share this folder" box.
The actions described above will result in the home user group seeing the existing folder and being able to use the information in it, provided that they have permissions.
Access
In the homegroup access settings there are several levels of accessibility for third party users: read, modify, and full access. To access the settings menu, select the advanced sharing setting and go to the "Permissions" section.
Setting up network sharing for printers and files
To do this you will need to go to the "Control Panel", where in the connection settings will be the section "Printers and Faxes". This section contains active printers that support WI-FI protocol, which will allow you to configure them automatically. If the reader's printer does not allow you to configure it automatically, then you will need additional software or a script that will transfer data first to the PC, and then to the printer.

- Create a shared folder and drop files there. You can also access the necessary folders in the context menu. Right-click on the desired folder and select "Open Network Access" (or a similar item of similar importance);
- install the necessary software, which automatically allows you to open access. TotalCommander or similar file managers will do.
Most modern routers, when connected, automatically prompt the user to select those devices that will act as repeaters, select those devices that will access files, select those printers that will receive signals within the network.
Printers must also be verified, otherwise the signal will go to the personal computer itself, but the security system will not let it go further and redirect it to the printer. If the printer or fax supports the WI-FI protocol, you must add it to the home group and verify it so that the data can go to it.
Conclusion
We hope that this article will help you appreciate all the advantages of wireless communication and establish a connection yourself. Let's look at the basic rules:
- The most reliable and correct is the instructions included with the router/router. The manufacturer has already thought of everything and explained, you only need to apply these recommendations;
- If you can't configure the gadget or it's at a standstill, you can reset and start over;
- It's worth setting the longest and most complex password possible, because if you gain access to your home network, an intruder will get personal data of all users (including passwords to accounts),
- an intruder will get personal data of all users (including passwords from accounts).
For many router models there are ready-made presets on thematic forums. The community and professional programmers have already figured out port forwarding, connecting, rebooting, automation, and so on. All the user has to do is to download and run the file.
Connecting all devices to the network
The first step on the way to optimization is the same: everything that can be connected via cable must be connected via cable. This uncomplicated way eliminates the possibility of speed and stability problems with the corresponding client devices. We will solve the bottleneck of the wireless network in the second step.
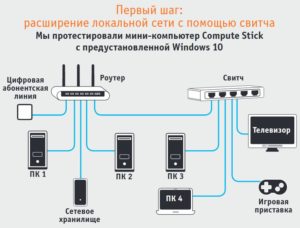
Almost all stationary devices – TV, game console, Blu-ray player and others – are equipped with an Ethernet port for a LAN cable. Just what they need is a broadband twisted-pair connection for stable video streams (media library, YouTube) and media data from other home network devices (PC, NAS) at high speeds.
Instead of pulling a twisted-pair cable from each client device to the router, you can connect all the devices in one room to a gigabit network switch (about 1000 rubles, see right) – this option would be more logical, given that the cable from the switch to the router, which will provide Internet access and data exchange with the rest of the home network, can easily be hidden.
If this is not possible, go to the section on mesh extensible network systems and Powerline Wi-Fi Extender devices designed to extend wireless network coverage (see page XX) – these technologies also allow you to connect a switch to your router.
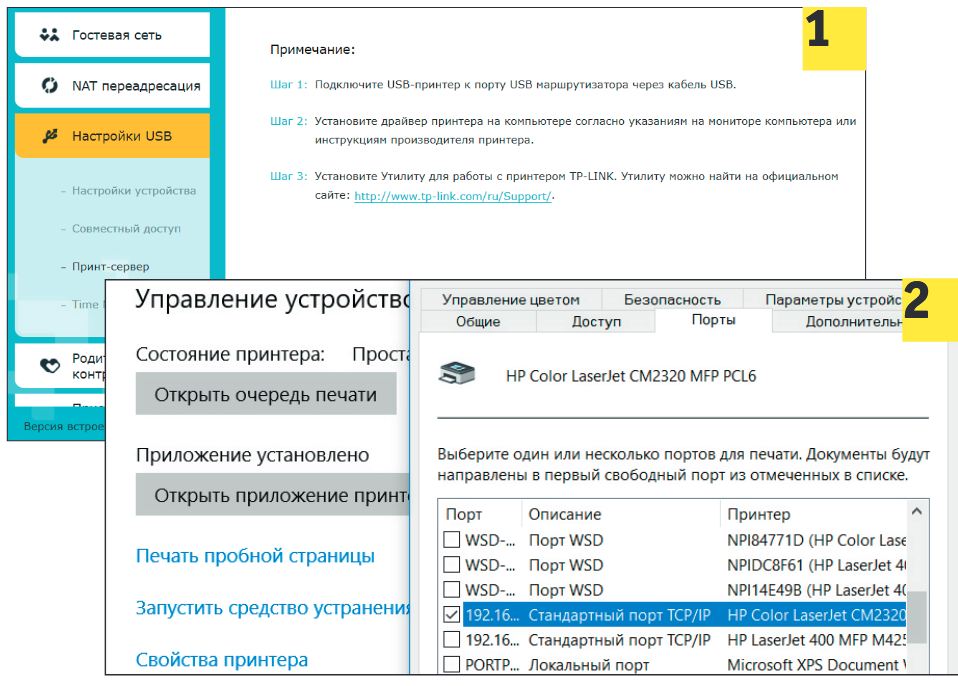
The more features that are available to you over your home network, the more convenient it is to use it. For example, if your printer still does not support networking and does not connect to the router over a twisted-pair or wireless network, you will have to take steps to be able to print files from any computer or mobile device.
Troubleshooting the wireless network bottleneck
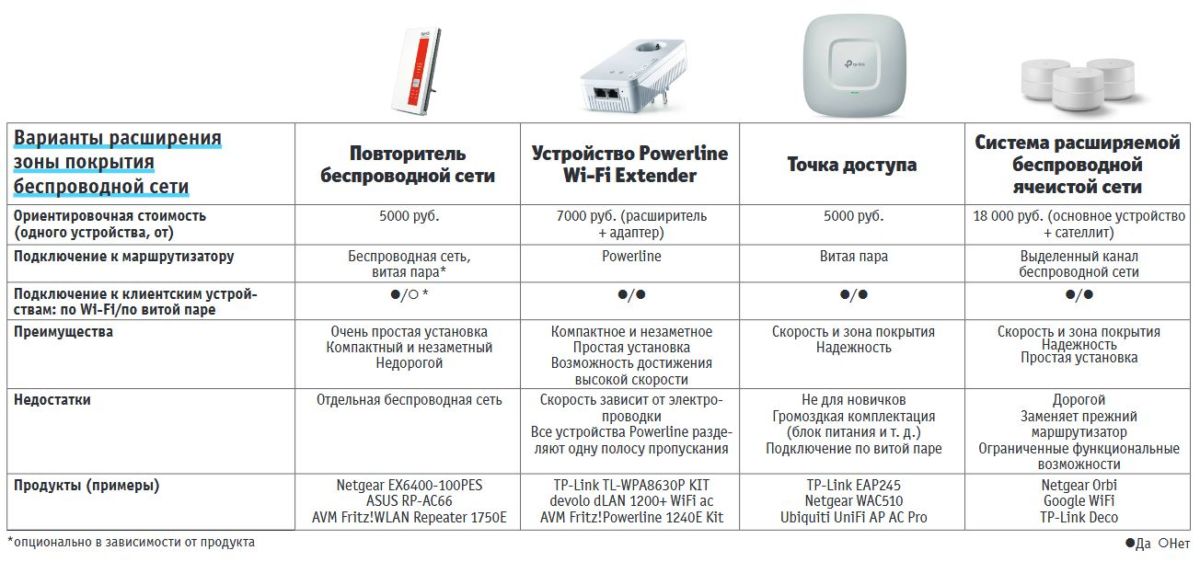
To meet today's wireless speed requirements, the router must support at least the 802.11ac standard with a nominal throughput of 1333 Mbps (802.11n can handle large amounts of data in most cases, too). Make sure the router is not covered by anything, and place it higher up.
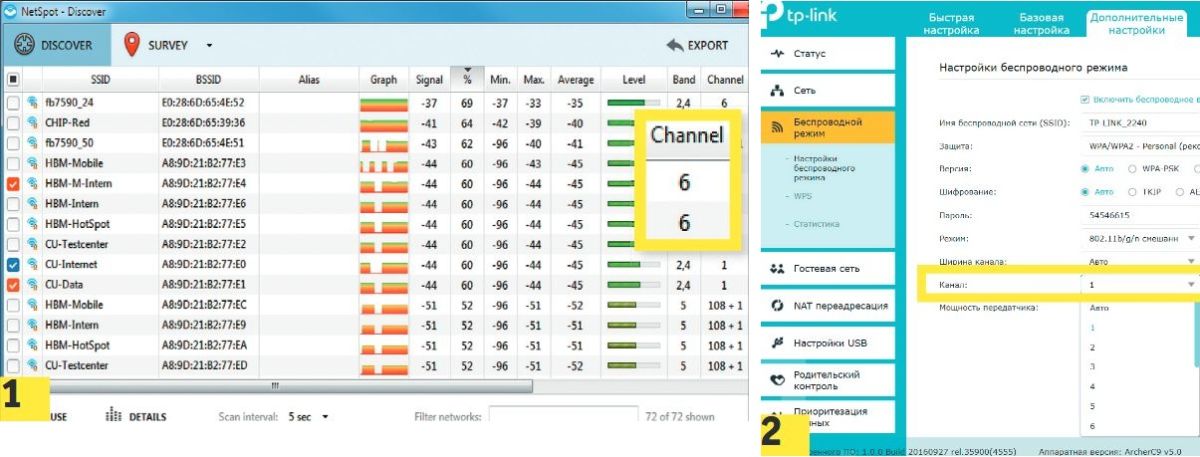
If some parts of the network are slow – find out where the dead spots are by using an Android app (like WiFi Analyzer) or a Windows tool (like NetSpot) from your laptop. If changing the channel (page 100) does not improve the connection, you can install signal boosters that are as close as possible to the client device: repeaters, access points, Powerline Extender devices, or mesh-based Wi-Fi-Network extensible systems.
The easiest option to increase network coverage is to install a Wi-Fi repeater. You need to place it, as well as the router, as high as possible (about midway between the router and the "dead zone") and make sure there are no obstacles for the signal to pass nearby. The setup process usually involves plugging in the power and pressing the WPS button on the router and extender.
Next, you connect the client devices that were previously in the "dead zone" to the wireless network deployed by the extender. Since the extender sends and receives packets of data simultaneously during operation, in many scenarios (namely, when the hardware or location of the devices only allows you to use the 2.4 GHz band) the speed of the already slow wireless data transfer drops by half.
Home LAN: with or without wires
To organize a home network with more than 3 devices, one must be a desktop PC, and the other two can be the same desktop, or portable, such as a laptop and a tablet or smartphone.
Currently, in home solutions, few people create a separate server for the organization of the network, connected to the Internet and through a switch access to the local network and the Internet. The best solution is a regular Wi-Fi router with 4 or more LAN-ports and one or more USB-port for connecting external hard drives.
In general, the settings of the router already have everything to organize a local home network. But this network will be one-way, in which devices will not have access to each other and therefore will not be able to exchange files. Access organization is exactly what we have to set up.
Organization of a workgroup
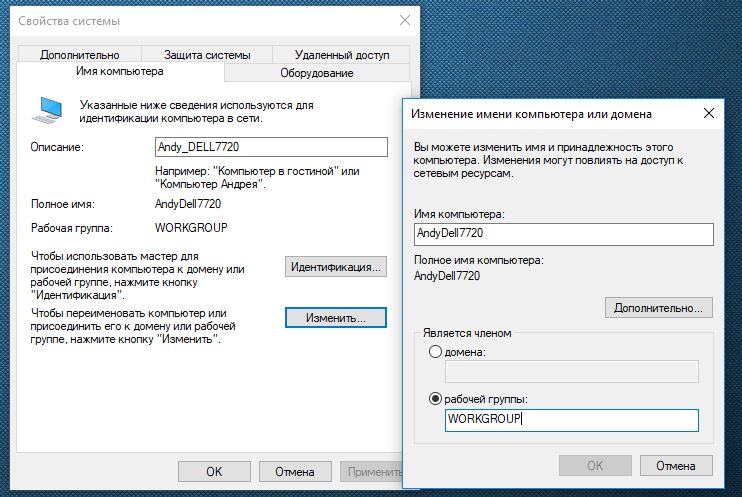
In order for all computers on the local network to see each other, you need to give them the same name for the "Workgroup" parameter. To do this, in Windows 10 you need to enter the Start type "System".Click on the result (System – Control Panel) and in the window that will open click on the link to the right Click on the link "Change settings" on the right side of the window..
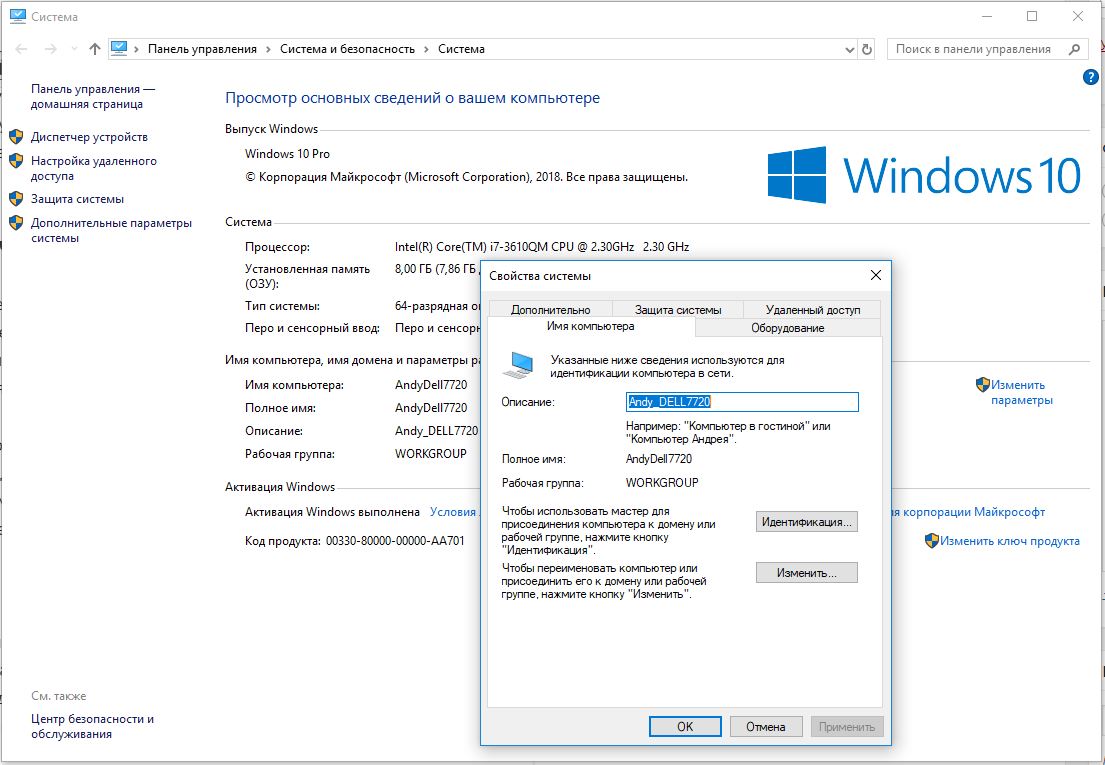
In the next window click on "Edit" and set the name of your network workgroup. It must be typed in English letters. Your device name must be unique so that it can be identified on the local network. After applying the changes, you will have to reboot your computer for the new settings to take effect.
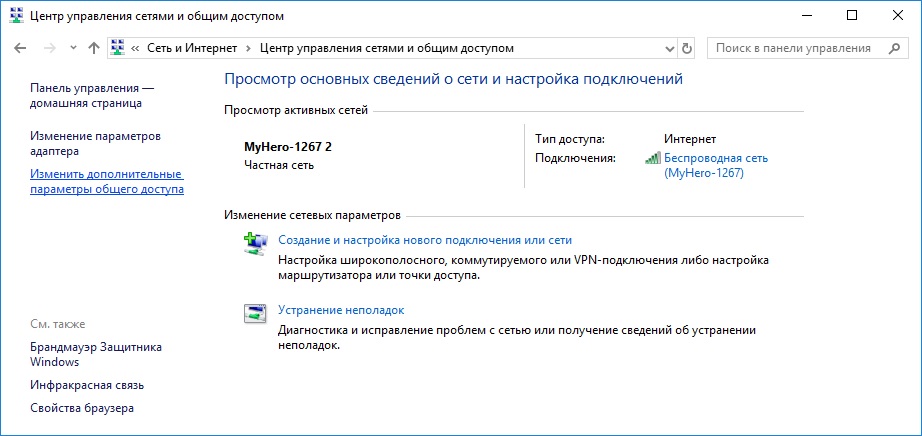
Then you need to configure the access itself. To do this, open Control Panel, click on the section "Network and Internet and go to "Network and Sharing Center.. Here, on the left side, click on "Change advanced sharing settings"..
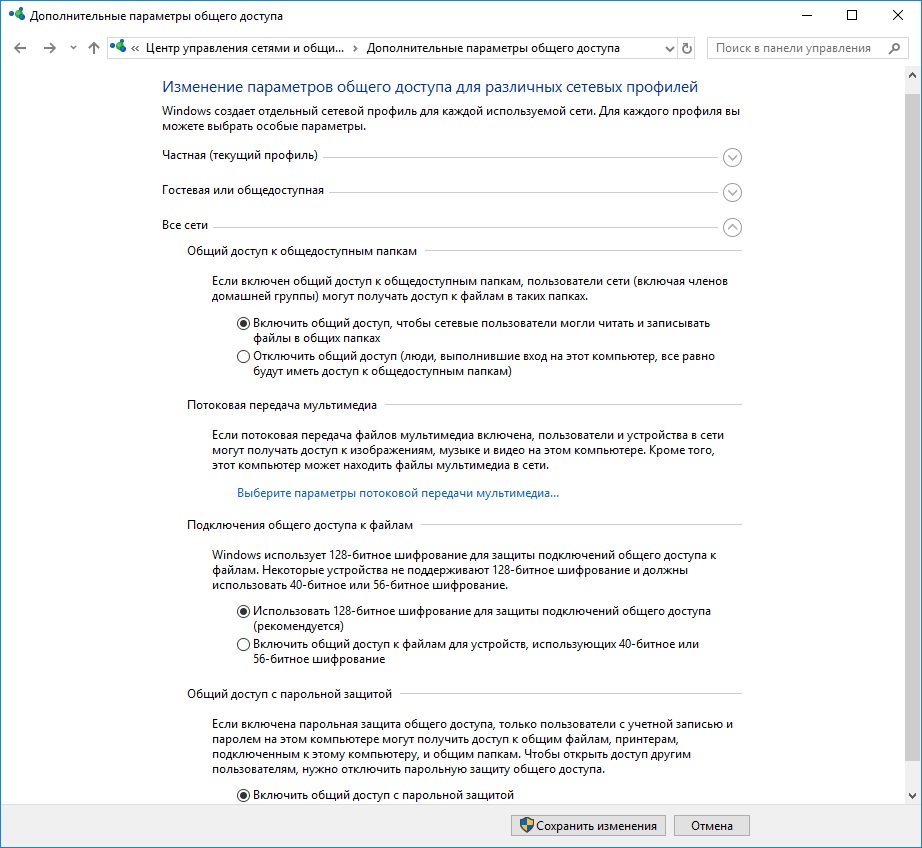
Here you must activate the detection of the computer itself and the printers connected to it for the home (private) network, then click on "Save changes"..
Basic configuration of the WiFi home network on the router
For a clear example, let's take one of the most popular wi-fi routers in Russia – D-Link DIR-300 version D1 with the latest firmware version. If you have a different brand or model – don't worry: the algorithm is not fundamentally different. The only difference may be in the arrangement of elements in the web-interface.
So, all the parameters we need are collected in the section that can be called "Wi-Fi", "Wireless" or "Wireless Network". Go to the "Main settings" subsection:
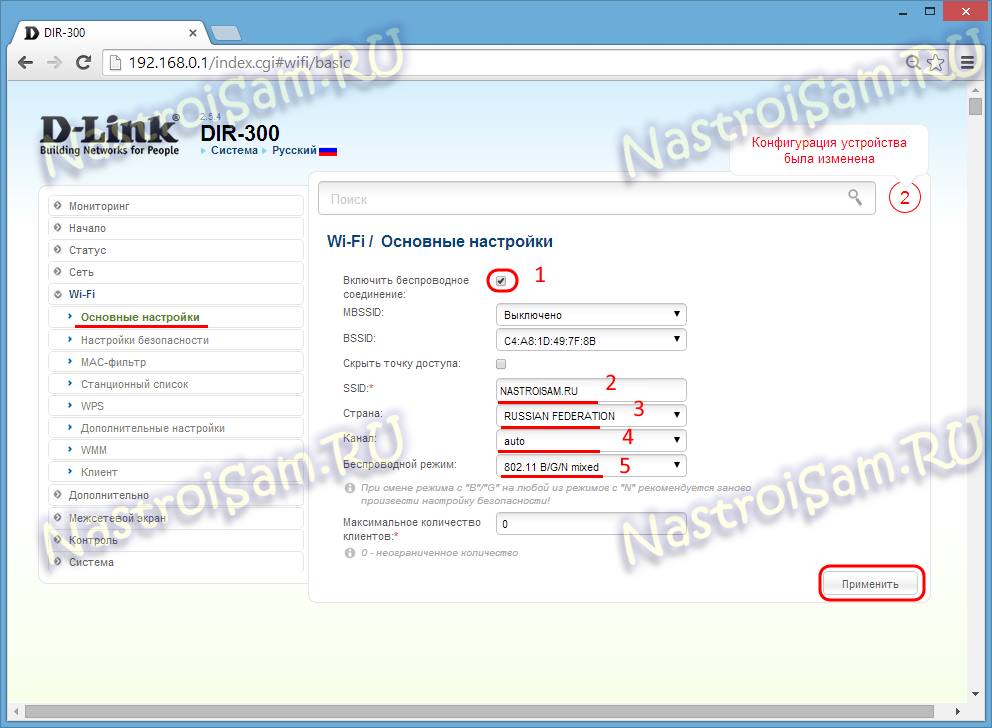
Make sure that "Enable wireless connection" is checked. Then, in the "SSID" field, enter the name of our Wi-Fi network. It can be any Latin word or numbers.
The "Country" parameter (aka "Country" or "Region") is responsible for the number of radio channels used. You should select the value "Russia" or "Russian Federation". If they are not in the list – choose the value "Europe".
The parameter "Channel" is responsible for the radio channel used by your home Wi-Fi network. It is best to leave it set to "Auto".
In the "Wireless mode" list, put the mixed type – 802.11 B/G/N mixed or 802.11 B/G mixed.
Press the "Apply" button.
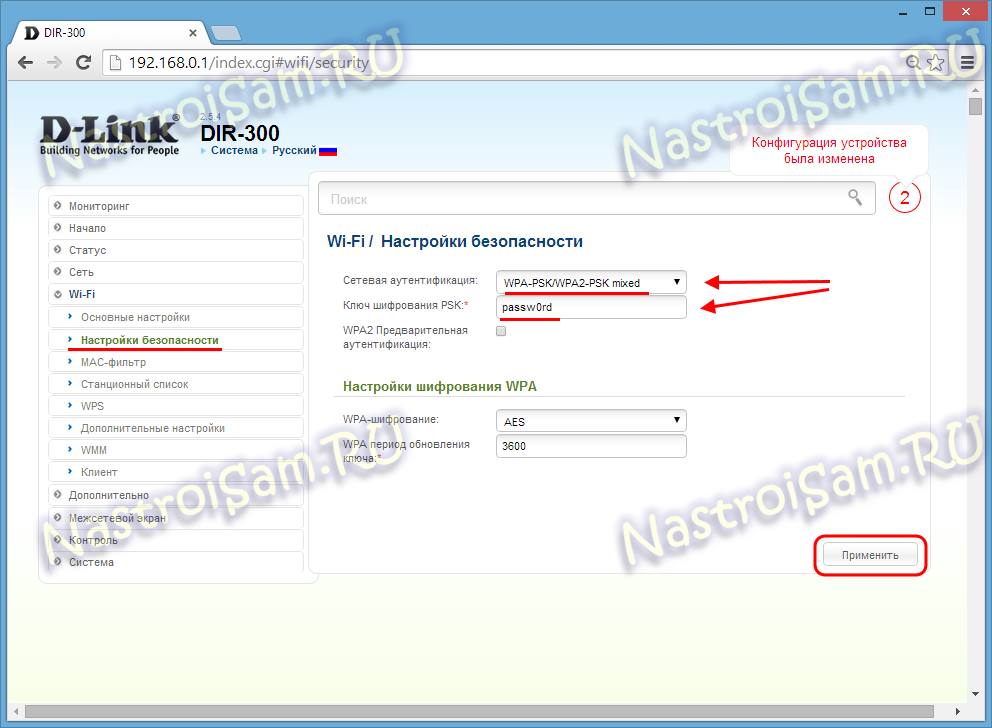
Here you must choose the currently most secure wireless security standard – WPA2-PSK. If you have old devices that do not support it, set "WPA-PSK/WPA2-PSK-mixed" in mixed mode.
In the "PSK encryption key" field, enter the password for your Wi-Fi and apply the settings.
This completes the basic configuration, you can connect.
How to connect?
Here, as an example, we look at Windows 8 and 8.1. On the previous "Seven" and the expected Windows 10 it is almost the same. The first thing to do is to click on the network icon in the system tray next to the clock.


Choose our home Wi-Fi and click on it, check the box "Connect automatically" and click as the "Connect" button:

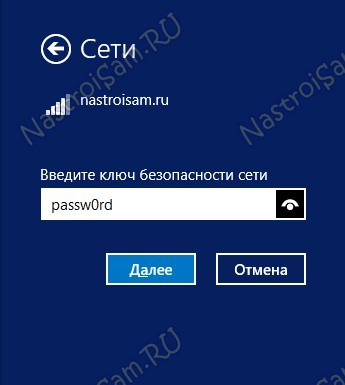
Enter your network key and go on. The system will ask you if you trust the network you are connecting to:


And, if everything is OK, the status will change to "Connected":

After that, you can start your browser and work on the Internet.
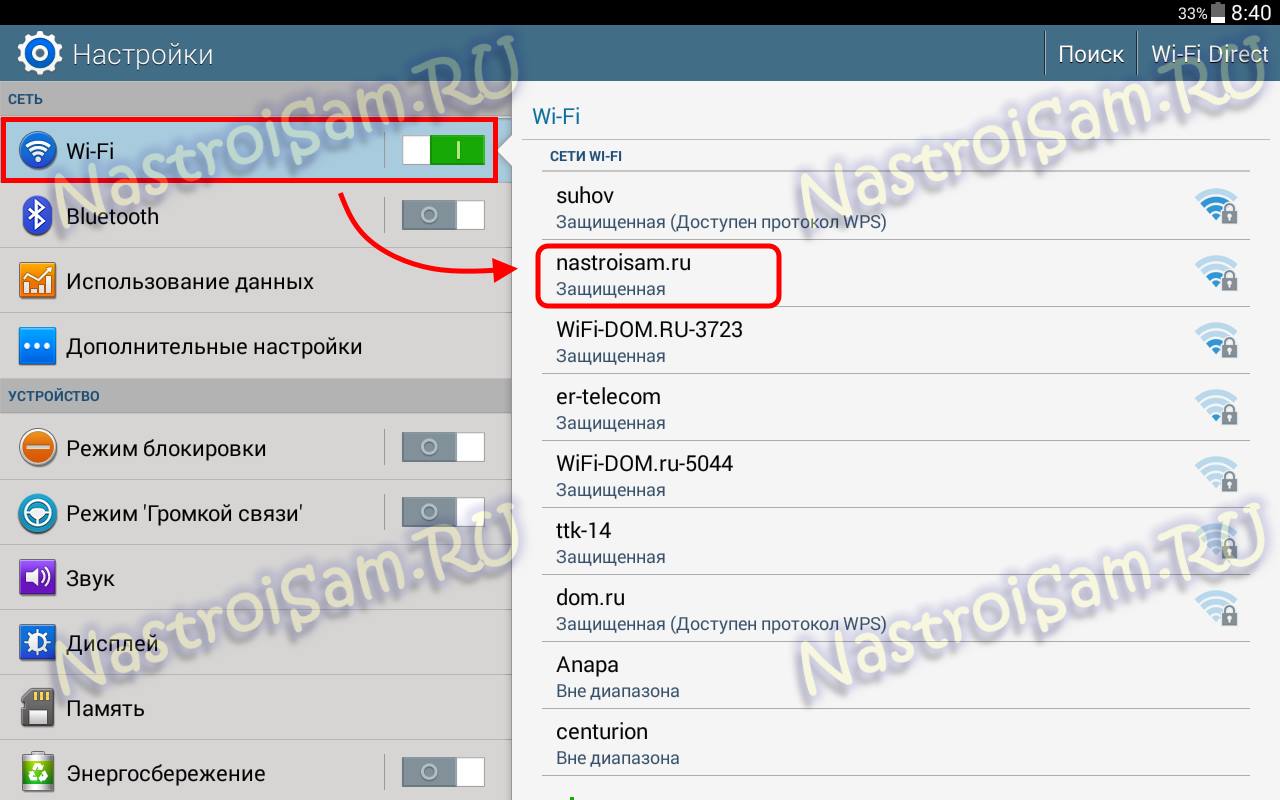
How to get connected to Wi-Fi from a mobile device, I'll take a Samsung tablet on the Android 4.4 KitKat operating system as an example. For other versions or Apple devices, the connection process is almost identical.
First of all, you need to go into Settings. In the menu, find the section Wi-Fi and move the slider from 0 to I. After that, look at the list of available networks:
