To begin, let's talk a little about the device itself, briefly reviewing its characteristics. The device is a representative of the budget segment of wireless routers. The retail price starts at 1250 rubles. In online stores you can find it cheaper – from 1000 rubles. According to the manufacturer, the device provides an uninterrupted Internet connection for several computers simultaneously, as the router can be used as a switchboard.
- Indicators (lights) on the TP-Link router. Which ones should be on, blinking, and what do they mean?
- What do the TP-Link router indicators mean?
- Logging in via computer, laptop directly
- Log in from a laptop via Wi-Fi
- Setting up the Tp-link TL-WR841N router
- Log in to the web interface
- Automatic Configuration
- What next?
- What to do if it does not work?
- The IP-address doesn't fit (for Windows)
- Incorrect login password
- Router and PC are in different subnets
- Figuring out the purpose of light indicators
- What lights should be on on the router
- Errors
- Setting up IPTV
- Firmware Upgrade
- What indication should be on the router?
- Possible malfunctions and troubleshooting
- Wi-Fi light is not on (off)
- The planet (WAN) light is lit orange (red)
Indicators (lights) on the TP-Link router. Which ones should be on, blinking, and what do they mean?
Almost all routers or modems have indicators. Most often they are just called light bulbs. Their task is to inform us about the status of the router, the connection of devices and the operation of certain functions. According to the state of the indicators, we can immediately determine whether the router is distributing Wi-Fi, whether it is connected to the Internet, whether the LAN connection is active, etc. You can also use the indicators to determine if the router is malfunctioning. In this article, we will deal with the indicators on TP-Link routers.
On almost all TP-Link routers the indicators are the same. But on newer models, there are slight changes. They may be a different color (in case of certain errors), there is no indicator in the form of a gear (system, SYS), and may be two indicators of Wi-Fi (separately for the range of 2.4 GHz and 5 GHz).
Many people wonder how the lights on TP-Link routers should light up or blink when the device is working properly. What does each LED mean and what should you do if, for example, only the Power LED is lit, all lights are lit, or the Wi-Fi icon is not active?
What do the TP-Link router indicators mean?
I think it is right to consider two TP-Link routers. I already wrote above that there are some changes in the new models.
And so, let's start by taking the popular TP-Link TL-WR740N model as an example.
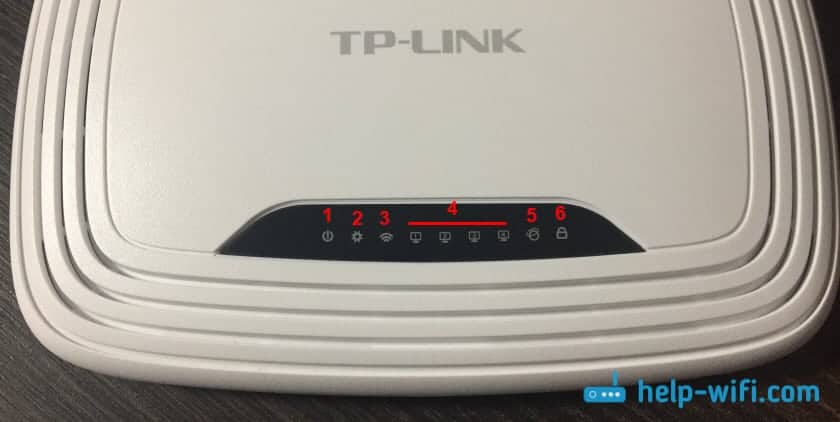
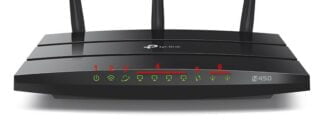
- Power indicator (Power). When the router's power is on it is on. When it is off it is not on.
- This is the system indicator (SYS) . It has three modes: not lit – system error, lit – router is booting or system error, blinking – everything is normal, as it should be.
- Indicator of the wireless network WLAN. And if it is not lit, it means that the Wi-Fi network is disabled by the button on the router, or in the settings.
- LAN ports. Not lit – means that nothing is connected to the port, lit – the device is connected but not active, blinking – the data transfer is going on.
- Internet connection indicator (WAN). The indication is the same as in the case of the LAN. On some models, it may be lit orange when there is no (or no set up) Internet connection.
- WPS. Slowly blinking – the device is in the process of connecting via WPS. Flashing fast – the device has failed to connect, the waiting time has expired. Off – this feature is inactive. On – when the router is booting and 5 minutes after the device is successfully connected.

I will not re-describe all the indicators. Let's just have a look at some of the changes.
- If you have two Wi-Fi indicators on your TP-Link router, they are responsible for indicating the wireless network operation in different bands: 2.4 GHz and 5 GHz.
- There may be one LAN icon. It is active if at least one device is connected via cable.
- On routers with a USB port there is a corresponding indicator (number 6 in the picture above) . It is off when there is nothing connected via USB, blinking when the device is detected, and on when the device is detected.
- The WAN (Internet, globe-shaped) LED lights orange (red) when the cable to the router is connected to the WAN port, but there is no connection to the Internet. The router cannot connect to the ISP. Practice shows that it is most often caused by the settings. This is a very popular problem, I will tell about it below in this article.
Logging in via computer, laptop directly
If everything is done correctly, it remains only to launch any of the browsers. In it then enter the IP address or DNS address, which assigned the device itself TP Link, logging in without compliance with this requirement is impossible.
Most often the developer uses the following addresses:
Address tplinkmodem net , login by which is also not difficult – one of the most convenient options.
Next, the user will be asked to enter a username and password. The most common combination is twice admin.
Sometimes the password is the name of the provider with whom the user has previously contracted to provide services. If you have problems with this solution and nothing works, you will have to call technical support representatives to get the password.
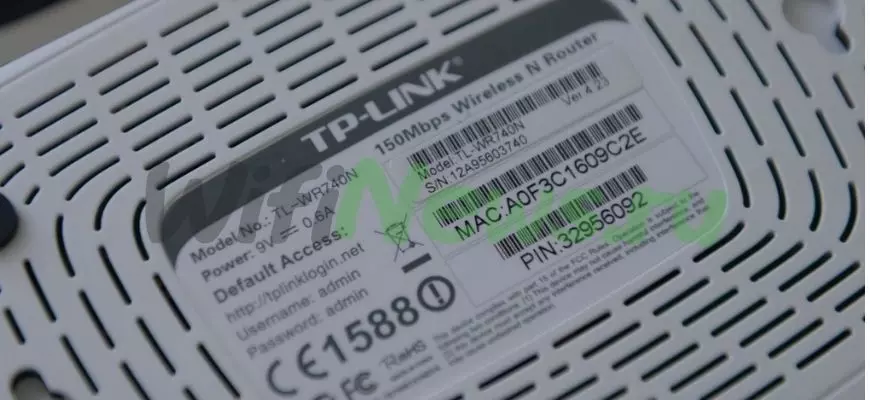
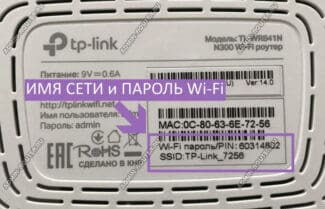
You can enter the TP Link router settings using the standard data that the manufacturer indicates on the label of the router.
Log in from a laptop via Wi-Fi
The instructions remain about the same regardless of which device is now in use, which smart Home, tapo smart or other system is built.
- On the back of the router is a button labeled WPS. Sometimes there is a wave emblem in the same place. It must be pressed for three seconds and then released. The address of the TP Link router can often be found in the same part of the device or nearby.
- On the laptop in the lower right corner, select the button or function associated with the wi-fi network. It remains to select the new network that has become available. The main thing is not to forget the login and password. If the router has just been launched from the package, the information on the label of the device helps. It also allows you to access the settings.
- When using WPS technology, you can press the button again, especially if the device keeps asking for the password.
- Then you have to launch the browser and enter one of the addresses already mentioned above.
- The admin panel is accessed using the known data. These addresses are 192.168.0.1, 192.168.1.1, tplinklogin.net, tplinkwifi.net, the login to the panel is admin admin – the most common password, but not the only one.
Setting up the Tp-link TL-WR841N router
We need to go into the settings of the TL-WR841N router. To do that, on the PC to which it is connected, open a web browser and go to 192.168.1.1, or 192.168.0.1. You will be prompted for username and password. Enter . admin и admin (standard password and username) . By the way, this information is listed at the bottom of the router on the sticker. Just in case, here's more detailed instructions on how to enter the settings on Tp-link.
If you want, you can update the firmware on the TL-WR841N. You can do it after configuration. Or don't update at all.
It is possible that settings at 192.168.1.1 will not open, or admin password will not work, and you will not be able to enter the settings. In this case, you need to do a reset on the Tp-link TL-WR841N router. There is a RESET button on the back of the router, press it with something sharp and hold it for 10 seconds. The router's power must be on. The indicators on the front panel should all light up and the router should reboot. You can also reset the router if you have already tried to configure it, but nothing worked. Reset to factory settings, and try to configure the router again.
The most important thing is to configure the router to work with your ISP. If you do not do this, or do it incorrectly, the Internet through the router will not work. Wi-Fi network will appear, but without access to the Internet.
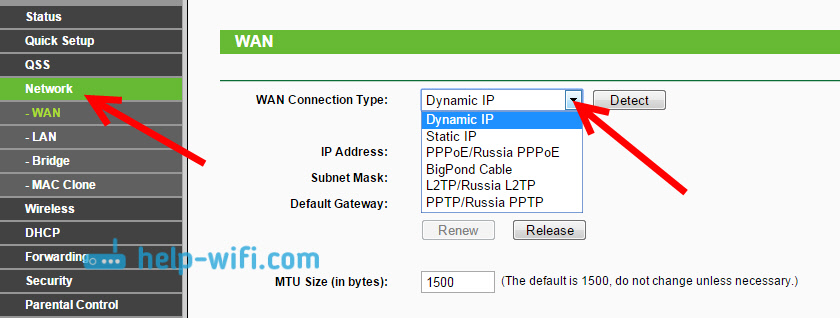
In the settings, go to the tab Network – WAN .. We'll see in the drop down list WAN Connection Type We need to select the type of connection your ISP uses. This can be: Dynamic IP, Static IP, PPPoE, L2TP, or PPTP. I have for example Dynamic IP, so I choose it. To save the configuration press the Save.
Log in to the web interface
To connect to a TP-Link router yourself, you need:
- Find the sticker on the router which is located on the back side of the device. Find the IP-address of the TP-Link wireless router as well as the login and password to enter the control panel.

- Switch to a web browser: Chrome, Yandex, Opera or Safari.
- Enter the IP of the device in the address bar and press Enter on your keyboard.

- A login and password form opens in front of us. Enter the appropriate data and click on the "Login" tab.

Automatic Configuration
TP-Link router auto-configuration starts with determining the type of connection:
- Select "Quick Setup" in the navigation menu.
- Click on the "Next" button.

- Select a way to define the type of connection and telecommunication service provider.
- Check the item "Autodetect".

- Look at the contract between you and the provider. Find your user name and password. Enter your credentials into the corresponding field.

- If you use a dynamic IP address, the "Clone MAC" window will appear. If you are connecting to the Internet from the main computer, you should check the "Clone MAC address" option.

- If you are using a static IP address, you will see a different screen. You must specify the IP address of the service provider, subnet mask (255.255.255.0), default gateway, primary and secondary DNS. All the necessary information can be found in the contract for the provision of telecommunications services or call customer support. There is no point in giving specific examples, since we all use different providers.

- Next, you need to configure the wireless mode. Under "Wireless Broadcasting" select "Enable". In the "Wireless Network Name" section, enter an arbitrary name for the access point, it is allowed to use the default name. In the "Region" tab specify "Russia" or other country. It is recommended to use "Mixed" in the "Mode" item. Leave the "Channel Width" and "Channel" parameters unchanged. The device will independently determine the preferred one. Select the maximum "300 Mbps" transmission speed. Set the encryption protocol to "WPA2-PSK". Come up with a unique combination of access key.

- Click "Finish".

What next?
Next, configure the connection to the Internet. This is done in the web interface of the device management. You can enter the "admin area" of the TP-Link modem if you have connected the client device via a network cable or Wi-Fi; there is no fundamental difference. If the client device fails to detect the Wi-Fi network, make sure you have enabled this function with the button on the router itself.
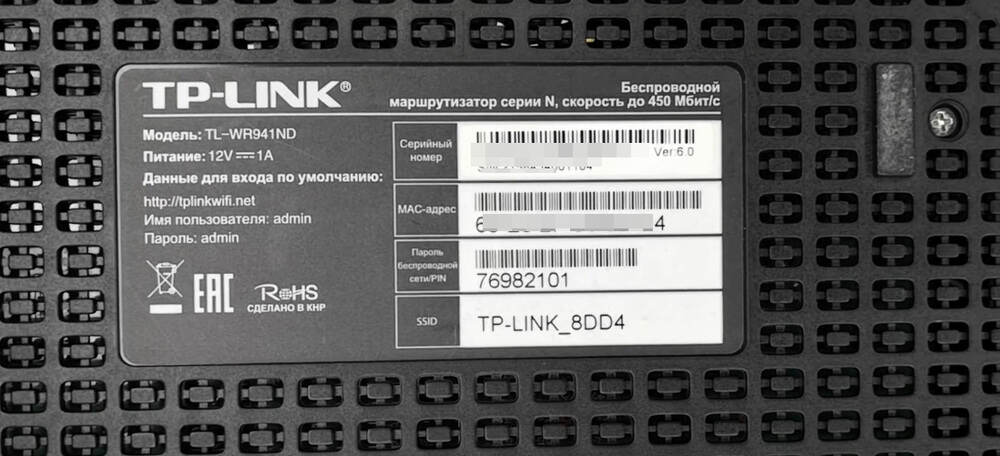
- When connecting over a Wi-Fi network, find the name of the access point, its username and password – the information is usually indicated on a sticker placed on the router's body. If the name of the hotspot is not on the sticker, in the list of available points we find the network with a name similar to the device name. If you use a LAN connection, start from the second point.
- Open your browser.
- Enter in the address bar: the request "192.168.1.1" or "192.168.0.1". You can also use directly http://tplinklogin.net and http://tplinkwifi.net for equipment before 2015 and for routers younger than 2015.
- Log in by entering your username and password on the page that opens. The default value for both lines is admin.
You can also enter the router's settings via the TP-Link Tether app.
- Make sure that your equipment supports setting via Tether. You can do this with the help of user documentation or on the manufacturer's website.
- Turn on Wi-Fi on your mobile device, find the wireless network created by the router, and connect. The data for logging into the network contains a sticker on the body of the modem.
- Download the Android or iOS app from the digital store.
- Launch the app, and read the help.
- Tap the "Get Started" button.
- Read the policy and rules, and give your consent by tapping the button that appears.
- Log in to the control panel: if you are doing it for the first time, use the default login and password. If you log in for the second time, use the data you specified when you first logged in.
What to do if it does not work?
It sometimes happens that you can't log in to the TP-Link web management interface. But the problem is solvable in most cases. That's why we tell you about the possible errors and the ways of fixing them.
The IP-address doesn't fit (for Windows)
- Enter Control Panel.
- Go to "Network and Sharing Center". You may need to open the "Network and Internet" section first.
- Click on the interactive label next to the active Internet connection to open a connection status window.
- Click on "Information".
- Look for "Default Gateway IPv4".
- Insert the IP address into the search box.
- Log in to the TP-Link configuration web interface.
Incorrect login password
If the system does not accept the default login information, it indicates that it has been changed. How do I know my login and password?
- We try to remember the login credentials. Maybe we changed them ourselves. If not, then go to step 2.
- Call the technical support of your Internet service provider. If the specialist is not able to help, then move on to the next step.
- Reset router settings to factory defaults. To do this, press the Reset button located on the back of the device for about 10 seconds. If the button is recessed inside the case, use a thin but not sharp object. Success will be indicated by blinking lights.
An alternative for PC users with a disk drive: use the Easy Setup Assistant. The software may be bundled with the device.
Router and PC are in different subnets
- Go to "Control Panel.
- Go to "Network and Sharing Center". First you may need to open the "Network and Internet" section.
- Click on the interactive label next to the active Internet connection to open the connection status window.
- Click on "Properties".
- Look for the "IP version 4 (TCP/IP)" line and highlight it.
- Click on "Properties.
- Enable auto acquire IP by putting a check mark in front of the corresponding item.
- Save it.
Figuring out the purpose of light indicators
All manufacturers of such wireless devices have a unified system of designating LEDs. However, there are models whose indicators differ in certain ways.

For example, a dual-band router that supports radio frequency Wi-Fi 2.4 and 5 GHz has on the panel two separate LEDs for each band. In addition, the indication that informs the user about the current status of the device can be absent from its panel. In new router models, the LEDs may be of different colors.

Let's tell you below how the icons on the TL-WR740N router from TP-Link should light up. This router model is very popular among users, that's why we have chosen it to describe the light indicators. The indicators of the device will be considered from left to right. The meaning of the LEDs of this router model from TP-Link:
- Power indicator ("Power" or "PWR"). When the power is connected, it glows green. When the power is off it goes out.
- System parameter indicator ("System" or "SYS"). Three possible modes of activity. Blinks green in standard operating state. Solid LED indicates the router is booting or a system error has occurred. Does not light when power is off or due to some system error.
- Wireless indicator light ("Wi-Fi" or "WLAN"). If the LED is blinking, the wireless data is transmitting. Continuous glow – The Wi-Fi hotspot can be used to connect on client machines. No glow indicates that the Wi-Fi hotspot has not been created through the router settings or it has been disabled by a button.
- Network port indicators ("LAN", numbering from 1 to 4). Ethernet ports, which are used to connect various network devices with a patch cord. There are 4 network ports on the router. For each port there is a separate LED on the device panel. If the indicator light is on and is continuously lit, it means that a network device is connected. It blinks when there is data transmission on that port. No light – device is not connected to the port, port is not working or not configured, wire is damaged.
- Internet icon ("WAN" or "Internet"). The indication is completely the same as previously described for LAN network ports. In addition, it may light orange when the router does not have access to the Internet.
- The simplified WiFi connection ("QSS" or "WPS") indicator. Allows you to connect to the router without entering a password. Should light up when this option is activated. Not lit when the option is disabled.
What lights should be on on the router
The following is a description of which keys and LEDs should light up on the router. The glow of these elements on the front panel of the router depends on the current state of the device. For modeling the TP-Link device LEDs glow, we are going to use the most probable situation. The router has been plugged in, but the network wires have not been connected and the settings are still being made. In this case:
While the router is connected to the Internet and no other devices are connected to it:
The client machines are connected to the router via Wi-Fi, data transmission is going on, including data transmission to the amplifier using "WPS". The light indication on the device will be like this:
Errors
Many people wonder what to do if after self-tuning errors appear or there is no access to the Internet. In such situations, use the tips below:

- Unplugging. In some cases, the failure could be caused by an incorrect reboot. You need to unplug the router and wait 10 seconds. In 90% of cases this method helps to solve the problems.
- Wireless network mode. As mentioned above, it is recommended to choose the "Mixed" mode of operation, so the range is extended. Try changing the settings.
- The operating system gives the error "IP address conflict". In this case it is recommended to recheck the "LAN" parameters. If the parameters are set automatically, you can try to enter the new data manually.
Setting up IPTV
With the installation of the local network the user usually understands himself, so skipping one page of the section, let's figure out how to connect the wireless router to the TV (Smart TV, for the usual "box" requires a set-top box).
Tp-Link Tl Wr841n is already "out of the box" configured to work with the TV, so there is only one parameter.

By specifying the port, all TV traffic is bound to it. If you don't specify any port you get a possibility to watch TV programs on any PC in your home network.
Firmware Upgrade
If there is any doubt in the workability of the router, you can reflash it. To do this, there is a special page in the system tools – "Firmware update".

Do not turn it off while updating! It will break the router.
Only "Hardware version" is a bit unusual. Before you flash the router, make sure that the downloaded firmware is designed for the same model. Although the 841n and 841nd differ only in their antennas, their firmware is different. Installing the wrong firmware may cause the router to be repaired under warranty.
What indication should be on the router?
How much, what lights and buttons should be on the router? It all depends on what condition it is in.
Let's simulate the most likely situation. The router is only plugged in, but it is not connected with any network cable and no settings have been made on it:
The router is connected to the Internet, but is not connected to any other devices:
The router is connected to all devices and they are receiving data packets, including a signal being sent to the repeater via WPS. Status of the lights flashing and lit on the router:
Possible malfunctions and troubleshooting
The indications indicate malfunctions that you can troubleshoot on your own. Here are some of them.
Wi-Fi light is not on (off)
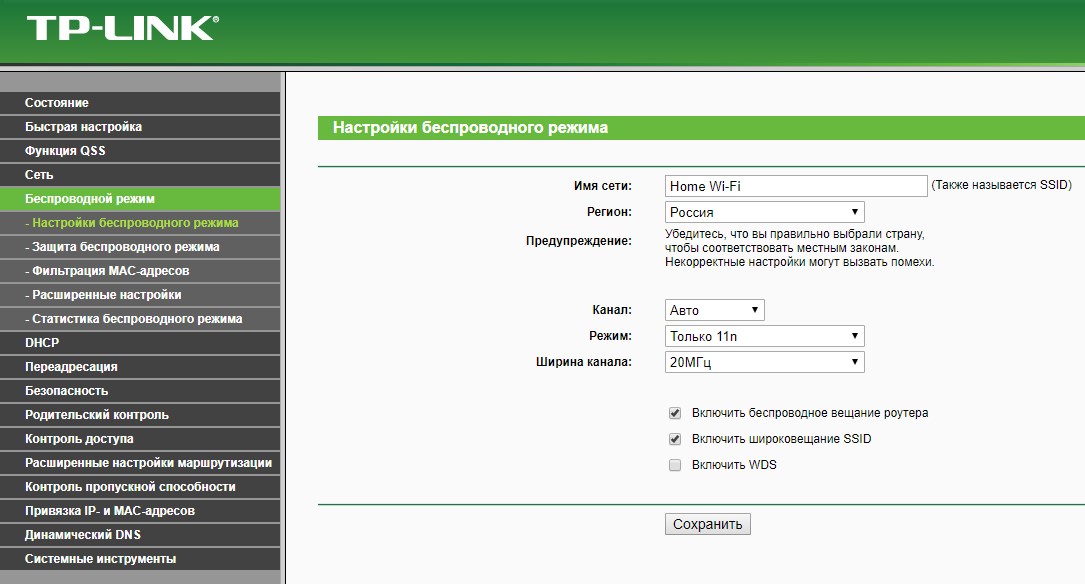
If the Wi-Fi light on the router is not blinking or lit, it indicates that the access point is disabled. You can check it in the router's admin panel, under "Wireless Mode Settings". To do this, connect to the router with a patch cord and enter the settings panel through the browser at 192.168.0.1.
For the created access point to be active, there must be a check mark next to "Enable wireless streaming router".
If everything is set and the indication is not lit, check to see if the Wi-Fi on/off button on the back of the device (or on the device) is pressed.
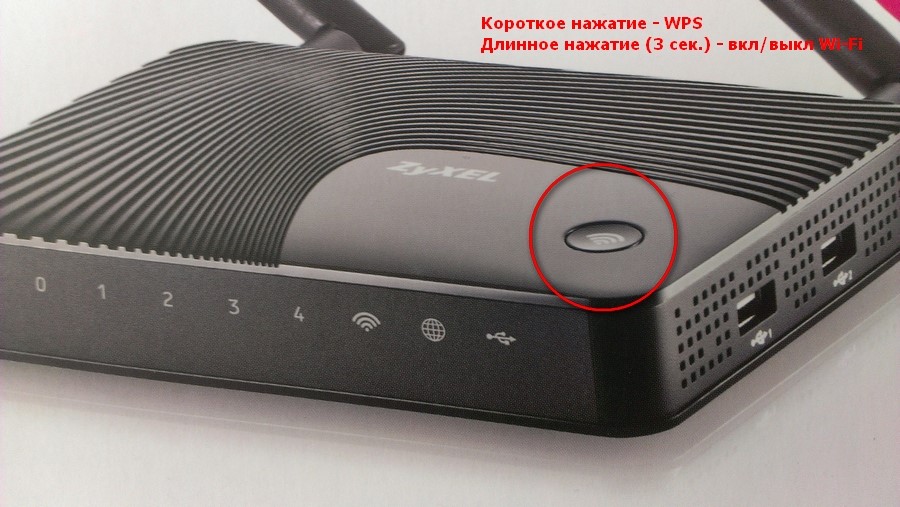
If pressing the button doesn't do anything, or if it's not there, reboot the device. If the problem persists and the devices do not detect Wi-Fi – roll back the router to the factory settings, using the Reset button pressed for 7-10 seconds.
The planet (WAN) light is lit orange (red)
This means that the cable coming from the ISP's network equipment is not connected or is damaged. The first thing to check is if the connector in the WAN port is loose, maybe it just came loose. If the connector is firmly connected, but the internet icon does not light up green, reboot the device. Not again? Call the technical support of your ISP.
Rarely, but it is possible that the WAN port is burned out. You can check its functionality with Ethernet-cable, by which your PC is connected to the modem. Move it from LAN port to WAN port. If the LED turns green, the port is working.
Read More:
