We get into the admin panel. Here everything is very easy – follow the step-by-step guide, entering the necessary data.
- How to Set Up the TP-Link Extender – Connecting the Repeater to your Router
- How to Connect a TP-Link Extender WiFi Signal Amplifier
- Automatic connection with the WPS button
- Setting up a TP-Link repeater from a smartphone
- Setting up a TP-Link router as a repeater (to boost the Wi-Fi network signal)
- Additional settings
- Basic configuration of the repeater
- Fine tuning of the repeater
- Strengthen the signal with additional hardware.
- 1. Changing or upgrading your antennas.
- What affects the signal range of the router and the reception range of the wifi adapter?
- Factors that affect the range of the WiFi signal
- Place wifi router
- Interference from Household Appliances
- Setting up the equipment
- How to increase the speed of your WiFi network?!
- 1. Choosing the fastest standard – 802.11N
How to Set Up the TP-Link Extender – Connecting the Repeater to your Router
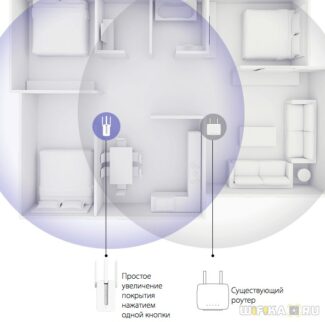
Among the many networking devices from TP-Link, there are a number of models of so-called WiFi repeaters. They are also called repeater, repeater or amplifier of signal as they are used for improving the quality of the wireless signal reception from the router and extending the reception area of the network. In this article, we will detail how to connect a TP-Link wifi repeater to a router and set up a wireless signal booster through.
TP-Link wifi repeater installation scheme to amplify the signal from the router is very simple.
- First, we determine in which room the signal on the laptop is weakest or not at all.
- After we have found out where we need to strengthen the wifi signal, we find the place where the network is catching, but not so well – one or two bars on the phone.
- That's where we put the repeater – its work zone is circular, which means that it will pick up the signal from the wifi router and transmit it further.

How to Connect a TP-Link Extender WiFi Signal Amplifier
There are three ways to connect and configure a TP-Link wifi extender:

Automatic connection with the WPS button
Like most modern models of networked wireless devices, the TP-Link TL-WA850RE wifi amplifier supports setting up to the signal of an existing access point in automatic mode.

To do so the router must also have such a function – the "WPS" button is responsible for its activation. On old TP-LINK devices it was called "QSS".

Press these buttons simultaneously on the router and the amplifier, and then it should pick up wifi and start distributing it.

Setting up a TP-Link repeater from a smartphone
I like to be in control of the whole process, so I never use the automatic way to set up the repeater, and I do everything manually. In order to connect the TP-Link Extender signal booster from a phone or tablet:
- turn on WiFi on your smartphone,
- press the central button on the device,
- and find on the phone in the list of available networks with the name TP-LINK_Extender_7320BA – this is the SSID, which is the default firmware of the device.
- Connect to it. In my case, the password is not required, but if your model requires entering an authorization key, it will be listed on a sticker on the device.

Setting up a TP-Link router as a repeater (to boost the Wi-Fi network signal)
At this time, I do not have the opportunity to test all of this in a real environment. As soon as I will have a router, in the settings of which it will be possible to select this working mode and check everything – I will do it. And if necessary, I will add the article. To write this article I used TL-WR841N hardware version v14 router's web interface simulator. I found the same settings on TL-WR940N v6, TL-WR840N v6.
Since this feature is currently (at the time of writing) available only on some routers, you will most likely have to configure WDS mode to use your TP-Link router as an amplifier. I gave you the link to the detailed instruction above.
First, we will need to go into the router's settings. You can use my instructions: how to enter the TP-Link router settings.
If your router has the ability to change the operating mode, there should be a tab "Operation Mode" (Operation Mode). Open it and put the switch next to the mode "Wi-Fi signal booster". and click on the "Save.". If the message "The new operating mode will only be used after restarting the router. Do you want to change the operating mode?" click "Yes.".


After changing the operating mode, there will be significantly fewer settings in the web interface. Unnecessary settings will be hidden. This is good, as they are easier to understand and there is nothing unnecessary. Also, the operating mode we have chosen will be specified in the wireless mode properties.
Additional settings
If you would like TP-Link to distribute the network with a different name and password, it is enough to change these settings in the "Wireless Mode" section – "Extended Network".. There you can change the extended network name (SSID), password, and save the settings. I do not advise to change the security of the extended network (leave WPA-PSK/WPA2-PSK).

As for the IP and DHCP server settings, once the router is switched to "Wi-Fi signal booster" mode in the LAN settings, it is automatically set to "Smart IP (DHCP)".

In this mode TP-Link automatically configures the necessary parameters. In this mode the DHCP server is disabled and the main router gives IP addresses. This is how it should be when using the router as a repeater.

Important point: When you plug devices into the LAN port of the router, the Internet will work. This means that in this mode the router can be used as an adapter (Wi-Fi receiver) for wired devices (PC, TV, set-top boxes, etc.). Since there is no separate mode "Adapter" on these routers (perhaps not yet).
Basic configuration of the repeater
Watch the video tutorial on how to connect the repeater in the following video:
Let's move on to the TP-Link TL-WA850RE setup instructions. We have two options: either a wireless connection or an Ethernet cable.
- Let's plug our repeater into an outlet. Make sure that the device is within range of the Wi-Fi router.
- On the back of your router, press the button labeled WPS.
- Within 30 seconds of turning on WPS mode, press the button on the back of the amplifier (it has a padlock on it).
- Wait until the LED next to the RE sign lights up.
- If it lights steadily, then your amplifier is already connected to the network and has increased the signal coverage area of the router.
- If it blinks, it means it is still connecting to the router.
- If it is not lit at all, then the repeater is not connected to the router.
Now let's talk about connecting via Ethernet, or cable. Its advantage is that through this mode you can use the web interface for more accurate configuration. To pull this off, we need the cable that comes with the amplifier and a laptop or computer.
- Plug the repeater into a power outlet, which is easy to do.
- Using the Ethernet cable connect your laptop or computer to the repeater.
- In the address bar of any browser type tplinkrepeater.net and press Enter. If this does not work, go to 192.168.0.254 ;
- In the open window, enter the factory username and password – they are printed on the repeater housing as a label. If there is no such label, then the basic login and password are the word admin;

Fine tuning of the repeater
Little by little we move on to a more fine-tuning of the access point. Once all the steps above have been done, you can also move on to a more user-friendly configuration.
To do this, it's best to open "Wireless Network" – there you can change the network name, password, repeater mode, region, network name, MAC address and channel width. Once the debugging has been done, you can safely click "Save".
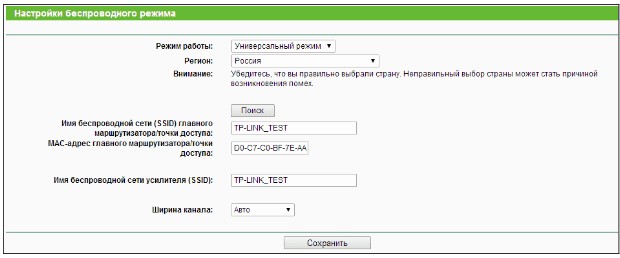
If you want to put protection in the form of a password, then go to the "Wireless Security" tab, and there choose the level, version of protection, password, and type of data encryption. Those who will need MAC-address filtering can use this function, but most other configurations will not be of much use at home.
As with a Wi-Fi router, you can see who has connected to your network. To see this, do the following steps:
- Open the web interface of the repeater through a direct connection to it (Ethernet cable).
- Open the "Network" column.
- Under "Network", find the "DHCP Client List" line and open it. In the window that opens you will see everyone who has connected to the repeater and the data of these users – IP address, MAC address, and how long the user has been connected.
Strengthen the signal with additional hardware.
If you have low quality reception and low speed even after you set your router to the maximum signal level – do not get upset, all is not lost. There are a number of other actions that you can use. Their point is to improve or upgrade your wireless equipment.
1. Changing or upgrading your antennas.
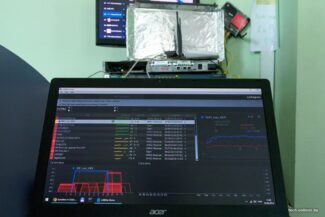
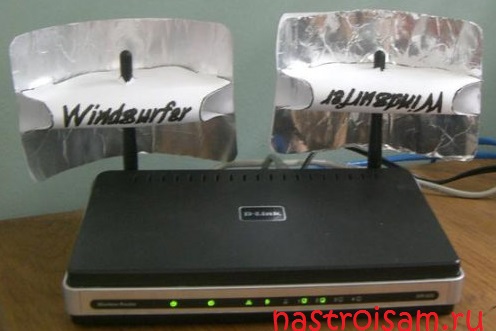
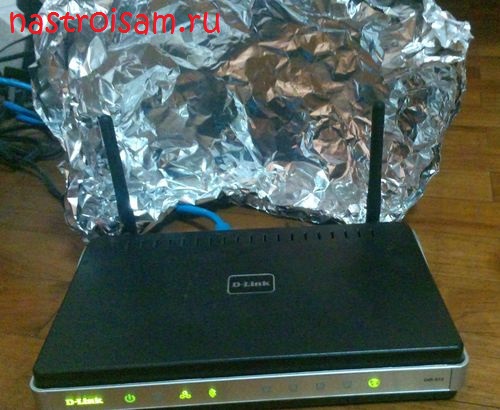
There are many different ways on the Internet to boost the signal of your regular router antenna. Most tips boil down to turning an omni-directional antenna into a directional antenna. And do it who can. Some make shields out of beer cans:
The third ones are too lazy to make up anything and just hang pieces of tin on the antennas:
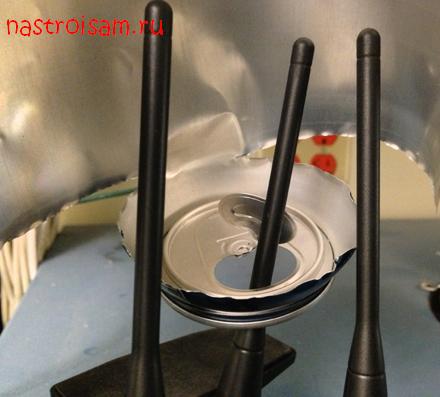
For the sake of interest I tried such ways to strengthen the signal and practically did not get any clear and significant effect from it. But the really effective result can be achieved by replacing the antenna with a more powerful one. For example, here are two devices: one – D-Link with a gain of 2dBi, and the second, white – Zyxel with antennas 8 dBi:
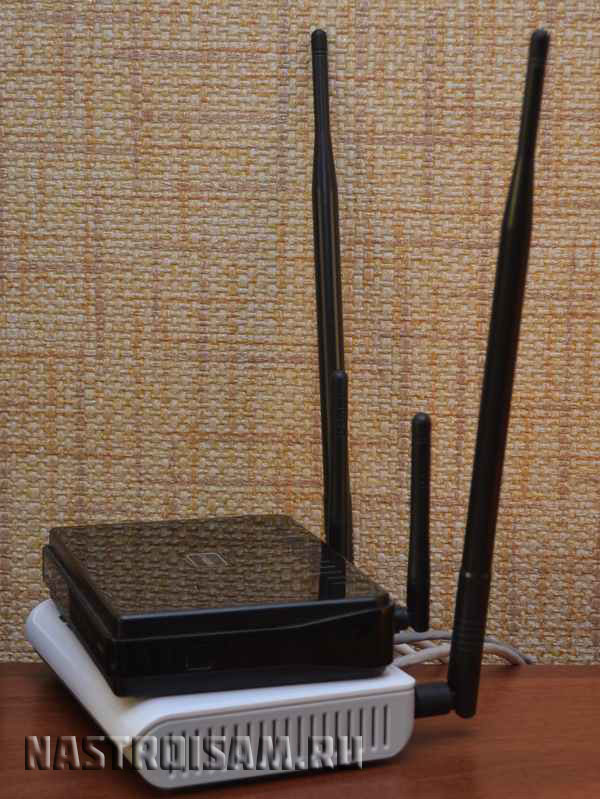
Of course, the coverage of the second will be at least 2 times larger. The cost of the antenna at 8dBi is somewhere in the region of 300 rubles apiece. Do you agree – not expensive! As an option – you can buy an antenna with a stand and a cable-extender. This will allow you to move the antenna around the room to find the best location, without touching the router.
Read More:Note: This replacement will be effective if you are replacing your 2dBi or 3 dBi antennas with an 8 dBi antenna. In my experience, replacing 5dBi antennas with 8 dBi antennas did not have a significant effect. Perhaps in an open space the effect would have been noticeable, but in a city apartment I did not feel a real improvement in the level of reception on the client's devices.
What affects the signal range of the router and the reception range of the wifi adapter?
For a stable network in a standard city apartment is quite enough the simplest router and built-in laptop adapter. However, there are many side factors that make it necessary to amplify the signal to increase the range of the wifi signal at home. I talked about the main reasons that can affect wifi speed in the article at the link.
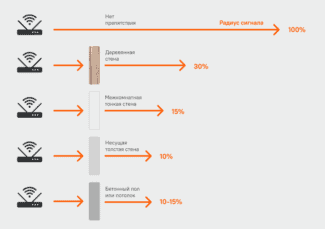
Let's not repeat ourselves, but let's pretend that we have ideal conditions for wireless radio signal propagation in our house. That is, there is no interference from neighbor's routers and other active frequency emitters, such as microwave ovens. In these conditions, the distance and obstacles on the way from the source to the receiver take on the main function of signal absorption.
Obstacle Additional loss (dB) Effective distance Open space 0 100% Window without tinting (no metalized coating) 3 70% Tinted window (metalized coating) 5-8 50% Wooden wall 10 30% Interior wall (15.2 cm) 15-20 15% Bearing wall (30.5 cm) 20-25 10% Concrete floor/ceiling 15-25 10-15% Monolithic reinforced concrete slab 20-25 10% This table clearly shows how much signal quality will be lost depending on the types of obstacles in its path. For example, let's take an abstract router that in the best of conditions and without interference or obstacles will actually give out a WiFi signal at 100 meters. These are the conditions under which manufacturers indicate the "shooting range" of their devices on the beautiful boxes and in advertising brochures.
Factors that affect the range of the WiFi signal
There are some of the most popular ways to boost a router's wifi signal to extend the reception range and improve the quality of the connection, which you can use yourself in any apartment or private home. And it does not matter what manufacturer the router will be – TP-Link, Asus, D-Link, Zyxel, Keenetic, Tenda, Netgear, Xiaomi, Rostelecom, Beeline, MGTS and so on
The first category is the elimination of external influences on the radio waves, as well as the use of additional devices.
Place wifi router
Many during the repair in the apartment determine the place of installation of the router somewhere in a special server room, or in the dressing room, or in the electrical switchboard. In a word, out of sight. But the configuration of the apartment layout is often such that the wireless signal from the router does not reach the remote rooms. As a result, the range of wifi is not enough to get it at any acceptable speed.
The way out is to use the advice from the FAQ section of Asus – move the router closer to the "geographical" center of the apartment, so that the signal from it in a circle evenly distributed throughout all the rooms. You can hide it somewhere behind a cabinet if you don't like the look of it, as long as there is an outlet for it.
Interference from Household Appliances
You should also avoid placing your router near appliances that emit strong electromagnetic waves. For example, near a microwave oven. The interference created will greatly affect the correct and uniform amplitude of the wifi signal propagation through the rooms.
Setting up the equipment
The other day a man came to me who was angry about his home router and really wanted to change it. The main complaint about the work was the following – "The router cuts the speed when working via WiFi": when connected via cable it pumps an average of 60-70 megabits, and over a wireless network – no more than 20. And no matter what arguments the subscriber did not want to pay attention, but just stupidly demanded an exchange. Of course, we met him and exchanged one fully working device for another. So in the near future expect it to appear again. To you, my readers, I want to explain in detail the examples of why the router can limit the speed of the Wi-Fi and how you can make this difference, if not completely eliminate, then at least partially leveled for the better.
Before we proceed to active operations, I will give a few facts that you should always take into account if you use Wi-Fi.
Firstly, network equipment manufacturers usually specify the theoretically achievable speed in the technical specifications. That is, if you see Wireless N150 on the router, it means that the maximum speed of the wireless module of the device can theoretically reach 150 mb/s. Correspondingly N300 – up to 300 mb/s. Pay attention to the word theoretically. With the one that you will actually have, it is not that it will not coincide, but it will differ significantly in a smaller way. With this we encountered a few years ago when the standard was actively used 802.11G with a maximum theoretical speed of up to 54 mb/s, which in practice was rarely higher than 20 mb/s. With faster and more modern standards everything is completely identical.
Secondly, if you have problems with WiFi speed, the first thing to do is to update the router's firmware, since it affects the operation of all of its components. You can get it from the official server of the manufacturer. For example, for D-Link devices this server is ftp.dlink.ru..
Pay attention to the firmware versions:How to increase the speed of your WiFi network?!
Below I will list the main reasons for the decrease in wireless network bandwidth and possible ways to fix them, which will help 90% of the time.
1. Choosing the fastest standard – 802.11N
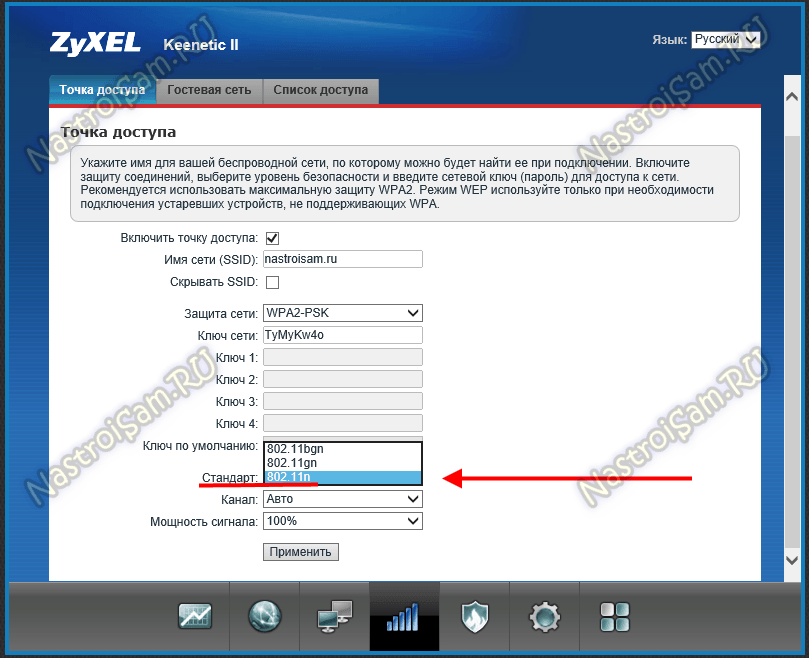
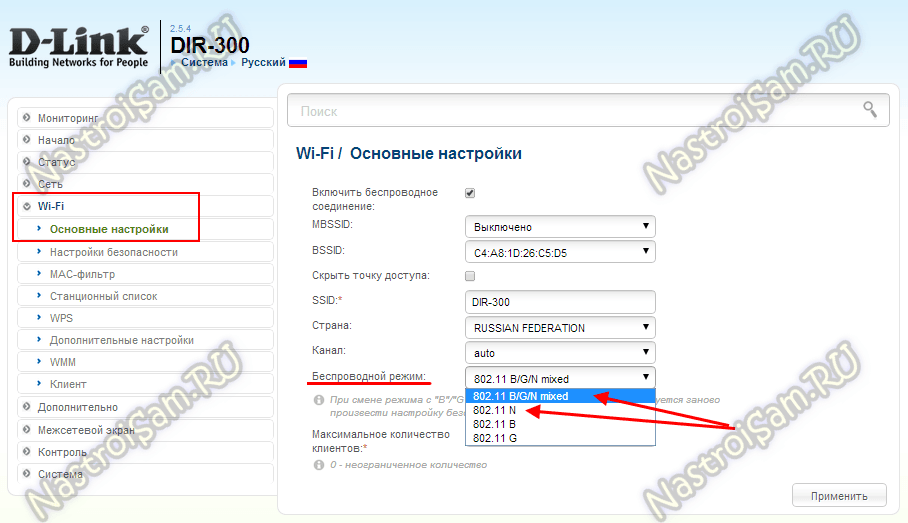
Currently in the 2.4 GHz band the fastest wireless standard is 802.11N. All wireless routers manufactured since 2010 are marked as Wireless N150 and Wireless N300, which means that they support this standard and the maximum achievable speed. But here the access device's universal settings play a nasty trick on the user. The thing is that in most cases the standard used is mixed, i.e. 802.11 B/G/N mixed. This is correct, but… the way that a wireless network works is that all devices work with the standard that they support. Take a look at this table here:
In other words, if you connect an old laptop with a G-standard adapter and actively receive and transmit data, then the speed of other devices will also decrease. In some cases even by 60-80%. The way out is either not to connect such devices, or, if possible, connect them via cable.
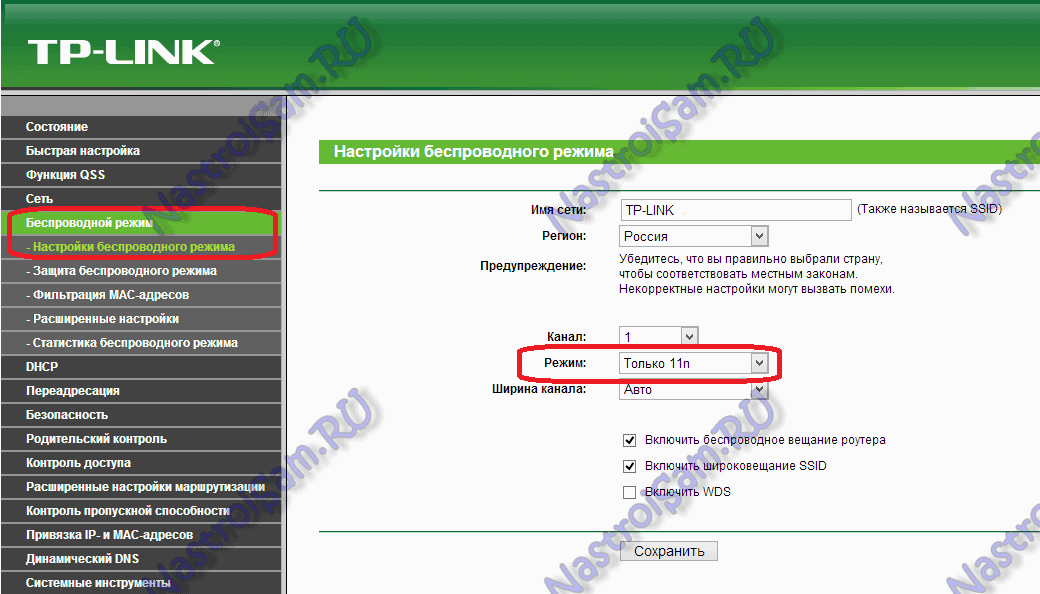
To achieve maximum speed indicators, all adapters in your home network must work on the Don standard. Therefore, if you have all devices modern and support 802.11 N mode, it is desirable to switch the whole WiFi network to it forcibly. In most cases, this is done using the router's configuration settings in the basic WiFi settings section.
Here is an example for Zyxel Keenetic II:
And here is an example for D-Link DIR-300 on the latest firmware versions:
Here you can change the mixed mode to any of the separately supported modes.
On Sagemcom 2804 from Rostelecom, instead of selecting the mode there is an option to support only 802.11N clients:


