You don't have to manually go through the channels on your router to find a free one. There are specialized programs that automatically scan frequencies and provide information about busy radio channels. The user will only have to select a free line.

- Figuring out how to change the router frequency to 5 GHz and what it will do
- Login to router admin panel
- How to change and configure the router frequency
- Conclusion
- How to Choose a WiFi Bandwidth (20, 40, 80 MHz) – Which Bandwidth is Best for 2.4GHz and 5 GHz on a Router
- What does the wifi channel width affect?
- What channel width should I choose?
- How to Change?
- What is the wifi signal strength in reality?
- Managing TX Power on the Asus router
- What is a wifi network channel and why change it?
- How to find a free channel with inSSIDer, or WiFiInfoView?
- The wi-fi channel width: what it is and what it affects
- Which mode to choose
- Logging into the web interface
- How to change the channel on the router
- Asus .
- D-Link
- Keenetic
- How do I change the channel on my TP-Link router?
- Why is it important to change the channel on a TP-Link router?
Figuring out how to change the router frequency to 5 GHz and what it will do
Nowadays, there are quite a few different router models on the market. According to the number of bands used, they are divided into single-band, which only work on the 2.4 GHz radio frequency, and dual-band, where you can simultaneously use two radio frequencies 2.4 and 5 GHz. By default, the 5 GHz band is active if it has not been disabled before. In case your router has only one 2.4 GHz band, it is not possible to activate the second 5 GHz frequency. This is due to the fact that in routers the second frequency is available only if a separate physical module with a processor is allocated.
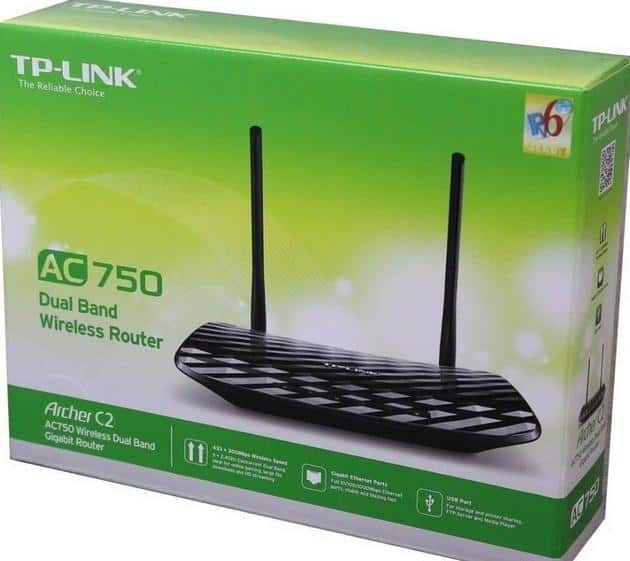
In order to determine whether your Wi-Fi router can work with two frequencies, it is necessary to look at its marking. When it contains the letters "AC" and "AX", it means that this router can operate at 5 GHz. Quite rarely, this frequency can be found in devices of the "N" class. However, not always manufacturers prescribe these classes on their devices, so you can determine the ability of the device to work at 5 GHz frequency only in its settings. Recently TP-Link, ASUS and Kinetic have started to produce devices in which wireless networks are automatically paired. In this case, only one Wi-Fi network will be visible, but in fact there will be two radio bands (2.4 GHz and 5 GHz). The router automatically selects and switches the client device to the Wi-Fi network with the best radio signal. Next in this article we'll tell you how to enable the 5 GHz radio frequency on your router. The following instructions will allow you to enable and disable this band on routers from different manufacturers.
Login to router admin panel
If you do not know if your router supports the 5 GHz band, the easiest way to find out is to use the web interface to configure the router. Before you open the admin interface of the device, you should first connect it to the power supply with the power adapter. Then you must connect the PC to the router. To do this, any LAN connector of the router is connected to the network card of the PC. Then you have to open an available web browser and in its address bar type the IP address of the router's admin.

To find out the IP address, you need to look at the information label on the bottom of the device.
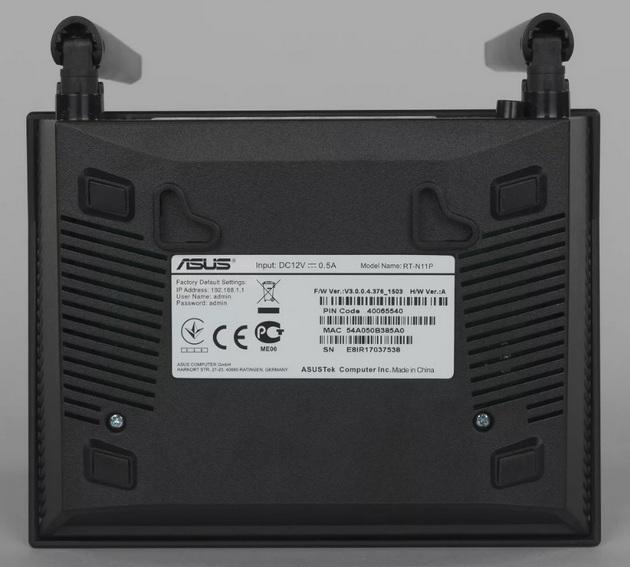
Often wireless equipment manufacturers use the following addresses, which can be seen in the picture below. In addition, a host name such as "tplinkmodem.net" may be used as the router's admin address.

Then a login page should open, where you must enter the user name and access code. The data for authorization is also located on the information sticker of the device.

Most often the standard username and password are "admin" and "admin". Enter these values into the corresponding fields on the page. If they were entered correctly, the admin panel of the device opens, where you can configure the operation of the 5 GHz frequency. Below we will look at how to enable the 5 GHz frequency in the router settings.
How to change and configure the router frequency
It's worth saying right away that in order to change the band from 2.4 GHz to 5 GHz, you need the router to technically support this frequency and the corresponding Wi-Fi certificate, as we wrote about in detail in the previous article.
In other words, if you have an old router model, there's no way out here: you will have to change the hardware.
You can find out the frequency of the Wi-Fi router and change it, if the device is working in two bands, in the settings. You can enter the router settings either with the cable (which is usually delivered with the device when you buy it) or by entering the IP address in the address bar of your browser (for example, http://192.168.1.1 or http://192.168.0.1). The default login and password are set by the manufacturer and are specified in the manual or on the router itself.
All necessary information can be found in the "Wireless Network" or "Wireless Mode" (the type of interface, of course, depends on the specific manufacturer).
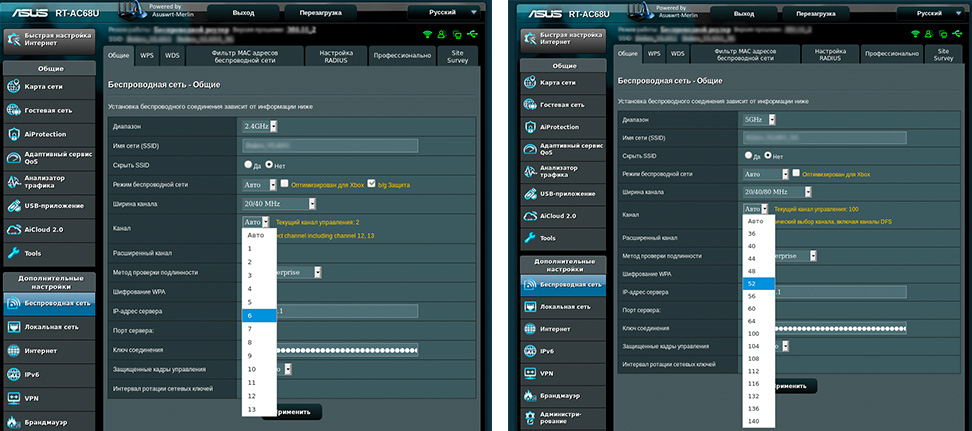
Either way, you can tune the channel even if there is no band change. At 2.4 GHz, it is best to choose bands 1, 6 or 11 because they are non-overlapping according to the standards for providing a minimum of 25 MHz.

As for the 5 GHz frequency, there are four bands that form the channels. At a minimum, you'll have channels 36, 40, 44, and 48 – that's the UNII-1 block, but depending on the device, there could be more, all the way up to 161.

Conclusion
It does not make sense to increase the speed through your ISP by connecting other Internet rates if you have old network equipment that does not support new Wi-Fi standards and frequencies. With the increase in the number of users, the load on the wireless network has increased, with the same progression, the number of interference in the 2.4 GHz band has also increased.
The 5 GHz frequency for Wi-Fi routers is now freer and more stable, with more non-intersecting channels, which means signals from neighboring devices are less likely to overlap and not share speeds.
To boost your Wi-Fi signal and Internet speeds, you need to keep up with the times and buy modern routers that meet the new wireless network requirements.
How to Choose a WiFi Bandwidth (20, 40, 80 MHz) – Which Bandwidth is Best for 2.4GHz and 5 GHz on a Router
When connecting a router, many users are confused by the "WiFi Bandwidth" option that comes up when setting up their wireless network. For each of the frequency bands (2.4 GHz and 5 GHz), it has a choice of several values – 20 MHz, 40 MHz, 80 MHz or auto. Which is the best choice? In theory, you could leave everything to automation, so that the router itself, based on its analysis of the current state of the network, chose the best mode for work. However, as you know, the robot does not always work correctly. And to fine-tune WiFi on your own, it makes sense to figure out what the channel bandwidth affects, and which one to choose and how to change it later if necessary.
In simple terms, the WiFi channel width (Bandwidth, Channel Width) is its bandwidth.
I have already talked at length about what a wifi network channel is. To make a long story short, it is a separate segment within a single frequency band on which wireless devices are operating. In the picture below, they are marked as arcs.

In order to keep all these gadgets from interfering with each other, they are separated into different segments by manually selecting the freest channel. The 2.4 GHz band has only 13 channels, the 5 GHz band has 33. And the length of these arcs is exactly the width of the channel. By default it is 22 MHz, but in the settings of the router for simplicity they specify the value "20 MHz".

In order to make it wider, you can increase the value by 2 times, so that it becomes 40 MHz. And here we come to the next question.
What does the wifi channel width affect?
The width of the wireless channel directly affects the speed. The wider the channel, the more devices can communicate with each other at the same time. It's the same as comparing a single track railroad to a two-, three-, or even four-lane railroad, which can pass many more trains and carry more passengers at the same time. Only the passengers in our case are the data exchanged between laptops, computers, smartphones and TV set-top boxes via a wifi router. Therefore, you can manually assign a certain value to it.
It would seem, put the highest number – and there will be happiness? But it's not that simple. The fact is that outdated devices may not support more modern standards. And if, for example, you set the channel width of 40 MHz, then they will not be able to connect to such a wifi signal. In addition, the wider the channel, the less distance the signal "shoots", and thus the reception area is reduced.
Therefore, there is a general rule, which channel width is optimal to choose in this or that case
- 20/40/80 MHz (Auto) is the default value, which is suitable for most users. It is recommended to leave it for universality and in the absence of problems with the network
- 20 MHz – can be set in the presence of interference from other people's routers and unstable wireless signal. This width allows for 3 non-overlapping 2.4 GHz channels, which means that if you connect three devices to the router at the same time, they will not interfere with each other in any way. Suitable for apartment buildings with many surrounding networks that cause interference
- 40 MHz – cuts off the ability to work with the network of some gadgets. Also in 40 MHz there is only one channel that does not overlap with others, which means that only one device will work comfortably on wifi. Connecting each new one creates additional interference. Use only when automatic mode does not help or if you live in a separate house and use a Mesh system.
What channel width should I choose?
This is the same with the width of the channel – the wider the channel, the more traffic will get through. The narrower it is, the less. You're better off with 40 MHz to increase the speed.
But it's not all so rosy. Take another look at the channel picture above. If you look at it, there are three channels highlighted: Channel 1, Channel 6 and Channel 11. The point of their selection is that they do not overlap. That is, if we choose a channel width of 20 MHz, we get 3 non-intersecting channels. Of course, you can also use overlapping, but here it makes more sense in the freedom of the common range from interference – in the range you can separate 3 devices, and they will not affect each other in any way.
Another thing with 40 MHz – such a channel can be placed only one. All others will overlap with it, interfere with it, and affect the final speed – this is a negative difference from a narrow band. And if things get really bad, through Wi-Fi, the final internet speed on end devices can even suffer.
So still, which channel width is better – 20 or 40 MHz? Bottom line:
- If you don't have neighbors – put 40 MHz.
- If you have neighbors, put it at 20 MHz.
- If you still don't get it, put on AUTO. Also a good choice, it will not make much difference, the router is also not a big fool.

You can test by trial and error – put 40 MHz. Test the work for a couple of days. If something didn't like it, put 20 MHz for a couple more days. Compare it.
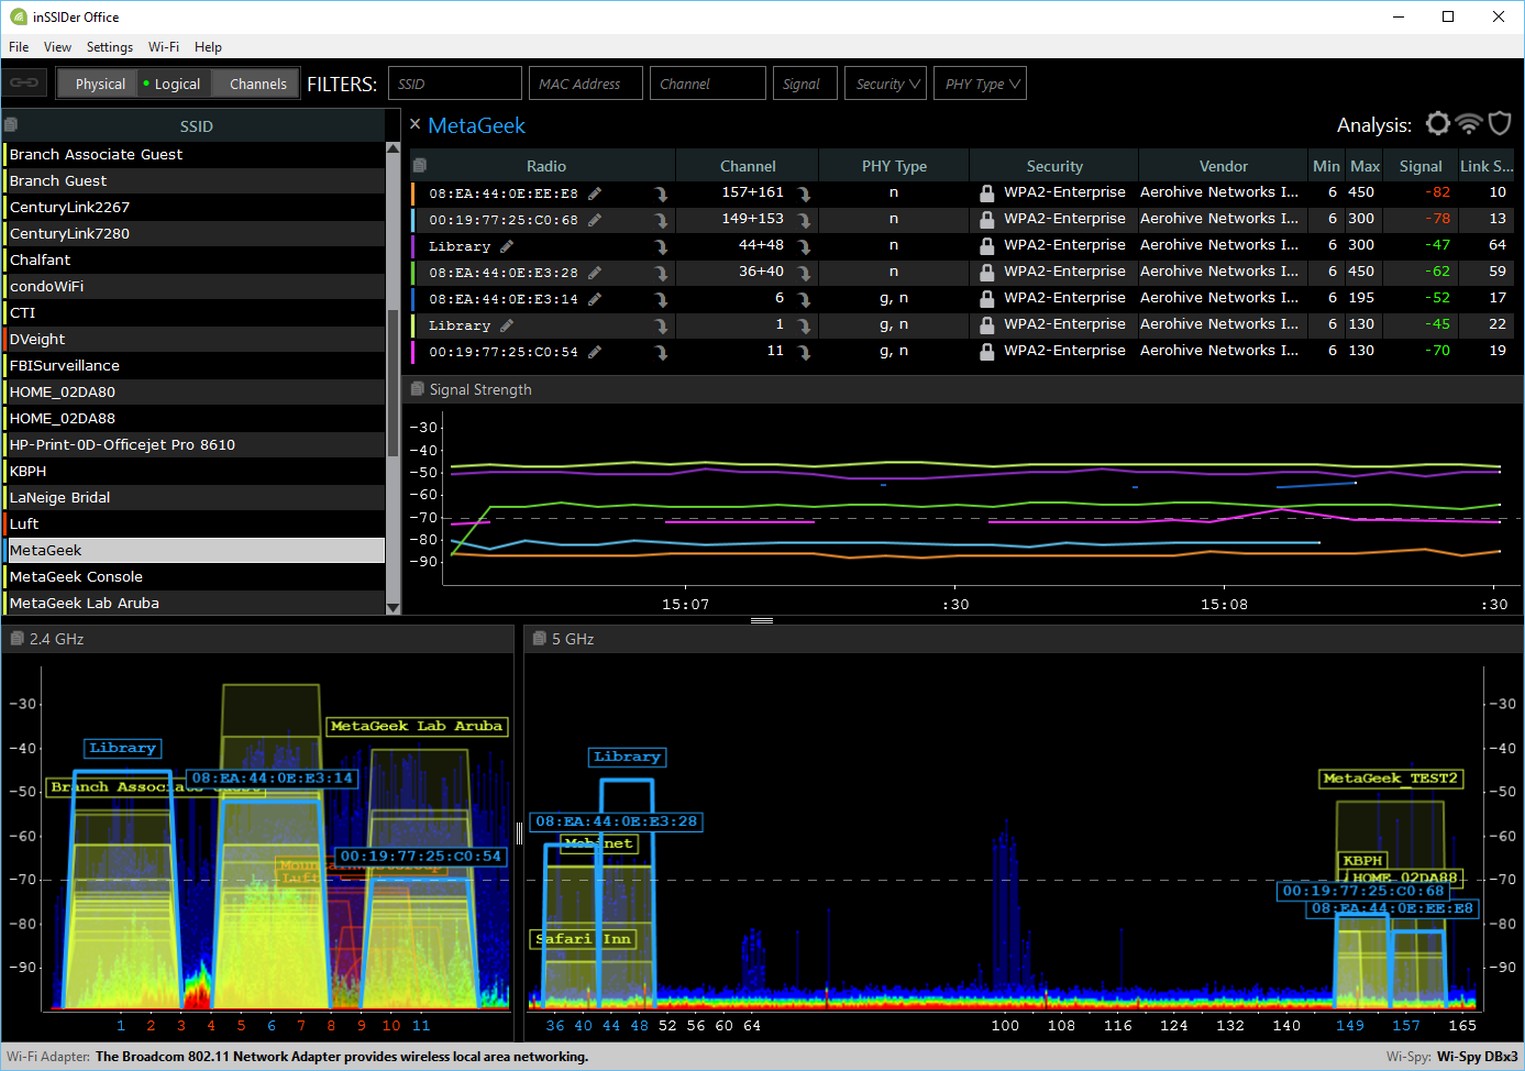
For theorists, you can preview the channel load before selecting the mode with the same inSSIDer.
Or here is another interesting video on selecting a channel (and from it the width):
How to Change?
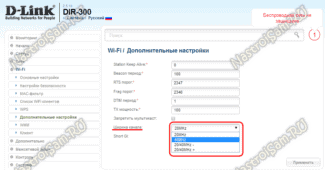
You need to change the channel width in the settings of the access point itself. Let it be the most common home router in our case. First you need to enter into the settings of your router and select the wireless network settings.
How to do this is not the subject of this article. Each router is slightly different, I recommend that you use the search on our website and enter your model there – we have a lot of instructions on configuring routers for almost every model. There you can also read about entering the web configurator.
And there everything will look like this (by the example of your TP-Link):
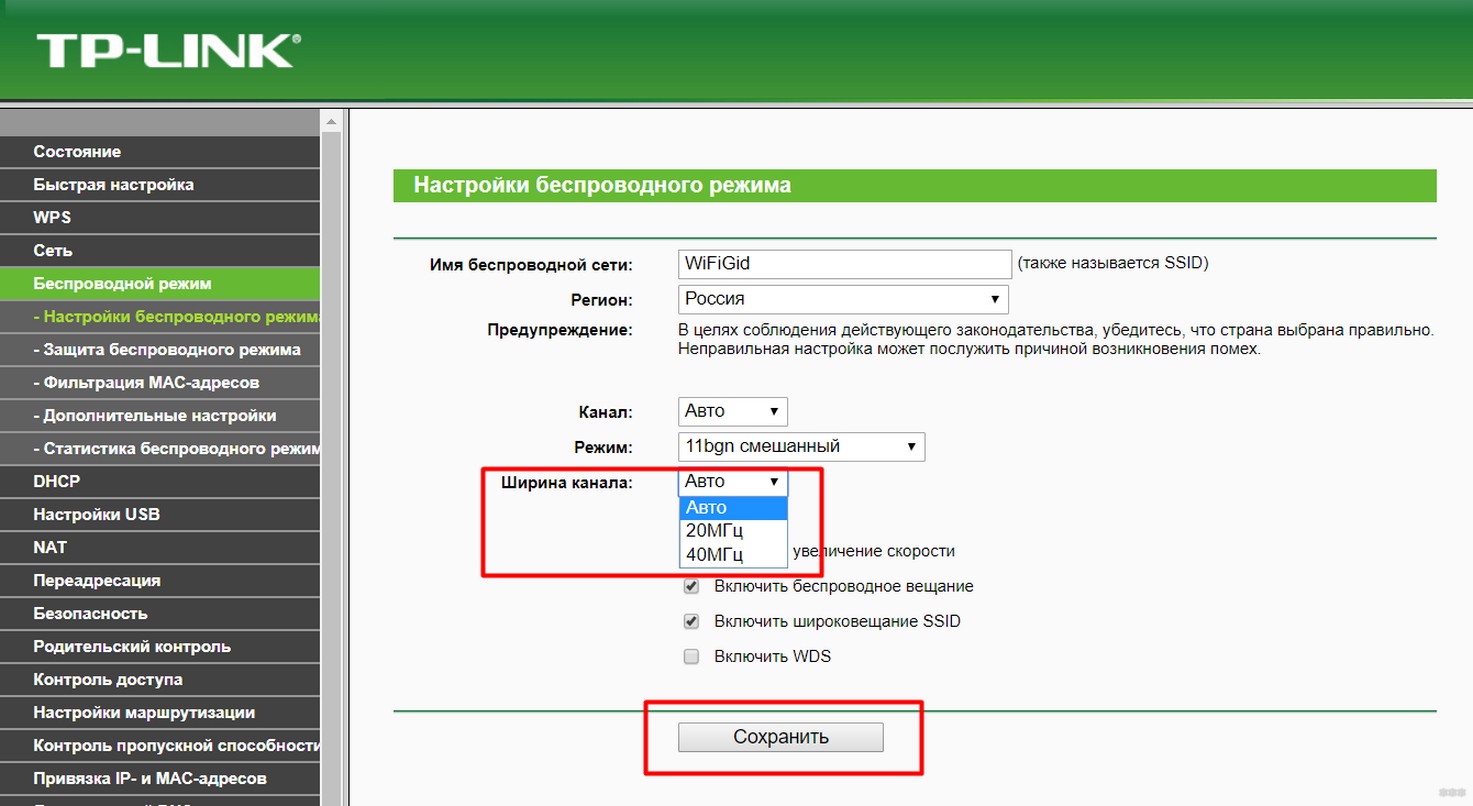
On other routers it is often called Bandwidth or Channel Width.
Don't forget to save the settings! Otherwise, there are individual cases in our questions…
That's pretty much it. Our portal is designed for the average user, without any extra stratagems, so the recommendation – feel free to put 20/40 MHz and do not be afraid of such automatics. In 99% of cases it works perfectly. So here I say goodbye and have a nice day!
What is the wifi signal strength in reality?
But this is all just theory. And we, practitioners, have a reasonable question – 20 dbm, how many meters is it? Answered it unequivocally impossible. After all, the reception area is very dependent not only on the signal transmitter itself, but also on many other factors. For example, obstacles or partitions on the way from the source to the receiver. Or the surrounding electromagnetic waves that can cause interference.
In the router settings, we can force TX Power down or up. The signal power reduction feature is very useful for those who think that wifi is bad for their health. And while many routers have the ability to turn it off on a schedule, the ability to make the wireless signal one or two divisions lower wouldn't hurt either, especially if you have a small apartment.
Managing TX Power on the Asus router
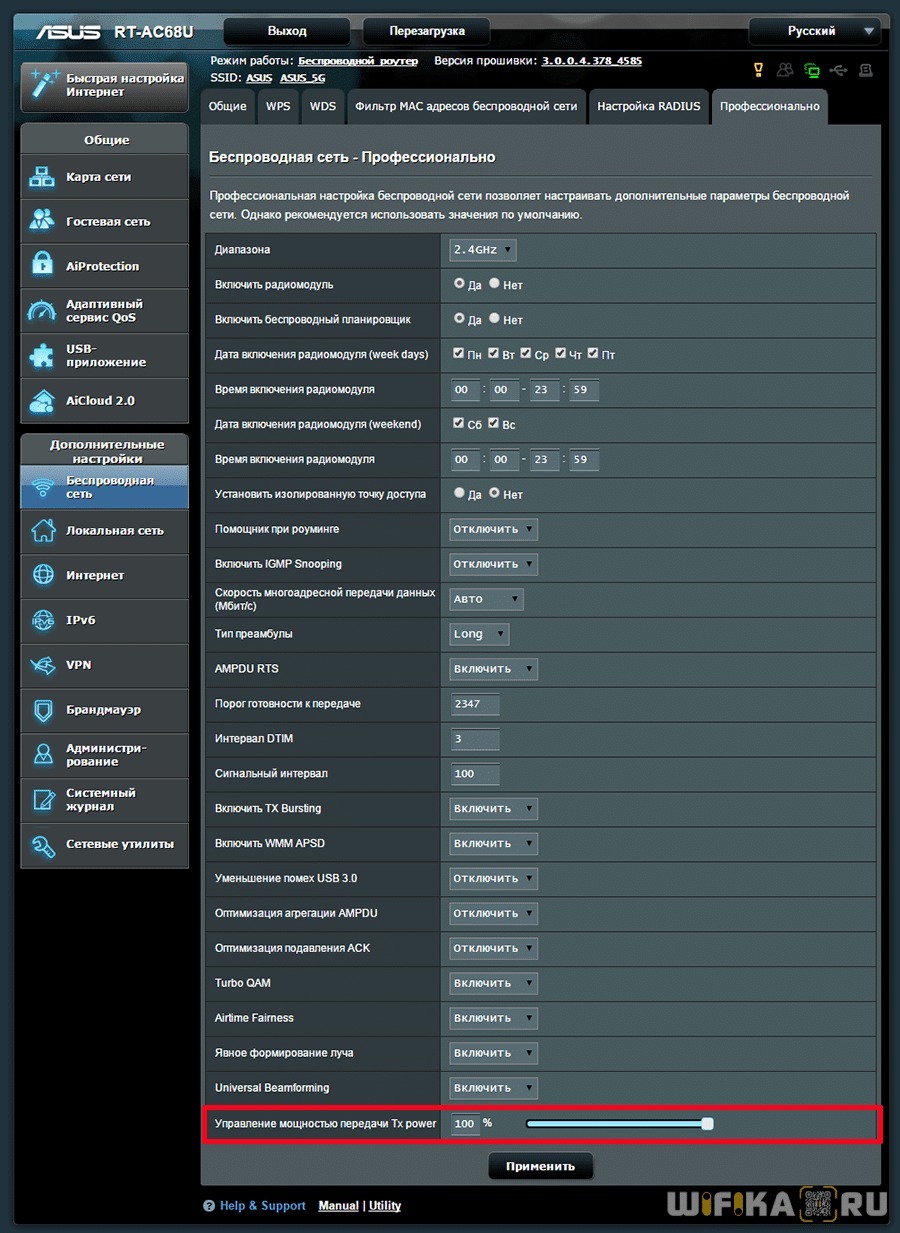
On your Asus router, the output power settings are in the Wireless section, in the "Professional" tab, but it's not available in all models. Here, if you scroll to the bottom of the page, you'll see the last item, "TX Power Signal Control." In some Asus routers, the wifi power must be prescribed independently in numbers in video units of mW – a maximum of 200mW.
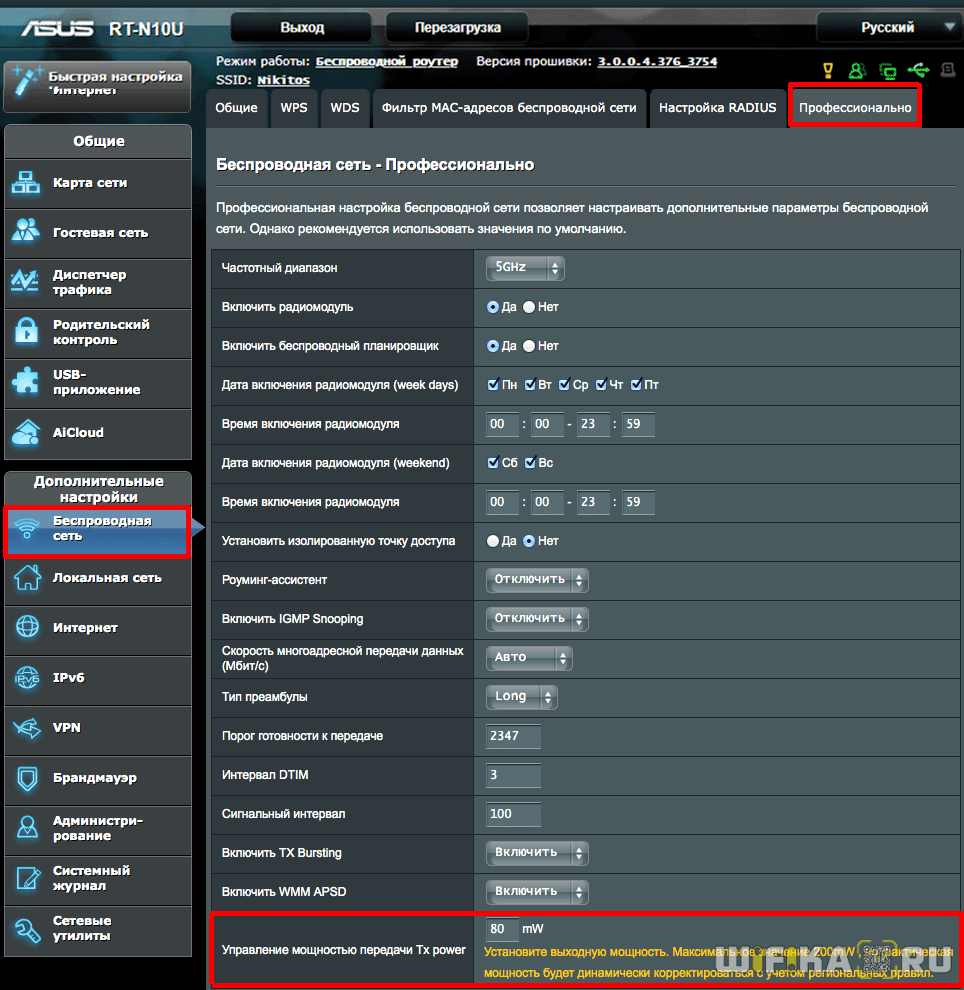
Others do this more clearly in the form of a slider as a percentage of the maximum signal strength
What is a wifi network channel and why change it?
To better understand the situation, let's first understand what's what. At the moment, almost all routers broadcast wireless on the frequency of 2.4 GHz. There are newer ones that broadcast at 5 GHzbut there are not many of them yet. They are expensive, and not everyone is willing to throw out their router and buy a new one, so that only the network was on 5 GHz. This is understandable. So, on a frequency of 2.4 GHz, in Ukraine and Russia are allowed to use from channel 1 to channel 13. This means that every Wi-Fi network operates on channel 1 through channel 13. In America, for example, only 11 channels are allowed. Because of this, by the way, there are problems when connecting to wireless networks with devices that are brought in from America. They simply can't see Wi-Fi, which works on channel 12, or channel 13.
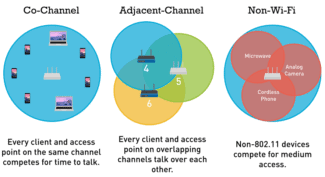
Typically, the problems start when two (or maybe more) Wi-Fi networks are on the same channel. If you live in a private house, you are unlikely to have any other networks within range of your Wi-Fi, and even if you do, they will be few and the signal will be weak. But in an apartment, there can be a lot of networks. And very often they will be on the same channel. Why? Let me explain. For example, you set up your router, and in the settings choose a static channel, let it be the 6th. Your neighbor sets up his router and also sets up channel 6.

By default, the router is set to automatic channel selection mode. This means that when the router is turned on, it chooses a free (or less busy) channel. Reboot it, and it can already choose a different channel. Whether this thing works, I do not know, but I think that even with automatic selection to 1 channel can get several networks. Especially if there are a lot of networks. They simply have nowhere to go.
How to find a free channel with inSSIDer, or WiFiInfoView?
If you open the list of free networks on your device (laptop, smartphone, tablet) and see a lot of networks available for connection, then to find a free channel for your network, it is best to use special programs. The most popular of course is inSSIDer. It is free and the interface is in English, but everything is clear there. I also really like the free, simple and small program WiFiInfoView (I recommend using it). I will now show you how to use these programs.
First, we will need to download inSSIDer. You can find it on the internet. To install the software, simply run the installation file from the package and follow the instructions. After setup, start inSSIDer (it will have a shortcut on your desktop). If I'm not mistaken, this program can also be installed on a tablet or phone that runs on Android/iOS. Look in the branded application stores.
For these two programs to work, you must have Wi-Fi enabled. The device must see the available networks. About the configuration of Wi-Fi on the laptop, I wrote in this article.
Run it means inSSIDer, and immediately go to the tab NETWORKS. You will immediately see in the table all available Wi-Fi networks and your network. If you are connected to it, you will see an asterisk next to it.

We need to look at the Channel tab or more precisely at the information that is displayed under it. It shows which channel each network is using.
As you look, you choose the free channel for your network. By the way, I forgot to mention: there are three channels which never overlap.. These are 1, 6, and 11, if they are not busy according to the program, then try to set them first. If the network works on channel 10 for example, it captures two more channels on each side. For example: 8,9,10,11,12. You may be asking why the program displays two channels opposite almost every network. 1+5, 13+9, etc. They write that it is because one channel is set manually, and the second selects the router for better coverage. Couldn't figure it out myself, but I checked and figured out why two channels are displayed. It is because the channel width is set to 40MHz in the router settings. Or, it is automatically selected and it is set to 40MHz. If you set it to 20MHz, it will show one channel. Checked.
The wi-fi channel width: what it is and what it affects
The width of a wireless channel (other names are Channel Width, Bandwidth) is its bandwidth. Bandwidth affects the speed of the Internet.
Most modern routers offer a choice of 2.4 GHz and 5 GHz bands. The advantageous difference of the 5 GHz band is the significantly larger number of network segments.

These channels are individual frequency bands of a selected band through which the router broadcasts. Bandwidth can be compared to a highway on which data "travels" to and from the user. The wider it is, the faster the information is exchanged. For example, the 2.4 GHz frequency band usually allows for a wifi channel width of 20 or 40 MHz.
By dividing the network into such segments, all devices within the coverage area can have a high-quality Internet connection. If one band channel is used by two or more devices at once, it slows down the connection proportionally.
Broadcasting from an identical segment in the area of overlap with the wireless coverage of another router causes noticeable interference and the connection speed drops. You can determine which mode to choose according to the desired bandwidth and channel occupancy.
Which mode to choose
The so-called non-intersecting channels, which have certain numbers, will work best. You can determine them yourself by looking at the broadcast diagram of, for example, the 2.4 GHz band:

Initially, routers with this frequency mode can broadcast on all 14 channels, but some are reserved for social and government needs. For example, 11 channels are officially used in the USA. Formally, the laws of the U.S. do not prohibit citizens to use the 12th and 13th segments of the 2.4 GHz band in low-power mode. All channels except 14 are available in Russia and Ukraine. Devices purchased in different countries can see only those frequency band segments, the use of which is approved by the relevant legislation.
Based on the number of 13 channels available to Russians and Ukrainians, channels 1, 6 and 11 will work best. The width of the network segment is also determined by the wireless standard, which is also useful to consider when choosing this parameter.
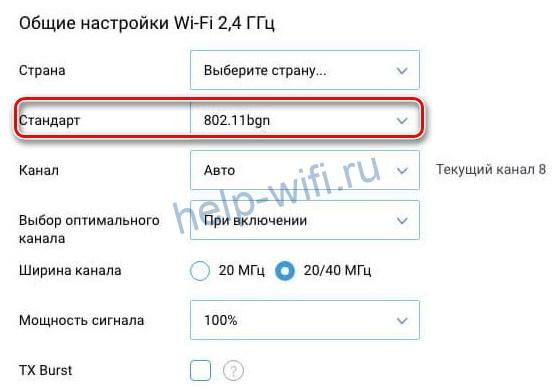
For example, the minimum conditional channel width of 802.11g and 802.11n specifications is 20 MHz, while its actual value has decreased to 16.25 MHz. This is due to modern modulation technology. The channel spectrum of the 2.4 GHz band with a bandwidth of 16.25 MHz has no longer 3, but 4 minimally overlapping segments with the numbers 1, 5, 9 and 13.
Broadcasting at 5 GHz provides a much larger number of channels with an identical initial bandwidth. This more advanced wireless technology allows you to choose from 23 non-overlapping segments available depending on the region of use. These channels are usually highlighted in bold in the router's settings.
Logging into the web interface
You can change the channel on the Wi-Fi router through the firmware. To do this, open your browser and type the IP of the device into the address bar. Most routers are available at 192.168.1.1 or 192.168.0.1.

Next, you need to log in to the router's web interface. The default username is admin, and the password for authorization is usually found on a sticker on the bottom of the device. In most cases it is also admin or 12345.Also on the sticker is the login address.
It is recommended to change the login and password after authorization. This will increase the security of the connection. Attackers will not be able to quickly pick up authorization data in the web interface of the router and will not get access to the settings.
How to change the channel on the router
The way to change the Wi-Fi channel is determined by the router model.
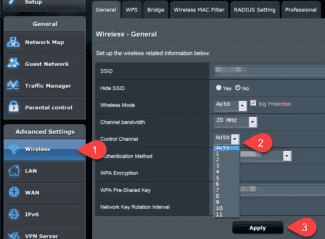
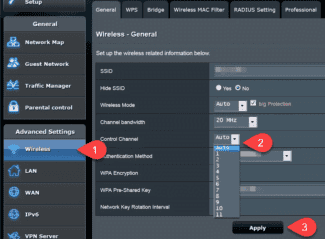
Asus .
In order to change the channel on the wifi router, you must:

- Open the section with additional settings.
- Go to the "Wireless Network" tab.
- Find the item "Channel" and set one of the numbers instead of "Auto".
- Click the Apply button. Make sure that after configuring the channels the wireless network works.
For the light version of the firmware all actions are similar.
D-Link
In order to change the Wi-Fi channel in the router settings, you need:
- Go to advanced settings.

- Open the main Wi-Fi settings.

- Choose one of the free channels. Many D-Link router models automatically display radio channel load, but this data is not always accurate. Before you switch the channel, check its load once again in the program.

Click on the "Apply" button. The router will automatically reboot and start with the new settings.

In the AIR interface, go to the Wi-Fi section, then go to the main settings of the desired frequency. Select the desired channel and click "Apply".
Keenetic
- Open the "Home network" subsection on the "My networks and Wi-Fi" tab.

- Open the "Advanced Settings" for the desired band.

- Select one of the 13 channels in the corresponding settings item and click "Save".
How do I change the channel on my TP-Link router?
Friends, you will now learn how to change the channel on your TP-Link router, and we will begin by defining the channels, width, basic settings, and generally tell you what they are for.
If your wireless Wi-Fi network has a bad signal or is disappearing, it could be due to interference caused by other devices. So, most of your home network transmits signals in the 2.4 GHz frequency band; very often devices operating on the same 2.4 GHz frequency interfere with the wireless signal. Some electronic devices such as baby monitors, microwave ovens, and cordless phones may use the same frequency band. It is very easy for such devices to interfere with your wireless home network to slow down network connections.
Generally, the wireless networks that most people use have the same radio frequency. Homes that share walls with each other can cause interference between different home networks and result in a bad signal. The good part is that most wireless routers give you the ability to change the wireless channel. The different frequency helps routers avoid interference.
Why is it important to change the channel on a TP-Link router?
TP-Link routers most often use 2.4GHz for 802.11n and 5GHz for 802.11n and 802.11ac. There is also a choice of "Channel" on each frequency. The user can select from eleven different channels depending on what other networks are broadcasting on the neighboring network. Multiple Wi-Fi networks often overlap each other, resulting in a slow signal or no signal. By switching to a less busy channel, you can improve the speed of your Wi-Fi.
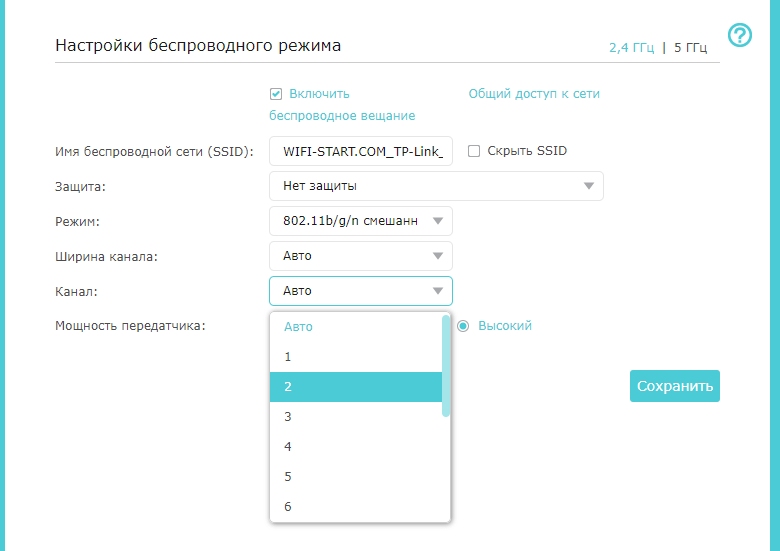
You can change the channel on your TP-Link router by logging into the web interface of your router. You do this by launching a web browser and entering the default IP address into the address bar. You can find the default IP address of your router in the printed manual that came with it, or by searching on Google. Using your default username and password, log in to your router's settings page.
Once logged in, go to advanced settings, select "Wireless Network" and then go to the "Advanced" to change the channel in the drop-down menu. Most routers have this option under the menu called "WLAN". For the changes to take effect, your router may reboot automatically.
It is very important to see nearby wireless networks and their channel, as it gives you clarity to change your channel and see what other channels are configured for.
Read More:
