Sergey

- How to enable, disable and configure the 5 GHz on a Wi-Fi router?
- Running, Configuring, and Managing 5 GHz Wi-Fi on a Router
- How to make changes
- How to change the data on TP-Link
- How to change data on D-Link
- How to Change Information on Asus
- How to find a free channel?
- InSSIDer .
- WiFiInfoView
- 2.4 GHz or 5 GHz?
- How to change the router frequency: software search for a free channel
- What is a Wi-Fi network channel and why change it?
- How do you find a free channel with inSSIDer, or WiFiInfoView?
- Possible problems.
- Changing wifi channel settings on D Link devices
- Changing the channel in Netis routers
- How do I know what frequency the Wi-Fi works on?
- How to find out the free Wi-Fi channel
- Move the router
- Change channel or range
- How to speed up your home Wi-Fi: 5GHz routers and their benefits
- 5 GHz router: What's its use now?
- How to change and configure the router frequency
How to enable, disable and configure the 5 GHz on a Wi-Fi router?
I very often come across various questions related to setting up a 5 GHz Wi-Fi network on Wi-Fi routers. I also noticed that some people want to enable and configure 5 GHz on those routers, where it is not possible in principle, because the router simply physically does not support this range. So, I decided to do a separate article on this topic and tell you which routers can enable the 5 GHz frequency, and how to configure it correctly. I will also show you how to disable 5 GHz Wi-Fi on routers from popular manufacturers.
Nothing complicated about it, but first things first. There are regular routers and there are dual-band routers. Regular (aka single-band) routers only give out one 2.4 GHz Wi-Fi network. Dual-band routers have two Wi-Fi networks, one on the 2.4 GHz band and the other on the 5 GHz band. It is always written in the specifications, on the box of the router, in the manual. If it says 802.11ac (or, for example, says AC1200) , or 802.11ax, then the router is definitely dual-band and supports 5GHz, since these Wi-Fi standards work only on that frequency. If the router is not dual-band, supporting only 2.4 GHz, you will not be able to enable 5 GHz. It's not the settings or the firmware, it's the support at the hardware level. It also needs to be supported on the device (client) side. I wrote about it in an article on how to enable and configure 5 GHz Wi-Fi on a laptop or computer and why a laptop, smartphone, or tablet does not see the 5 GHz Wi-Fi network.
Running, Configuring, and Managing 5 GHz Wi-Fi on a Router
If your router supports 2.4 GHz and 5 GHz, its web interface (settings page, or app on your phone) has separate settings for each band. You can set different names and passwords for each network. And separately set the channel settings, channel width, network mode, security settings, etc. In the settings of each router there is an option to disable and enable each band separately. For example, you can turn off the 5 GHz Wi-Fi network and turn it on if necessary. Usually you just need to uncheck/check the box and save your settings.
On all dual-band routers, both bands are enabled by default. If you do a router reset, it will give out two Wi-Fi networks. The factory names of these networks (SSIDs) are usually listed on the bottom of the router on a sticker. The 5 GHz band network name usually has "_5G" at the end. But there are routers, such as Keenetic, that have a feature enabled that combines two Wi-Fi networks (in different bands) into one (two networks with the same name) . The devices see one network, connect to it and automatically choose the best band.
Since you can disable, enable and configure the wireless network in the 5 GHz band on the router is usually possible on one page (in one section of the web interface), I will show you how to perform all these actions on examples of routers from different manufacturers.
How to make changes
Before you change a router's WiFi channel, take a look at the router's name. Approaches may differ for different manufacturers' models.
In general, the instructions on how to change a router's WiFi channel can be summarized as follows: enter the router's settings, in the Network section, enter the data, reboot the device. Keep in mind that depending on the model of the gadget, the name of the menu will be different.
How to change the data on TP-Link
To change the channel on the WiFi router from TP-Link do the following steps:
It remains to change this parameter to any other option and check if the region is specified correctly. After changing the data, save it, reboot the device and check if the Internet is working correctly.
How to change data on D-Link
Now let's look at how to change the WiFi channel on the D-Link router. The algorithm is as follows:
An interesting feature of D-Link is the indication of the degree of loading. Thanks to this feature, it is easier to change the channel, because the user sees a free network. As a result, you can do without any additional programs.
How to Change Information on Asus
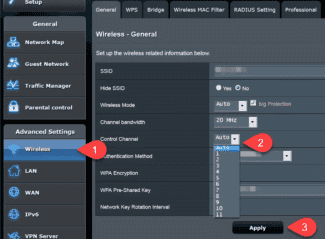
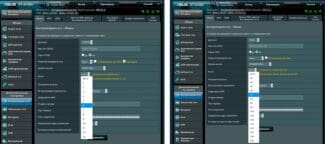
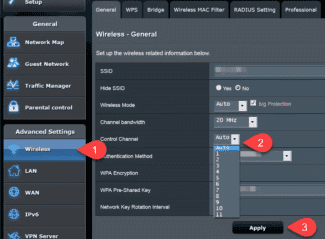
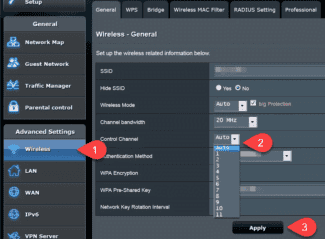
To change the channel on the Asus router, you need to do approximately the same steps:
After a new download, check the quality and speed of the connection. If the speed is not satisfied, you can change the data again.
How to find a free channel?
How to correctly change the channel, we have considered above. But another question arises – how to find a free WiFi channel for the router, because the user has up to 15 different options at his disposal. And if the D-Link routers give clues, in other cases you will have to make the decision yourself. Special programs can be used as assistants.
InSSIDer .
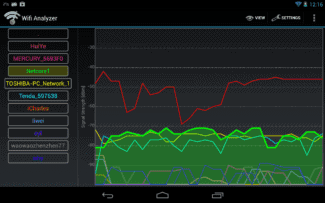
To deal with the channel on the router (which one to choose), you can use InSSIDer. To begin with, download and install it on your PC or laptop. If you want, you can find an app for your Android or iOS phone. Make sure that WiFi is enabled, then follow these steps:
Two numbers are displayed next to each profile. The first is the one selected by the user and the second is the one set by the router. One of the reasons for this display is that the frequency is set to 40 MHz. If you set it twice as low (20 MHz), only one digit will be shown.
WiFiInfoView
Before you change the WiFi channel on your router, use WiFiInfoView to select the appropriate option. Its advantage is that the software does not need to be installed on your PC. Download the archive and run the executable file.
After entering the Channel line, you can see the data for each network. It remains to find a free one and put it in the settings. Try not to choose 12 or 13, because they may not be seen by some devices in the apartment or house. It is better to put numbers up to 10.
2.4 GHz or 5 GHz?
Almost all routers now broadcast wireless on 2.4 GHz. However, new models of the latest generations are able to work at 5 GHz, but there are few devices, in addition, they are quite expensive. In RF it is allowed to work on channels 1-13. This means that all wireless networks use subfrequencies one through thirteen. In the U.S., only eleven subfrequencies are allowed. Therefore, problems occasionally occur with devices that are imported from that country.
Serious problems can occur if two wireless networks use the same communication channel. Owners of private homes usually do not face such difficulties, because there are no or very few other networks in the range of their Wi-Fi. But in a city apartment, there are quite a few networks, and they use the same subfrequencies. For example, you set up your router and set static channel 6 in the parameters. And your neighbors down the hall did the same. Therefore, to use fast and stable Internet out of town is not possible.
By default, the automatic channel selection mode is set in the network equipment parameters. When the router starts, it immediately chooses a less busy or even free subfrequency to work. Reboot the router to check. After the second power-up the device may choose a different channel. You can use special programs to find free channels on your own.
How to change the router frequency: software search for a free channel
Open the list of available networks on your tablet, smartphone, or laptop. If there are too many networks available for connection in the list, then it is better to use the software to search for a free channel. Users like to work with the program inSSIDer. It is free and quite accessible, although the interface is in English. You can also use another simple program called WiFiInfoView.
Consider step by step how to find a free subfrequency with inSSIDer:
- Download and install the program on your computer or laptop.
- After installation, run inSSIDer.
- Check whether the Wi-Fi is activated.
- In the program, select the Networks tab.
- The table in front of you will display all the available wireless networks, including yours.
- Click the Channel tab. This contains information about the channels used by each network.
- Find a free channel and select it.
Use the second WiFiInfoView utility to find out the available channel. Its advantage is that it does not require installation. Download and open the archive on your computer. After launching the file WifiInfoView.exe. you can get to work right away. In the Channel column you can check the data of each network. Check all the busy channels and pick up the freest one.
What is a Wi-Fi network channel and why change it?
To better understand the situation, let's first understand what's what. Right now, almost all routers broadcast wirelessly at 2.4 GHz. There are newer routers out there that broadcast at 5 GHzbut there are not many of them yet. They are expensive, and not everyone is willing to throw out their router and buy a new one, so that only the network was at 5 GHz. This is understandable. So, on a frequency of 2.4 GHz, in Ukraine and Russia are allowed to use from channel 1 to channel 13. This means that every Wi-Fi network operates on channel 1 through channel 13. In America, for example, only 11 channels are allowed. Because of this, by the way, there are problems when connecting to wireless networks devices that were brought from America. They simply don't see Wi-Fi, which works on channel 12, or 13.
Typically, the problems start when two (or maybe more) Wi-Fi networks are on the same channel. If you live in a private house, you're likely to have no other networks within the range of your Wi-Fi at all, and even if you do, they will be few and the signal will be weak. But in an apartment, there can be a lot of networks. And very often they will be on the same channel. Why? Let me explain. For example, you set up your router, and in the settings choose a static channel, let it be the 6th. Your neighbor sets up his router and also sets up channel 6.

By default, the router is set to automatic channel selection mode. This means that when the router is turned on, it chooses a free (or less busy) channel. Reboot it, and it can already choose another channel. Whether this thing works, I do not know, but I think that even with automatic selection to 1 channel can stand up several networks. Especially if there are a lot of networks. They simply have nowhere to go.
How do you find a free channel with inSSIDer, or WiFiInfoView?
If you open the list of free networks on your device (laptop, smartphone, tablet) and see a lot of networks available for connection, then to find a free channel for your network is best to use special programs. The most popular of course is inSSIDer. It is free and the interface is in English, but everything is clear there. I also really like the free, simple and small program WiFiInfoView (I recommend using it). I will now show you how to use these programs.
First, we need to download inSSIDer. You can find it on the Internet. To install the program, simply run the installation file from the archive and follow the instructions. After installation run inSSIDer (shortcut will be on the desktop). If I'm not mistaken, this program can also be installed on a tablet or phone that runs on Android/iOS. Look in the branded application stores.
For these two programs to work, you must have Wi-Fi enabled. The device must see the available networks. I wrote about setting up Wi-Fi on the laptop, in this article.
Run it means inSSIDer, and immediately go to the tab NETWORKS. You will immediately see in the table all available Wi-Fi networks and your network. If you are connected to it, you will see an asterisk next to it.

We need to look at the Channel tab or more precisely at the information that is displayed under it. It shows which channel each network is using.
Look, and choose the freest channel for your network. By the way, I forgot to write: there are three channels that never intersect.. These are 1, 6, and 11, if according to the program they are not busy, then first try to set them. If the network works for example on channel 10, it captures two more channels on each side. For example: 8,9,10,11,12. You may be asking why the program shows two channels in front of almost every network. 1+5, 13+9, etc. They write that this is because one channel is set manually, and the second selects the router for better coverage. Couldn't figure it out myself, but I checked and figured out why two channels are displayed. It is because the channel width is set to 40MHz in the router settings. Or, it is automatically selected and it is set to 40MHz. If you set it to 20MHz, it will show one channel. Tested.
Possible problems.
Sometimes changing the channel doesn't help and you have to change the Wi-Fi range to get a more stable wireless connection. To do this, launch the router's configurator again in the Internet browser. The further procedure depends on the model of the device.

For TP-Link, you can change the frequency in the router in separate sections. Both 2.4 GHz and 5 GHz modes are active there by default. The user can deactivate the one he doesn't need in the "Working Frequency Selection" section.
If after changing the operating frequency of the device the wireless network is stable, it means that 2.4 GHz band overload was the cause of the malfunction. If after changing the channel and frequency the Internet continues to work unstable, you need to return to automatic mode, and then test the other lines.
If your laptop or computer does not connect to the wireless connection, you need to change the Wi-Fi priority. In Windows 7, the setup goes as follows:
After changing the priorities, the wireless adapter will first try to establish a connection with the network placed first.
Changing wifi channel settings on D Link devices
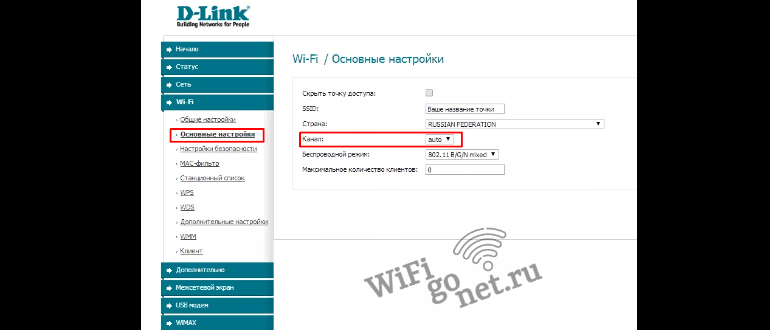
The settings tab of interest is under the "WiFi" menu item in the "Main Settings" subsection. The option to change the broadcast frequency is under the country selection line. After setting the desired value press "Apply" and then the red exclamation mark to finally complete the change of configuration of the device.
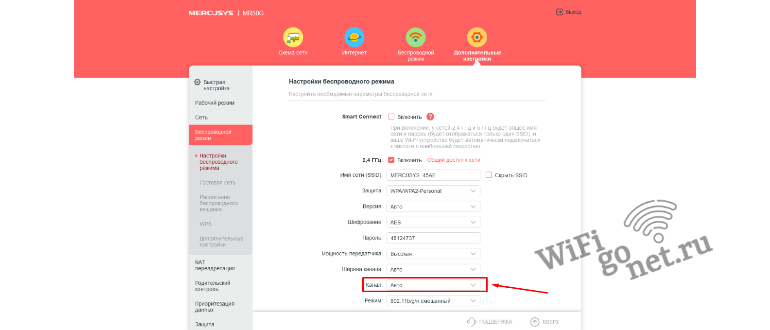
In the web interface enter the section "Wireless mode", located in the tab "Advanced settings" in the upper menu. By default the channel mode is set to automatic. To change it, select the desired value of this parameter in the pop-up window. The router will reboot and the changes will take effect.
Changing the channel in Netis routers

As in the case with other equipment manufacturers, first go to the web control panel and click "Advanced" or "Advanced" for the English version. Before changing the channel on the Netis router, it is recommended to change the default region from USA to Russia in the wireless connection settings to activate additional frequency selection options. After selecting the desired parameter, the results are saved and the device is restarted.
Logging into the administrative panel at 192.168.0.1 and authorizing in it, go to the WiFi settings. Among the icons that appear, select "Channel and Bandwidth". For each of the proposed networks, specify the desired value in the drop-down list. After choosing, click "Save" for the parameters to take effect.
How do I know what frequency the Wi-Fi works on?
- Click on the network icon in the lower right corner of the PC connected to your Wi-Fi network.
- Click on Network and Internet Settings in the window that appears.
- Click on WIFI in the navigation menu.
- Click Settings under WIFI.
- You will then see the connection settings, which will tell you which network you are connected to.
So, in order for us to change the channel, we need to log in to the web interface. There is no need to install any programs or utilities. The most important thing is to connect to the network of the router. This can be done via Wi-Fi or cable. Do this from the device from which you scanned the network.
Open any browser and enter the address of your router. Let me tell you right away that on all routers, the standard address is under the case on the label. Just look there. It is also very common to use 192.168.1.1 and 192.168.0.1 as the IP address. Then you will be prompted for a username and password. If you have not changed it, also look at the role of the router; there should be default information. Other instructions vary with the manufacturer of the device.
WARNING: I do not recommend setting 12-13 channels. As I said before, these channels are not used by most devices made in the USA. And who knows if after that other devices will work with these frequencies.
How to find out the free Wi-Fi channel
5 GHz Wi-Fi channels – increase your Internet speed with the right channel

To find a free channel and change it, you need to use software tools. The most famous one is inSSIDer. The application is free for the home version only. It is recommended to download it from the site and then run it. The prerequisite for the program is the presence of a wi-fi adapter at the workstation. On laptops it is built-in, and for PCs you need to buy it separately.
- After starting the program, go to the Network tab, there will be displayed all available wi-fi connections. The connection used by the client is marked with an asterisk.
- The "Channel" column contains the numbers used by each wireless device. Look through them carefully, select the figure that rarely occurs.
- Next, go into the router settings. In the Wireless section, manually set the value of the desired channel.

If the values in the Channel column are indicated as, for example, 1+5, it means that the user changed one of them manually, and the network device automatically selected the other.
Separately, it is worth noting that routers never use three digits: 1, 6, 11. They are always free.

An alternative to the above program is the utility WifiInfoView, which is a file . After unpacking you need to run the program.
The principle of operation is similar to InSSIDer. Only then WifiInfoView will show detailed information about each wireless network. Once launched, it will scan your surroundings, displaying a list of available connections with the distance to each of them. So finding the least busy wi-fi network to connect to is quite realistic.
Move the router
It's not a good idea to keep your router in an enclosed space, such as a closet. Walls and even bookshelves can weaken the Wi-Fi signal. Moving the router can seriously improve speed and coverage. Universal advice is not to put it in a corner, under a cabinet or in a desk drawer. Also, poor ventilation can cause the router to overheat, the Citilink editor said.
It's better to place the router in the center of the apartment so that the signal can spread to all the rooms. The expert notes that you shouldn't hang the router too high or too low, the height of one or two meters above the floor is enough.
If the router is used on stationary devices, their location should also be considered in terms of the game consoles, laptops and other gadgets were closer to the router. Gadgets that do not require a high-speed connection, on the contrary, can be moved a little further away.
If possible, the router should be kept away from devices that propagate electromagnetic waves. This includes baby monitors, wireless keypads, and microwave ovens.
Change channel or range
The Wi-Fi signal has multiple channels, and your router uses only one of them to communicate with devices around the house. If your neighbors live close and your routers use the same channel, you may experience hang-ups. In these situations, switching to another channel helps, Kaspersky Daily experts advise.
To configure it, you should study the paper documentation or look at the instructions on the Internet. First, it is worth trying to configure the router to channel 1, 6 or 11 – they usually have the least amount of interference when several devices are connected.
Nowadays, a huge number of routers use dual-band technology at 2.4 GHz and 5 GHz. You can often tell the difference by the name of the network. Your ISP's technician will usually configure your router so that the 5 GHz network has the number 5 in the network name.
According to Pavel Sumtsov, the 2.4 GHz mode provides a larger radius of coverage, but Internet speeds are lower than in the 5 GHz mode. In addition, the 2.4 GHz frequency is supported by more devices, and therefore channels on this frequency are often overloaded.
He recommended switching to 5 GHz for PCs, smartphones, and tablets if they support that frequency.
Also in the settings of the router there may be an option to make one of the frequencies a priority for certain devices.
How to speed up your home Wi-Fi: 5GHz routers and their benefits

Most routers distribute wireless Internet on the 2.4 GHz frequency – the same frequency that phones and microwave ovens emit their waves. This frequency was designated as the operating frequency for older wireless standards – IEEE 802.11 versions b, g, and n.
Since 2009, Wi-Fi standards gradually began to use another frequency – 5 GHz, and in 2021 the Russian Ministry of Communications officially allowed the use of the 5 GHz range for wireless Internet access. Support for 5 GHz first appeared in the 802.11n standard and became permanent in the latest version – 802.11ac, which is used by most current routers today.
The new standard is backward compatible with the old ones, so the devices supporting 802.11ac can distribute Internet in two frequency bands: 2.4 and 5 GHz. Thus, all gadgets can connect to them – both new ones that "understand" the 5 GHz frequency and older ones that can only catch Wi-Fi in the 2.4 GHz band.
Here are the key benefits of an 802.11ac 5GHz router.
- Huge bandwidth – up to 160 MHz.
- MIMO technology – the Wi-Fi signal can include up to 8 spatial streams, while at 2.4 GHz there can be only 3.
- Beamforming technology – the router detects where the device that is using the network is and directs the signal from the antennas directly to it.
What does this mean in practice? With plenty of high-frequency channels, high bandwidth, and smart search for connected devices, an 802.11ac Wi-Fi router can deliver exorbitant Internet speeds of up to 7 gigabits per second.
5 GHz router: What's its use now?
All of the above, of course, sounds very cool. But in reality such an Internet does not yet exist – at least not on a scale that can be called publicly available. Today's Russian providers offer rates for a maximum of 1 Gbps, and those are mostly in the capital city.
How to change and configure the router frequency
It's worth saying right away that in order to change the band from 2.4 GHz to 5 GHz, you need the router to technically support this frequency and the corresponding Wi-Fi certificate, as we wrote about in detail in the previous article.
In other words, if you have an old router model, you will have to change the hardware.
You can find out the frequency of the Wi-Fi router and change it, if the device is working in two bands, in the settings. You can enter the router settings either with the cable (which is usually delivered with the device when you buy it) or by entering the IP address in the address bar of your browser (for example, https://192.168.1.1 or https://192.168.0.1). The default login and password are specified by the manufacturer and can be found in the manual or on the router itself.
All necessary information can be found in the "Wireless Network" or "Wireless Mode" (the type of interface, of course, depends on the specific manufacturer).

Either way, you can tune the channel even if there is no band change. At 2.4 GHz, it is best to choose bands 1, 6 or 11 because they are non-overlapping according to the standards for providing a minimum of 25 MHz.
As for the 5 GHz frequency, there are four bands that form the channels. At a minimum, you'll have channels 36, 40, 44 and 48 – that's the UNII-1 block, but depending on the device, there could be more, up to 161.
Read More:
