The speed of the Internet in a wireless network is highly dependent on the router. It happens that everything is loaded perfectly via cable, but Wi-Fi lags. To cope with this trouble will help change the settings of the router. I will tell you how to increase the speed of the Internet via Wi-Fi router. I will show you an example of a TP-Link router. But for other routers the algorithm is the same.
![]()
- How to find free Wi-Fi channel and change the channel on your router?
- What is a Wi-Fi network channel and why change it?
- Different channel widths and their peculiarities
- How to set the channel width on your router
- Tuning your equipment
- How to increase the speed of your WiFi network?!
- 1. Choosing the fastest standard – 802.11N
- Activate WPA2-PSK security technology
- Change the channel width
- Don't hide the SSID
- Turn off slower data rates and standards
- Changing wifi channel settings on D Link devices
- Changing the channel in Netis routers
- Modification process
- Channels selection
How to find free Wi-Fi channel and change the channel on your router?
I have noticed that many people are interested in selecting a free channel of Wi-Fi network and changing this channel in the settings of the router. It is not strange, because of the channel, or rather because of the fact that the channel appears interference, there are a lot of problems in the Internet via Wi-Fi. Frequent interruptions of Wi-Fi connection, low connection speed, unstable operation, etc. All this can be due to the fact that on the channel on which your network is running other networks begin to work and it turns out that the channel is very busy.
And also, if your device simply does not see the Wi-Fi network, but other networks see it and other devices see this network, it may also be due to the settings of the wireless channel. Now I will tell you why it happens, how to find a free channel and change it in the settings of your router. Let's look at the most popular router manufacturers: Tp-Link, D-Link, Asus, Zyxel and Tenda.
What is a Wi-Fi network channel and why change it?
To better understand the situation, let's first find out what's what. Currently almost all routers broadcast wirelessly at 2.4 GHz. There are newer routers out there that broadcast at 5 GHzbut there are not many of them yet. They are expensive, and not everyone is ready to throw out their router and buy a new one, so that only the network was at 5 GHz. This is understandable. So, on the 2.4 GHz frequency, in Ukraine and Russia it is allowed to use channels 1 through 13. This means that every Wi-Fi network works on channels 1 through 13. In America, for example, only 11 channels are allowed. Because of this, by the way, there are problems when connecting to wireless networks with devices that are brought in from America. They simply can't see Wi-Fi that works on channel 12, or channel 13.
Typically, problems start when two (or maybe more) Wi-Fi networks are on the same channel. If you live in a private house, you're likely to have no other networks within the range of your Wi-Fi at all, and even if you do, they will be few and the signal will be weak. But in an apartment, there can be a lot of networks. And very often they will be on the same channel. Why? Let me explain. For example, you set up your router, and in the settings choose a static channel, let it be the 6th. Your neighbor sets up the router and also sets up channel 6.

By default, the router is set to automatic channel selection mode. This means that when the router is turned on, it chooses a free (or less busy) channel. Reboot it, and it can already choose a different channel. Whether this thing works, I do not know, but I think that even with automatic selection to 1 channel can get several networks. Especially if there are a lot of networks. They simply have nowhere to go.
Different channel widths and their peculiarities
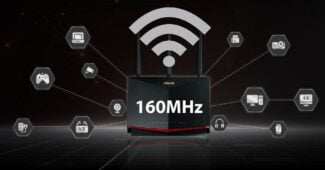
Channel widths can be different, including 20, 40, 80 and 160 MHz. Often routers operate on two frequency bands: 2.4 GHz and 5 GHz. The 2.4 GHz bands typically use 20 and 40 MHz wide channels, and the 5 GHz bands use 40, 80, and 160 MHz wide channels.
Choosing the optimal channel width depends on a number of factors, such as the number of devices on the network, their location, types of applications, and possible sources of interference. In general:
- For 2.4 GHz, 20 MHz is recommended because it reduces the chance of overlap with other networks and provides good compatibility with various devices.
- For 5 GHz, you can use wide channels (80 or 160 MHz) for maximum speed if your home does not have many other networks that might cause interference.
How to set the channel width on your router
You'll need to access your router's administrative interface to set the Wi-Fi channel width. The steps may vary slightly depending on the router manufacturer and model, but the process is usually as follows:
- Enter the IP address of the router in the address bar of your browser. This is usually 192.168.0.1 or 192.168.1.1.
- Enter your username and password to access the router's settings. If you haven't changed them before, look for the information on the router label or in your documentation.
- In the router settings menu, find the section relating to wireless settings (Wireless Settings).
- Select the desired channel width for each band (2.4 GHz and 5 GHz).
- Save your changes and reboot your router if necessary.
- Resolve Wi-Fi Channel Width Problems
Clear instruction, using a TP-Link router as an example:
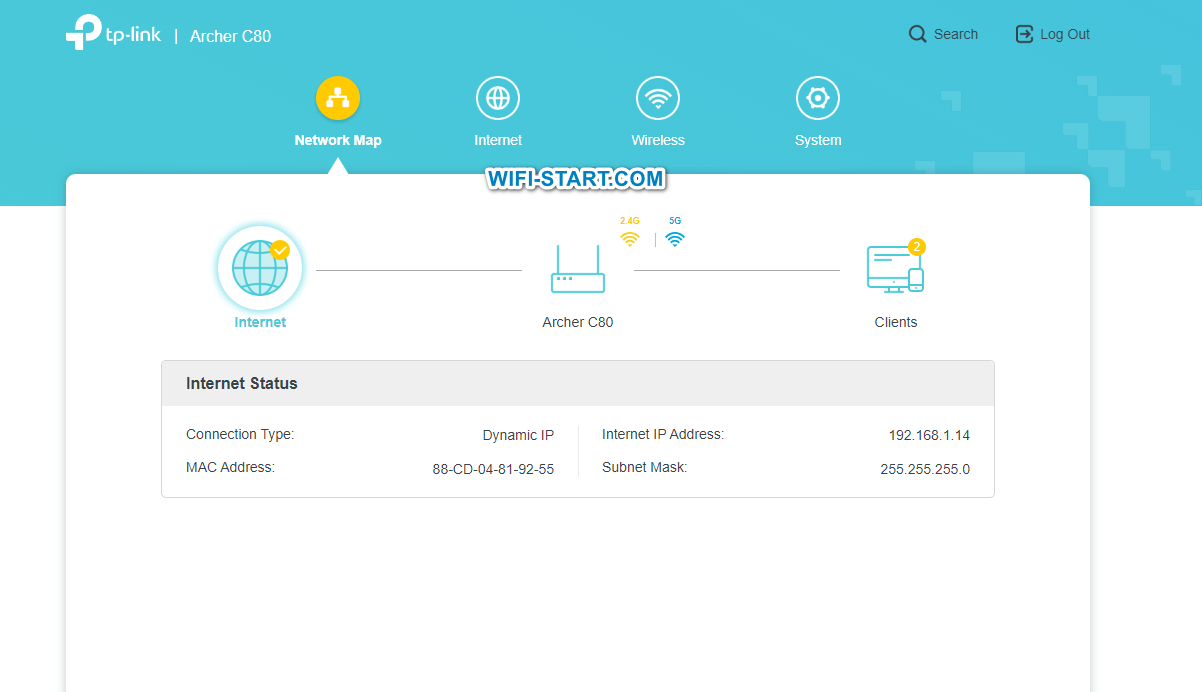
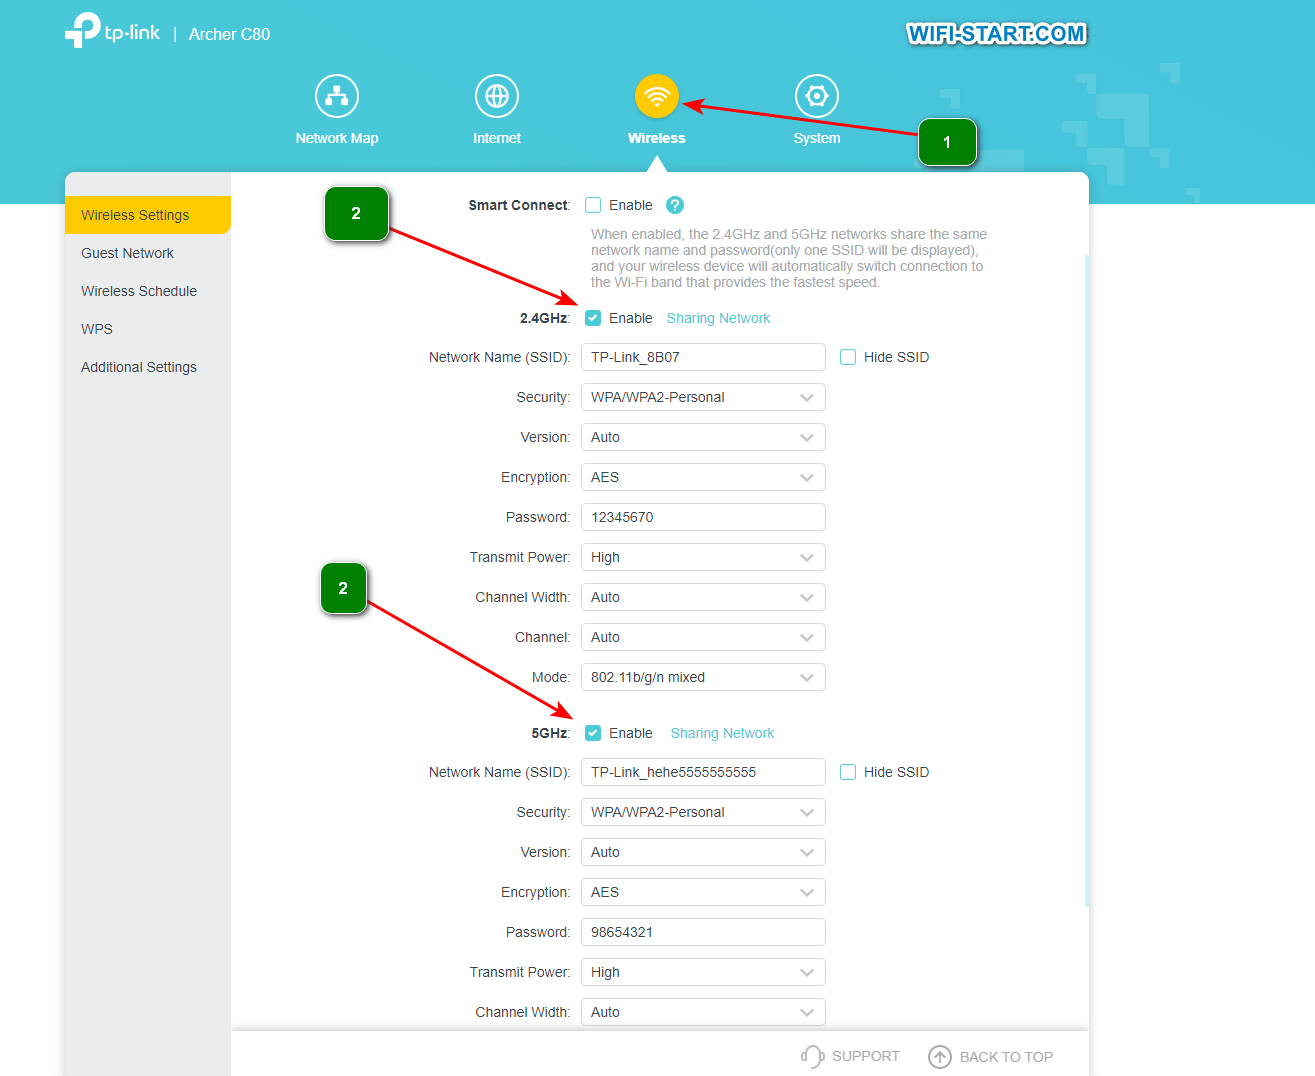
If you encounter problems such as slow speeds, signal loss, or device compatibility, try changing the channel width. Start with the smallest width and gradually increase it, observing signal quality and network performance. You may have to experiment with different channel widths to find the best option for your situation.
Tuning your equipment


The other day a man came to me who was angry about his home router and really wanted to change it. The main complaint about the work was the following – "The router cuts the speed when working via WiFi": when connected via cable it pumps an average of 60-70 megabits, and over a wireless network – no more than 20. And no matter what arguments the subscriber did not want to pay attention, but just stupidly demanded an exchange. Of course, we met him and exchanged one fully working device for another. So in the near future expect it to appear again. To you, my readers, I want to explain in detail the examples of why the router can limit the speed of the Wi-Fi and how you can make this difference, if not completely eliminate, then at least partially leveled for the better.
Before we proceed to active operations, I will give a few facts that you should always take into account if you use Wi-Fi.
Firstly, network equipment manufacturers usually specify the theoretically achievable speed in the technical specifications. That is, if you see Wireless N150 on the router, it means that the maximum speed of the wireless module of the device can theoretically reach 150 mb/s. Correspondingly N300 – up to 300 mb/s. Pay attention to the word theoretically. With the one that you will actually have, it is not that it will not coincide, but it will differ significantly in a smaller way. With this we encountered a few years ago when the standard was actively used 802.11G with a maximum theoretical speed of up to 54 mb/s, which in practice was rarely higher than 20 mb/s. With faster and more modern standards everything is completely identical.
Secondly, if you have problems with WiFi speed, the first thing to do is to update the router's firmware, since it affects the operation of all of its components. You can get it from the official server of the manufacturer. For example, for D-Link devices this server is ftp.dlink.ru..
Pay attention to the firmware versions:
How to increase the speed of your WiFi network?!
Below I will list the main reasons for the decrease in wireless network bandwidth and possible ways to fix them, which will help 90% of the time.
1. Choosing the fastest standard – 802.11N
Currently in the 2.4 GHz band the fastest wireless standard is 802.11N. All wireless routers manufactured since 2010 are marked as Wireless N150 and Wireless N300, which means that they support this standard and the maximum achievable speed. But here the access device's universal settings play a nasty trick on the user. The thing is that in most cases the standard used is mixed, i.e. 802.11 B/G/N mixed. This is correct, but… the way that a wireless network works is that all devices work with the standard that they support. Take a look at this table here:
In other words, if you connect an old laptop with a G-standard adapter and actively receive and transmit data, then the speed of other devices will also decrease. In some cases even by 60-80%. The way out is either not to connect such devices, or, if possible, connect them via cable.
To achieve maximum speed indicators, all adapters in your home network must work on the Don standard. Therefore, if you have all devices modern and support 802.11 N mode, it is desirable to switch the whole WiFi network to it forcibly. In most cases, this is done using the router's configuration settings in the basic WiFi settings section.
Here is an example for Zyxel Keenetic II:
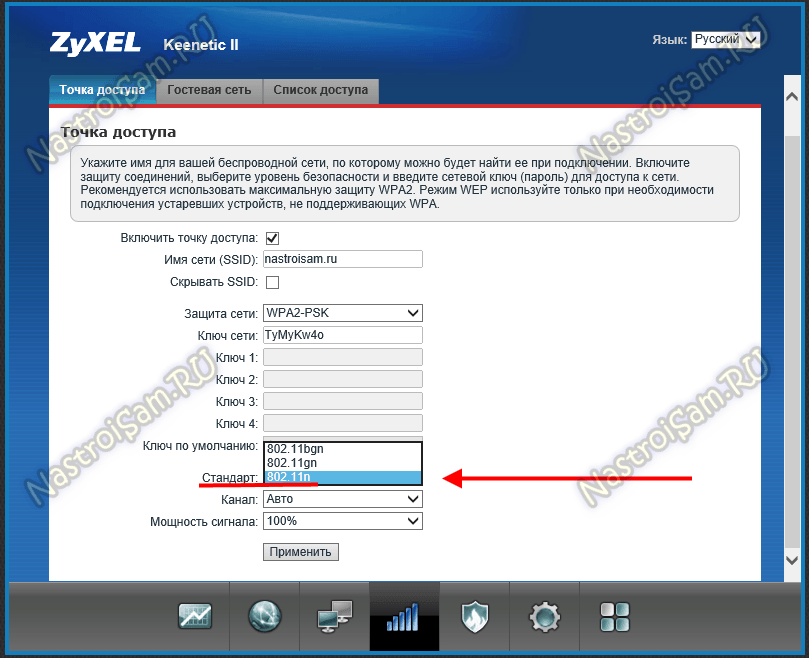
And here is an example for D-Link DIR-300 on the latest firmware versions:
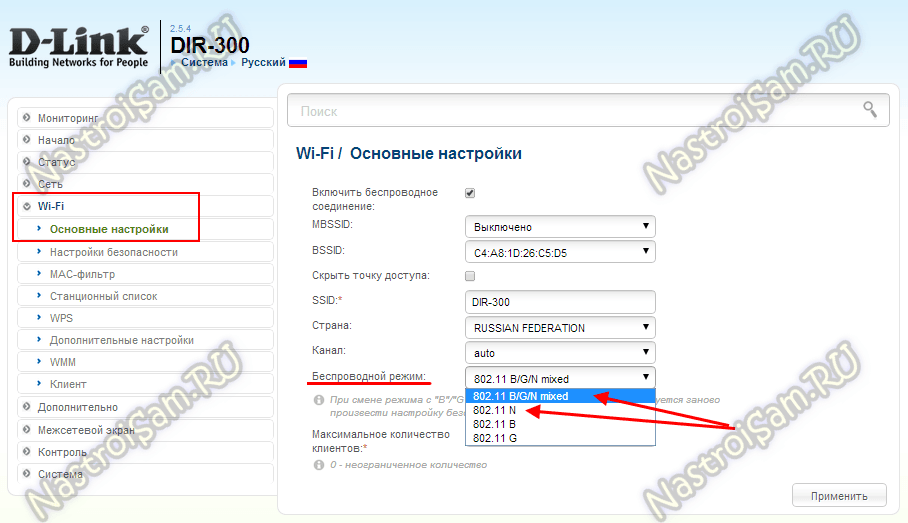
Here you can change the mixed mode to any of the separately supported modes.
On Sagemcom 2804 from Rostelecom, instead of selecting a mode, there is an option to support only 802.11N clients:
Activate WPA2-PSK security technology
Outdated security mode standards overload the router's processor and affect the data transfer rate. This setting is usually set to "Auto".
In the wireless mode settings, set the security settings as shown in the screenshot below:

WPA/WPA2 security – Personal, WPA2/PSK version, AES encryption.
You can disable the security at all. Then your router will not waste time and resources on data encryption, and the speed will increase. You can do this here by selecting "No protection" from the list.

The problem of unauthorized connections in this case is solved by creating a white list of devices. You can do this in the "Protection" – "Access Control" section. Activate the "Access Control" switch and select the "Whitelist" option.

The devices on your network will be shown below. Go even lower. Add the desired devices to the whitelist using the button.

Here you need to specify the MAC address of the device. You can see it in the "Status" tab of the client list.

Now the selected computers and smartphones will connect to your router without a password. Those who are not on the list will not be able to connect to Wi-Fi.
Change the channel width
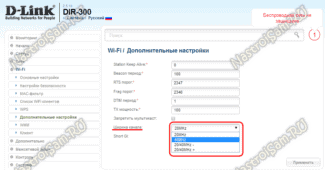
The wider the channel, the higher its bandwidth. In the router settings, the default setting is "Auto". And some users, following the recommendations, choose the maximum width – 40 megahertz. This is correct, but only if you have high internet speeds and a minimum of neighboring networks with which you share the band. In apartment buildings, where you see a list of a dozen routers, you should, on the contrary, reduce the channel width.
In the wireless mode settings, set the channel width to 20 MHz.

Or leave it set to "Auto" if you have few neighbors. But I don't recommend choosing 40 MHz.
Don't hide the SSID

You may have heard that hiding the network name by disabling the SSID in the beacon broadcast can help with security. However, it only hides the network name from casual users. Most devices will show that there is an unnamed network nearby. In addition, anyone with a Wi-Fi analyzer can usually detect the SSID because it will still be present in the control traffic.
Hiding the SSID also causes additional management traffic on the network, such as sample requests and responses. In addition, hidden SSIDs can be confusing and time-consuming for users because they have to manually enter the network name when connecting to Wi-Fi. Therefore, this approach to security can do more harm than good.
A better security method is to use WPA2 and/or WPA3 enterprise mode. If you find that not all devices on the network support enterprise mode or that it is too difficult to set up, be sure to use a long, strong passphrase with mixed case and characters. Also consider changing the password periodically and be sure to change it after any employee quits or loses a Wi-Fi device.
Turn off slower data rates and standards
While today's Wi-Fi devices can support speeds above 1 Gbps, for certain traffic, access points can transmit up to 1 Mbps in the 2.4 GHz band and 6 Mbps in the 5 GHz band. Generally, the farther away you are from the access point, the lower the signal strength and data rate.
However, even if the network coverage and signals themselves are excellent, most access points default to transmitting control traffic or multicast traffic, such as SSID beacons, at a very low rate rather than the maximum rate as when sending normal data. Increasing the access point's minimum or multicast data rate can force control traffic to be sent at a higher rate, effectively reducing overall airtime.
This method can also help devices connect faster automatically to better APs. For example, some devices may not default to looking for another access point to roam until they completely lose the connection to the previous one. This may not happen until the device has moved so far away that signal and data speeds are at the minimum level supported by the AP. So, if you increase the minimum data rate, you basically reduce the maximum coverage area of each access point, but at the same time increase the overall performance of the network.
There is no recommended minimum data rate that all networks should use. This decision depends on, among other things, individual network coverage and the capabilities of the wireless clients. However, keep in mind that by turning off lower data rates, you can effectively turn off support for older wireless standards. For example, if you disable all data rates at 11 Mbps and below, this will prevent 802.11b devices from being used, since the maximum data rate of that standard is 11 Mbps.
Changing wifi channel settings on D Link devices
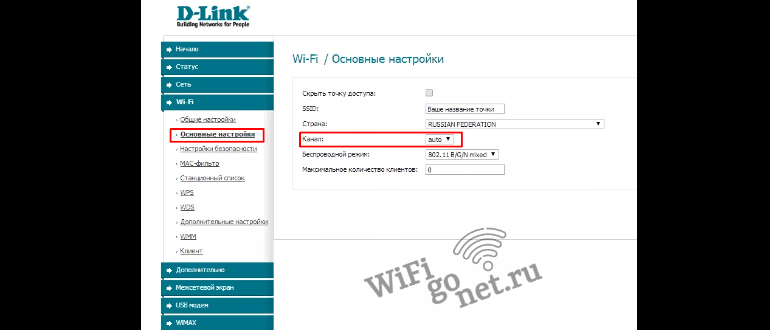
The settings tab of interest is under the "WiFi" menu item in the "General Settings" subsection. The option to change the broadcast frequency is located under the country selection line. After setting the desired value, click "Apply" and then on the red exclamation mark to finally complete the device configuration change.
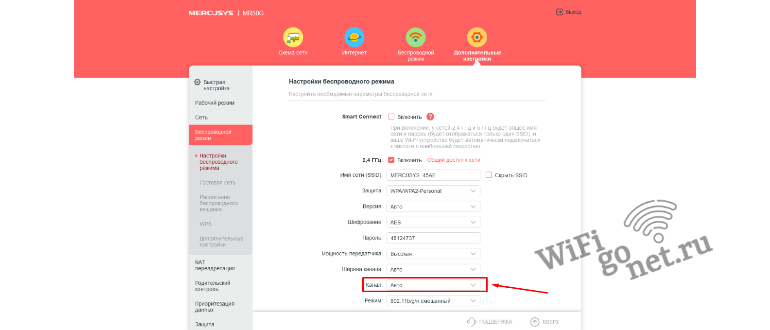
In the web interface enter the section "Wireless mode", located in the tab "Advanced settings" in the upper menu. By default the channel mode is set to automatic. To change it, select the desired value of this parameter in the pop-up window. The router will reboot and the changes will take effect.
Changing the channel in Netis routers

As with other hardware manufacturers, first enter the web control panel and click "Advanced" or "Advanced" for the English version. Before changing the channel on the Netis router, it is recommended to change the default region from the USA to Russia in the wireless connection settings to activate additional frequency selection options. After selecting the desired parameter, the results are saved and the device is rebooted.
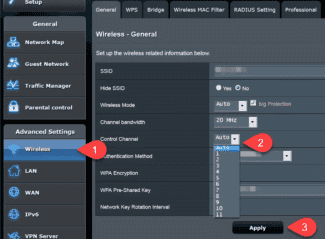
Logging into the administration panel at 192.168.0.1 and authorizing in it, you go to the WiFi settings. Among the icons that appear, select "Channel and Bandwidth". For each of the proposed networks, specify the desired value in the drop-down list. After choosing, click "Save" for the parameters to take effect.
Modification process
To change any router settings, you will need to connect to its web client. If the device is already set up and functioning properly, you'll be able to do this directly through the wireless network. Otherwise, you will have to use the RJ-45 cable that comes with the device. The base address for the connection is 192.168.0.1, and as an alternative a similar combination of characters can be used, in which zero is replaced by one. This address is valid for 90% of devices – if entering it in the browser line does not work, you need to find the correct combination in the instructions.

The login and password can be customized by the router user, but by default you need to enter the word admin in both lines to access any device. Once you have access to the web client, find the menu tab that allows you to change the Wi-Fi channel. In many Russified interfaces it is called "Wireless Network", but you may also find the following options:
Usually such tabs contain many settings, so you will need to select from them two items that allow you to set the desired Wi-Fi channel. Just focus on the words "channel" or "Channel" to find a drop-down list with numbers and one box-switch where you can check the box. The list sets the number of the channel, but the switch is designed to select the automatic mode of the router. After selecting a channel, you only need to reboot the device using the system settings tab.
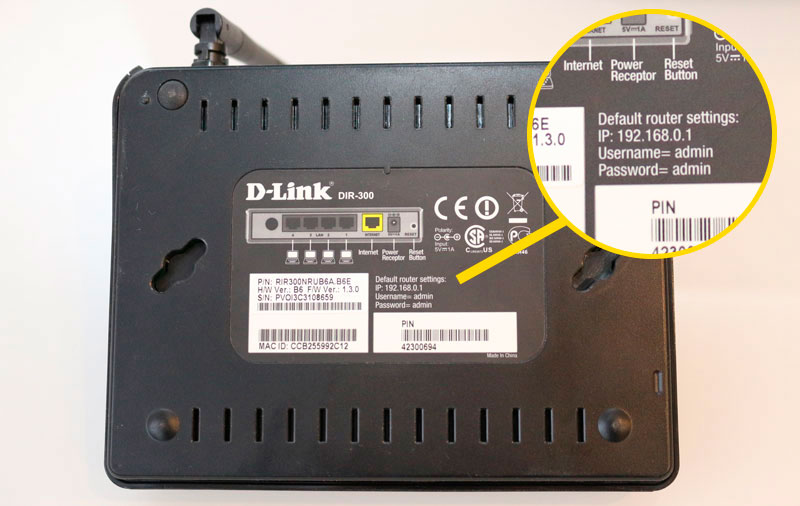
The instructions for different manufacturers of network equipment are slightly different, as well as the web interface of individual models of the same brand. Let's take a closer look at how to get to the router's parameters using certain brands as an example.
Channels selection
It's logical to assume that randomly selecting a wireless network channel won't produce a good result – so you should approach router setup with some preparation in advance. Of course, you can always bypass your neighbors and agree with them to use strictly defined channels, but such an approach would be irrational. In a multi-storey office or residential building you may need to check 30-40 routers whose coverage areas overlap with the effective radio transmission radius of your device.
In order to understand which wireless channel to choose, it is necessary to use special applications. Among the most effective and understandable programs should be noted:
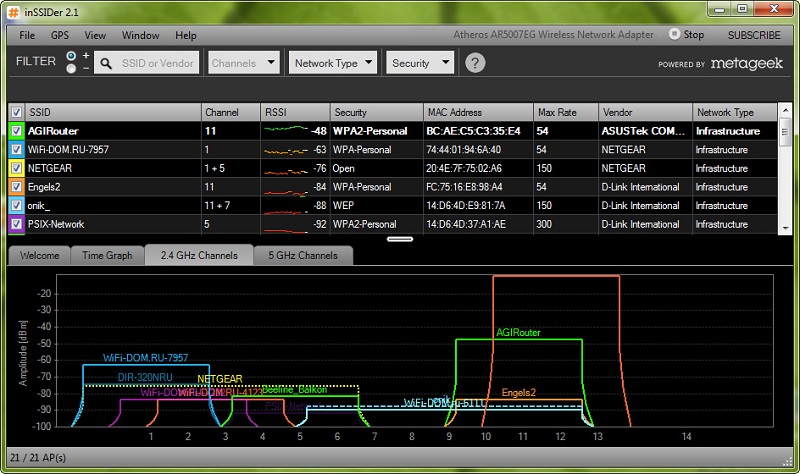
The interfaces of the above applications are different, but all have a function of viewing channels, which will help you find the frequency that is loaded the least, compared to the others. Having found a free Wi-Fi channel, set the appropriate value in your router, using the right menu item of the web-client.
Now it's time to talk about automatic selection of Wi-Fi channels. Most routers use exactly this option in the factory settings. It allows not wasting time in selecting channels with a special program – the router will automatically scan the frequencies and choose the least loaded ones among them to provide the maximum speed of the wireless network. It is highly recommended to enable this option for novice users.
However, master users prefer to manually select the best-performing Wi-Fi channels, which provides an important advantage. In automatic mode, the router spends some of the bandwidth of its antenna to scan free frequencies and determine the least busy of them. In addition, practice shows that its choice is not always optimal, since there may be inconsistently working devices, which also create a lot of interference. Therefore, setting the frequency manually will increase the bandwidth of the wireless network.
Read More:
