Sometimes, you may experience connectivity problems with your WiFi connection due to the fact that the wrong channel is selected for operation. In this case, restarting the router may help. However, in some cases this does not help. To establish a wireless connection, you need to figure out what happens, which channel to choose for WiFi, 5 GHz or 2.4 GHz, and what you need to do to specify it in the settings. How to do this correctly will be explained in more detail in this article.
- What's the best wi-fi channel width to choose for home Internet 20 or 40
- How much bandwidth to set
- Characteristics of channel selection modes
- Select a free wireless channel on the router
- D-Link .
- TP-Link
- How to find out the free Wi-Fi channel
- Changing the channel on the router
- TP-Link
- D-Link
- How to increase WiFi speeds by selecting the right channel
- Choosing the optimal Wi-Fi channel on the router
- Changing the Wi-Fi network channel on different routers: step-by-step instructions
- How to change the Wi-Fi channel on Tp-Link
- How to change the channel on the Wi-Fi router D-Link
- Frequent problems when changing the wireless network channel and their solution
- How to change the channel on a specific router: step by step instructions
- TP-Link
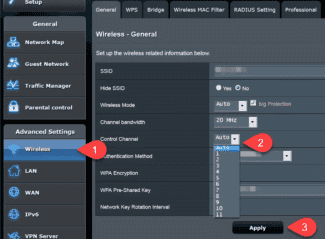
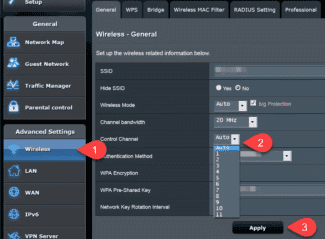
- ASUS
- Useful Tips
What's the best wi-fi channel width to choose for home Internet 20 or 40
Wireless computer networks have firmly entered the life of modern man. The desire of an ordinary user to independently create a local network connection and properly configure it is natural and understandable, but each step in the configuration must be conscious. It is necessary to understand what leads to a change in one or another component of the Wi-Fi signal, what it can improve or deteriorate. One of these parameters, which directly affects the reliability of Wi-Fi, is devoted to this review.
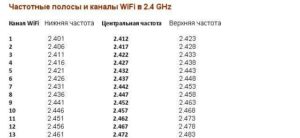
The channel width is the bandwidth from the lower boundary to the upper boundary. So, for the 2.4 GHz channel 5 standard with a center frequency of 2432 MHz (2.432 GHz), the lower bound of the band is set at 2421 MHz and the upper bound is 2.443 MHz. Thus, the bandwidth is 21 (conventionally, 20) megahertz. The standard range provides several discrete bandwidths from 10 to 160 MHz. Household networks use 20 or 40 MHz bands. For a practical understanding of this value, an analogy to vehicular traffic is often given. If there is a highway with 20 lanes, half as many cars can drive on it at the same time as on a highway with 40 lanes. Consequently, with a frequency bandwidth of 40 MHz, the channel can work with more devices than the narrower 20-MHz channel.

Important! In most cases, the router sets the channel number automatically.
How much bandwidth to set
It would seem that the Wi-Fi bandwidth of 40 MHz is clearly better, and you can forget about the 20 MHz when configuring the router. In fact, it's not that simple:
- A wider frequency band is more susceptible to interference, reducing the stability of the connection, especially if the signal strength is low. For example, from wireless devices that have become part of our everyday lives. To use an analogy with the freeway: a wide road that takes up more space is easier for unauthorized vehicles that do not recognize the established rules;
- a wider signal in turn increases the likelihood of crosstalk from other devices;
- there may be conflicts with Wi-Fi installed in the neighboring premises. An analogy: neighbors have built their own highway, without coordinating with anyone the plan of its laying (Wi-Fi channel choice), and it crosses other highways in random places. The wider is the lane (the width of the highway), the higher is the probability of such a conflict.
Characteristics of channel selection modes
What is the mode of all routers? Routers are most often initially set to automatic channel selection settings In most cases, the router's operation under these conditions is perfectly acceptable. However, there are situations when it is necessary to change the channel manually and enter the necessary data.
This is what the TP-Link router settings (automatic) look like:

In the highlighted line, you can change the automatic mode to manual. To do this, simply change the value of the section "Channel".
This choice of channel is necessary when there are many networks in the house and access points are too close to each other.
If you have the problems mentioned above, you should probably set up a manual channel selection. That way you can find a free channel and adjust the router's operation.
It should also be remembered that problems with wireless networks can occur for a variety of reasons. Before touching the router's settings, you should:
Select a free wireless channel on the router
Whichever router is used, the algorithm for setting the necessary and free channel on the router is the same for all. Setting up the selected channel will take a little time. For this you need to know:
You will find this information either in the router's manual or on the label/box of the router itself. You can find instructions on our website on how to get into the router settings. Now consider the choice of the wireless channel on the example of various routers.
D-Link .
Let's take DIR-300 NRU as an example to change the wifi channel frequency. The first thing you have to do is to enter the settings of the router D-Link.
1. Enter the SETUP section.
2. Select the subsection on the left – Wireless Setup.
Click on the Manual Wireless Connection Setup button, which will help you change the way you set up Wi-Fi.

4. Under Wireless Network Settings, look for Wireless Channel and select the desired channel.
5. To save the changes to the settings, click Save Settings.
6. Wait a few minutes, disconnect the device from the network and reconnect to Wi-Fi.

TP-Link
Let's take the TL-WR941N as an example to change the frequency of the wifi channel. The first thing you will need to do is go into the TP-Link router settings.
1. Go into the Wireless section. Automatically opens the subsection Wireless Settings. Go into this subsection.
2. Search for the Channel item and select the number of the channel we need.
3. To save the change press Save. Only then will the changes take effect.
4. Disconnect from the network, and after a couple of minutes reconnect to Wi-Fi.
How to find out the free Wi-Fi channel
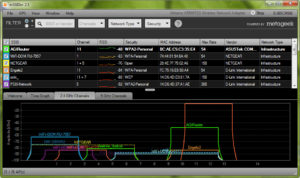
To find a free channel and change it, you need to use software tools. The most famous of them is inSSIDer. The application is free only for the Home version. It is recommended to download it from the website and then run. The precondition for the work of the program is the presence of a wi-fi adapter at the workstation. In laptops it is built-in, and for PCs it is purchased additionally.
- After launching the software, go to the Network tab. All available wi-fi connections will be displayed there. The connection used by the client is marked with an asterisk.
- The Channel column shows the numbers used by each wireless device. Look through them carefully and select a rarely encountered number.
- Next, go into the router's configuration. In the "Wireless network" section, set the value manually to the desired channel.
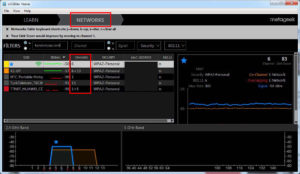
If the Channel column has values such as 1+5, it means that the user changed one of them manually, and the other was selected automatically by the network device.
Separately, it is worth noting that routers never use three digits: 1, 6, 11. They are always free.
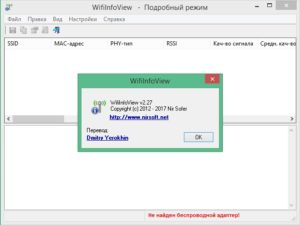
An alternative to the above program is the WifiInfoView utility, which is an archive. After unpacking it, run the program.
The principle of action is similar to InSSIDer. Except that WifiInfoView displays detailed information about each wireless network. Once it starts, it will scan your surroundings and display a list of available connections with the distance to each of them. Thus, it is quite realistic to find the least busy wi-fi network to connect to.
Changing the channel on the router
Now let's look at how to change the home router channel from different manufacturers of network devices. There are several main ones: TP-Link, D-Link, Asus, Zyxel and Huawei.
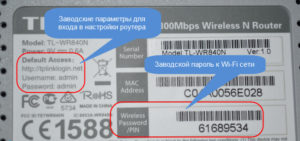
In order to change the parameter you have to enter the web interface of the equipment via your browser. The router usually has its IP address and login and password. If for some reason they are not there, it is recommended to visit the official site and find the model in question. The instructions on the portal will tell you in detail how to enter the router's administration panel and change the value in the Channel field.
TP-Link
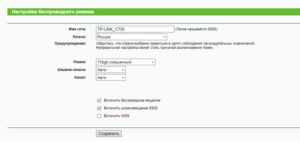
To change the wi-fi channel on the tp-link router, you need to go through the web interface to the Wireless section, or in Russian – "Wireless network":
By default, the value in the Channel field is "Auto". Using the above program, you must find the currently free number. After that change the status "Auto" to the found value, press "Save" button. Then you need to restart the equipment for the changes to apply.
D-Link
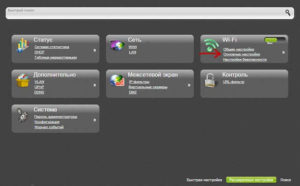
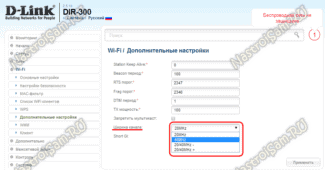
To change the channel on the router from the manufacturer D-Link, you need to enter the menu Wi-Fi – "Basic settings". The item "Advanced settings" should be green at the bottom:
Then select the field "Channel", change the value based on the program InSSIDer. Press the "Save" button to remember the configuration change. It will be necessary to reboot the device to switch the wireless module to the new settings.
How to increase WiFi speeds by selecting the right channel
Various reasons can affect the speed of the wireless connection, one of them is the wrong choice of WiFi router channel, 5 GHz or 2.4 GHz.
When using home WiFi, you need to take into account that most users among the neighbors choose the default channel for the router. Therefore, it is usually the case that there are many users on some of them and few or no users on others. The more routers use the same frequency, the worse their communication becomes.
In this situation, it is possible to improve the quality of communication by selecting the frequency range where there is the least interference. To do this, you need to know which are the most and which are the least used. This can be done by using a specialized application.
For example, you can download from the Internet and run the program Acrylic Wi-Fi Home. It is free for personal use.
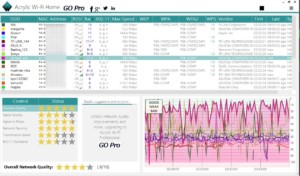
It shows you information about the wireless networks that are currently available. Using the application you can see data on all available networks, by selecting one of them in the lower right part of the window, you can see the main performance characteristics of this WiFi network. At the bottom right of the screen there is a graph that contains information about the level of channel load.
Now you need to find which one is more free, go into the router settings and set it.
Choosing the optimal Wi-Fi channel on the router
In most cases, the router is able to automatically select the fastest option. However, it is able to cope not in all situations. The situation when it is necessary to select the desired frequency range by yourself, as a rule, occurs in the following cases:
- At some point, there is a sudden drop in the speed of the Internet connection.
- There are a large number of different devices using WiFi connection. They use channels that have been randomly selected and interfere with each other.
- If a high-quality and powerful router is used, but there is no way to connect to it from a few meters away.
In all of the above cases, the most likely cause is that several devices are occupying the same or overlapping frequency slots, which adversely affects the speed of access to the Internet.
To find the least busy channel, you can use one of the specialized applications. There are programs for this on your computer, but you can, for example, use an Android app. For this task, the WiFi Analyzer is a good choice.
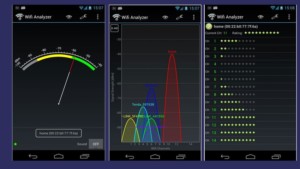
Once you run it, you will see a list of available options. In the list displayed, you will see a row of stars next to each one. The more of them, the better the quality of communication on this channel will be.
Changing the Wi-Fi network channel on different routers: step-by-step instructions
After performing the above manipulations, you can move on to changing the channel. The procedure will differ depending on the specific model of the device. The following are instructions for the most common routers.
How to change the Wi-Fi channel on Tp-Link
One of the most common models of Wi-Fi routers on the Russian market. It has a simple and straightforward interface, it is easy to configure even after resetting to factory parameters.
You can change the Wi-Fi channel on this device in a few steps:
- Go to the web interface of the device according to the above described scheme.
- In the options column on the left side of the menu, find the "Advanced settings" section and click on it with the left mouse button.
- Expand the "Wireless Mode" subsection.
- In the central part of the window, find the "Channel" option and click the arrow next to it to expand the list of available slots.
- Select any channel. The default setting is "Auto".
- Click the Save button at the bottom of the web interface to apply the changes.
- Reboot the router and check the Internet speed. You can compare your results with previous ones at https://www.speedtest.net/ru.
This way you can choose the best channel by switching slots one by one. However, if you use one of the programs discussed above, you can quickly find a free slot and specify it in the transmitter parameters.
Note! The names of the tabs on the router's official website may slightly differ from the ones presented above.

How to change the channel on the Wi-Fi router D-Link
On these routers, changing the Wi-Fi channel is done as follows:
Frequent problems when changing the wireless network channel and their solution
With the change of the Wi-Fi connection channel, a number of problems can arise that require immediate elimination. For example:
- Lack of Internet. After changing the channel the network may be completely gone. In this case you need to install another slot. If there is no result, it is recommended to re-enter the login and password in the web interface of the device, issued by your ISP.
- The router has stopped distributing Internet to other gadgets. This problem indicates a momentary system failure which can be solved after rebooting the router. It's also possible that the user accidentally changed the guest network settings while changing the channel. To correct this situation you need to set the settings back.
- Internet periodically crashes while working. This problem indicates that the user has selected an unsuitable channel. You should try another slot. Often such a problem occurs on the ISP side. In this case, it is better to contact the operator or wait for the problem to be fixed.
- The transmitter has stopped functioning. If after changing the type of data transmission the device does not provide the computer with the Internet, and all the LEDs on it are lit simultaneously, it is necessary to reset the router to the factory settings. This procedure can be done through the menu of the web interface of the device or by holding down a special button on its body.
- The transmitter automatically sets the wrong region. The country can be changed in the router settings. For many users the region is not important.
Important! After resetting the device will have to be reconfigured via the web-interface. If you can't fix the problem which occurred after changing the channel, you can ask for help from the technical support specialist of the provider company.

How to change the channel on a specific router: step by step instructions
Regardless of the type of hardware used, debugging the free bandwidth is performed according to a conventionally uniform algorithm. In this case, the user must know in advance the IP address of the device and its password.
TP-Link
The devices are widespread in the country, but their interface for the inexperienced user looks complicated and confusing. Which channel on this router is better to choose for Wi-Fi:
- After going into the settings of the device, open the tab "additional adjustment", located at the top of the display.
- Among the information find the block "wireless mode", open the subsection "debugging".
- In the window that appears on the screen look for the "Wi-Fi channel" parameter and choose one of the suggested slots.
- Complete the adjustment by pressing the "save" button – after that the changes made will take effect.
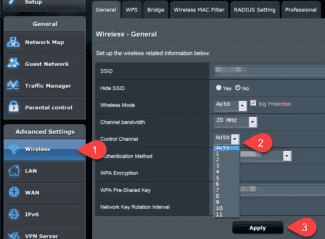
Old routers require a slightly different approach. The algorithm of actions includes:
Important! Any changes made to the hardware interface must be saved. Otherwise, the user will have to go through all the steps all over again.

ASUS
Adjusting the operation of the specified type of devices is practically the same as working with equipment that has a standard debugging design. There are no problems with changing the working slot, even for beginners.
- After going to the adjustment subsection, find the inscription "additional debugging" on the left side of the screen.
- Open the sub-item "wireless connections".
- In the opened properties search for "channels" and select an unoccupied slot.
Confirm the changes made by pressing the "apply" button. The system will automatically save the settings entered by the user.

Useful Tips
Most of the problems users have are caused by inability to enter the hardware interface. The standard data for all devices (login and password) is "admin". If the owner has changed the factory settings and forgotten them, the issue is solved by hardware restart of the router. After that it will go back to the original values.
Trying to study the devices leads to questions: short gi Wi-Fi what is it and what is it for. By short security interval is meant the interval between the transmission of data packets (from the device and back to it). So it is sgi Wi-Fi: routers function at the standard values of 800 ns. When the functionality is activated, the interval between Wi-Fi signals is halved and information is transmitted faster. So it sounds in theory, but in practice the speed figures fall due to possible failures and interference on the line.
Important! Interference and signal attenuation occur under the influence of other radio frequency sources, including neighboring routers.
To adjust the equipment (to find non-crossing lanes), you need to do some experiments, turn on the specified function and look at the indicators of Internet speed. If they will be extremely low, then the problem lies in the devices working nearby and the signal clogged them.
The router automatically looks for the fastest options, but it fails in all situations. Problems occur:
- When the Internet connection speed drops drastically.
- If there are a large number of devices registered on the line. They use randomly matched bands, interfering with each other to function stably.
- When using powerful equipment, but not being able to connect at a distance.
Any of the above options requires manual reconnection of the channel connection. You can use any of the computer utilities or use the analyzer on your mobile device.
Read More:
