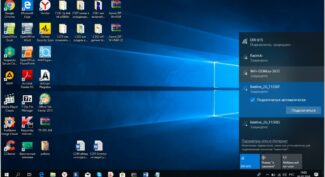
Click on IPv4 and click on "Properties" under the list
- How to connect a router to your computer: the most complete instruction
- Installing
- Connecting the computer to the router
- Method 2: Wireless connection
- Connecting the devices
- Router Setup
- Setting up the TV with a wired connection directly or via a router
- How to configure the TV with "Dynamic IP"
- How to set a static IP and DNS on your TV
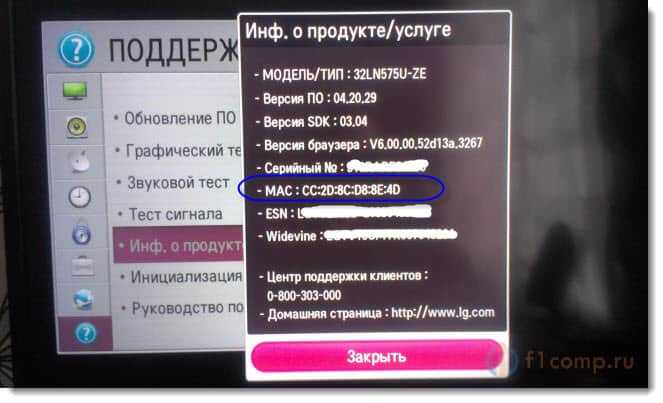
- How to know the MAC address of your TV
- Where are your router settings: logging into the web shell
- How to change your router settings password
- Configuration via the built-in wizard in the web interface – suitable for beginners
- How to connect a router to another router
- Possible problems: what to do if the computer does not see the router
- Connecting directly via network cable from your provider
- Set static IP and DNS on the TV
- A simple algorithm to configure the router
- Setting up a new router via cable
- Possible errors when configuring and connecting the router
How to connect a router to your computer: the most complete instruction

Hi! Today I'm going to show you how to connect a Wi-Fi router to anything in your house. But in the simplest case, let's start with a computer – it is often used that way, and it is more convenient to configure on a computer than on a phone. There's no particular difference in the wired connection between a computer and a laptop – everything is the same. Let's get started.
Dear reader! Do you have any questions? Do not know how to solve your problem? Below this article has comments – write your story in all the details, and I will give you the answer.
The connection algorithm of the router of any model is the same – you will not have any questions. Another thing is the internal settings of the router, which change from model to model. For the details of the configuration I recommend to look for the appropriate article for your router on our website. This article will be about the process of connection with little reference to the further steps.
Installing
So, you unpacked the new router, it's time to find a place for it in the house. Unfortunately, the range of the router is limited, so the best option for its installation is to place it in the middle of the apartment:
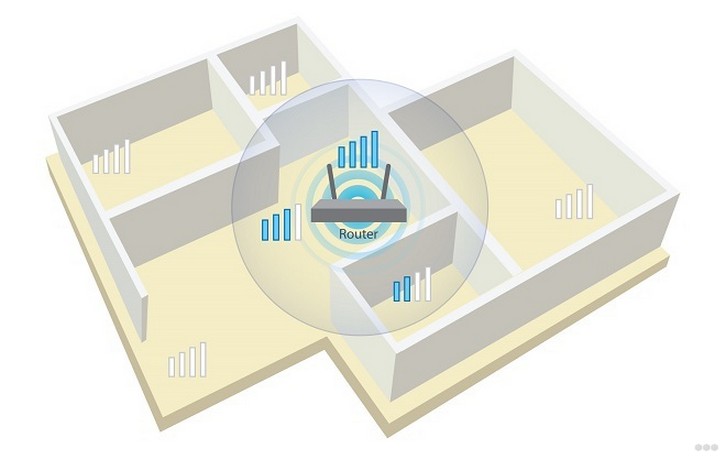
If you have one room – no problem. But if you have many – you put a router and walk around the apartment with your laptop or phone, measuring the signal strength so that there is enough signal everywhere. Choose the best spot, and there will be less hassle later on.
Another problem is to place so that the ISP's cable can reach your router without damaging the apartment. Usually when laying the Internet master can immediately tell you where to pull the wire – this is done just for better signal coverage at home. But if it is already there, you will have to adjust to it.
In addition, you may need at this stage "assembly" of the router – often the antennas are unscrewed, and it would be necessary to screw them in.
Connecting the computer to the router
So, try to perform not a very complicated operation – to connect your computer to the router. Even a novice user should be able to do it. The sequence of steps and logical approach will help us in solving the problem.
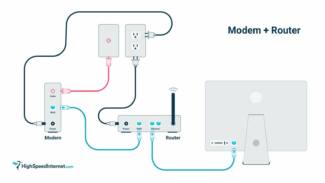
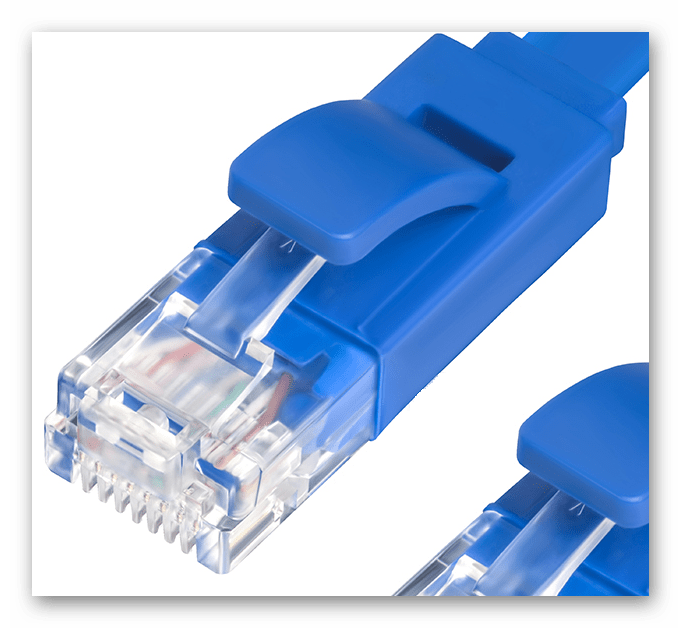
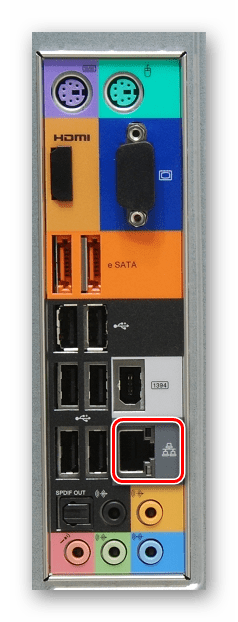
The easiest way to connect your PC to the router is to use a patch cord. In the same way you can pull a wired connection from the router to the laptop. Please note that any manipulation with wires is done only when the devices are disconnected from the network.
-
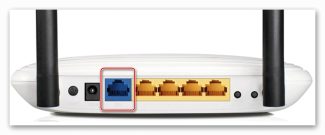
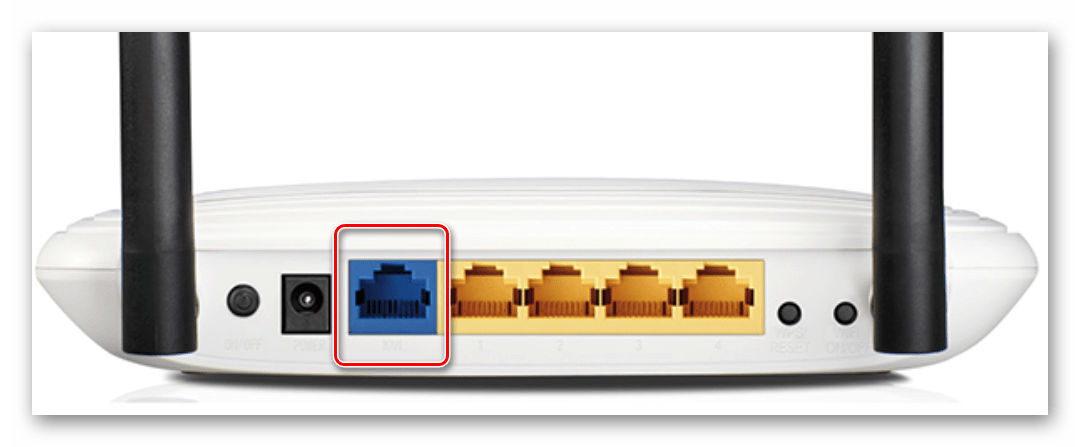
Install the router in a convenient place, on the back of the device find the WAN port, which is usually marked in blue. We plug into it the cable of your Internet service provider's network, which is installed in the room. When installing the connector into the socket, you should hear the characteristic click sound.



Method 2: Wireless connection
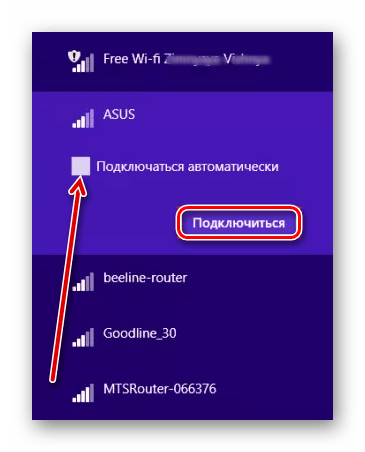
Perhaps you do not want to spoil the appearance of the room with all sorts of wires, then you can use another way to connect your computer to the router – through a Wi-Fi network. Some models of motherboards are equipped with a wireless module. In other cases, you need to buy and install a special card in the slot PCI computer or plug into any USB-port of the PC so-called Wi-Fi modem. Laptops have a Wi-Fi access module by default.

- Install the external or internal Wi-Fi adapter in the computer, switch on the PC and wait for the device drivers to be installed.
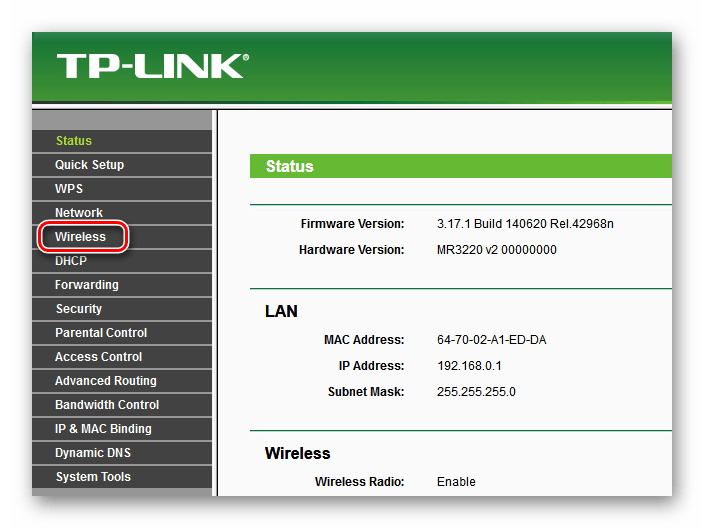
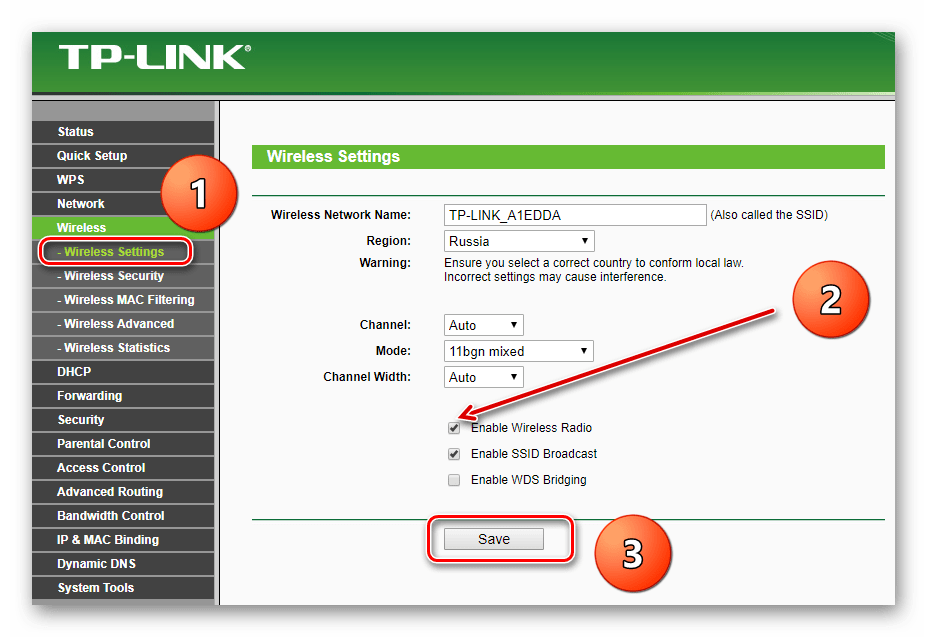
- Now you need to configure the wireless network configuration by entering the router settings. Open any Internet browser, in the address bar write: 192.168.0.1 or 192.168.1.1 (other addresses are possible, see manual) and press Enter.



Connecting the devices
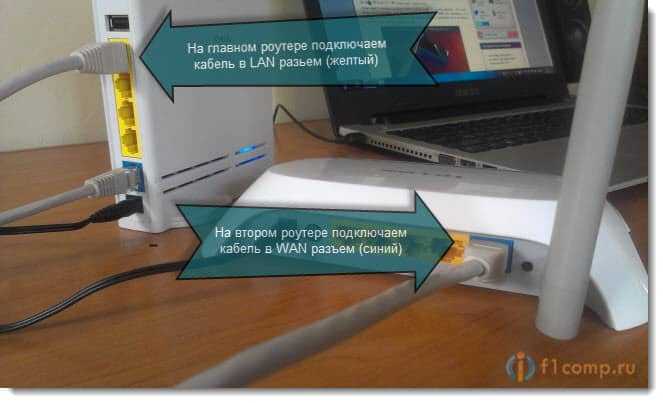
Connect one end of the cable to the master router (from which we will take the Internet). Connect in LAN socket, it is yellow .
Connect the second connector to the second device on the WAN socket, it's blue.
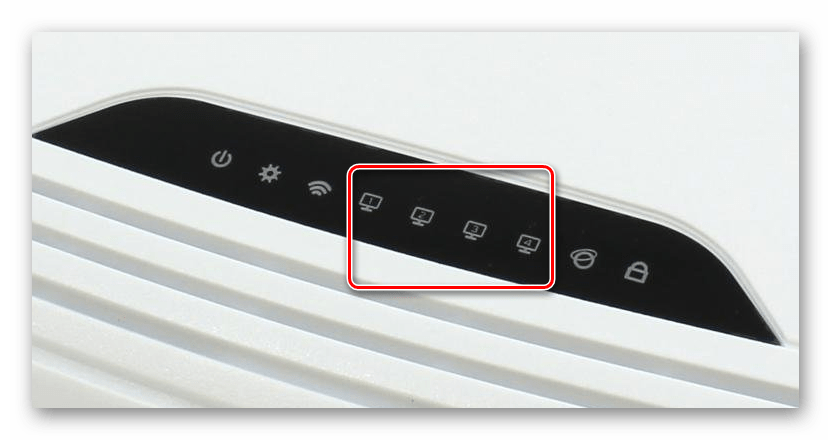
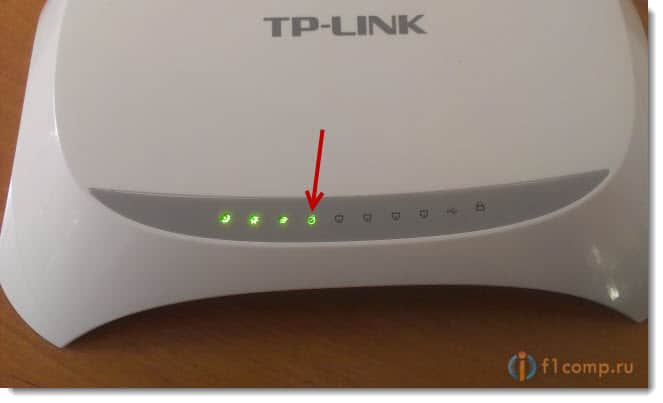
On the first device should light up the LAN connection indicator (computer icon, usually one of the four). And on the second router should light up the WAN connection indicator. It's like this:
Router Setup
As I wrote above, the main device does not need to configure (but if our scheme does not work, you can check the settings) .
On the second device there is almost nothing to configure. Just make sure that it is set to receive IP automatically. On TP-Link, it is done as follows:
Go into the router's settings and click on the Network — WAN.
Make sure that you have WAN Connection Type must be set to Dynamic IP. If not, set it.
If you have done everything correctly, you should see an IP Address, Subnet Mask, and Default Gateway (like I did in the screenshot below). That means that the connection to the master router is established and everything should work.

Don't forget to configure the wireless settings on the Wireless and set the Wi-Fi password on the Wireless Security.
If you have other devices, there is nothing wrong with that. You do everything the same way, there may only be differences in the control panel.
Setting up the TV with a wired connection directly or via a router
After the physical connection, you need to configure the TV to receive an Internet signal.
How to configure the TV with "Dynamic IP"
If you have "Dynamic IP", the Internet on your TV will be set up automatically when the cable is connected. This will be indicated by a message on the screen "Wired network connection established". If the message does not appear and the Internet does not work, go to manual debugging (using Samsung Smart TV as an example):
- Go to the device menu. Select the "Network" block.
- Open the item with the network settings.
- For the "Network Type" parameter, select the cable connection.
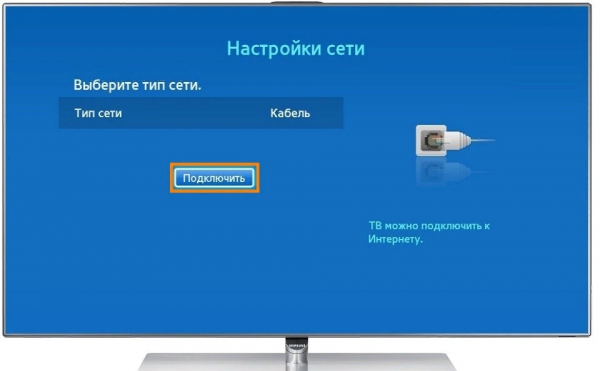
Click on "Connect" to establish the connection
For TVs from other manufacturers, the setup principle is the same, but there will be a different interface. Some sections may have the same name. Most importantly, find the block with the network or network connection settings (usually marked with a globe). In LG, for example, you need to first click on "Set up connection", then on "Manually configure". After that, select the wired connection.
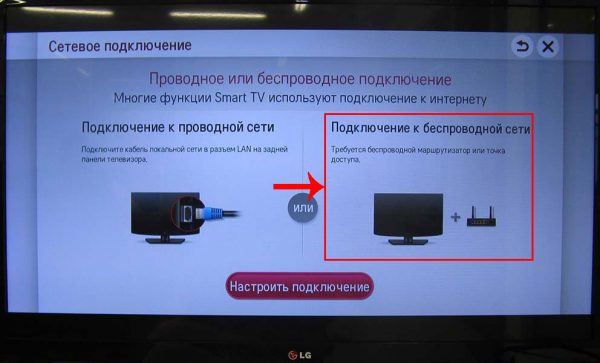
How to set a static IP and DNS on your TV
If you connect the Internet directly and use the protocol "Static IP", after the basic TV setup (which was explained in the previous section) you must enter in the TV settings the data from the contract: IP-address, DNS addresses. Where to write them:
- After the basic wired connection setup, go to "Connection Status" (Status).
- Then click on IP Settings.
How to know the MAC address of your TV
Your direct connection may not work if your ISP uses a MAC binding. The provider has the MAC of the device (its physical number) to which the Internet (your router, PC) was previously connected. Now you've decided to change the device, so the ISP must be told the new MAC – your TV, so that the company now delivers the Internet to that device, too.
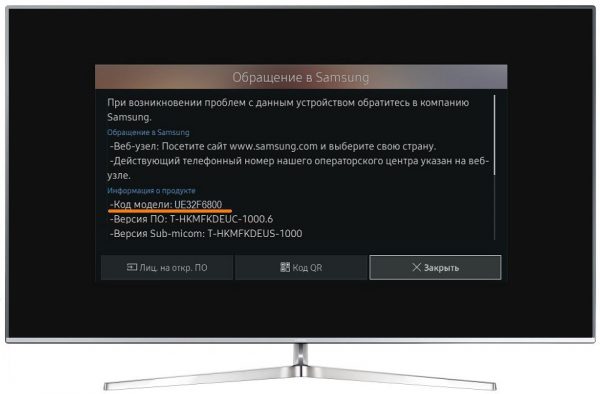
How do you find out the MAC address of your TV? This unique code is, of course, found in the TV's documentation. Or you can see the address on the screen of the device itself. If you have a Samsung, go to "Support", under "Product Info" there will be a "Model Code". This is the MAC of your TV.
Where are your router settings: logging into the web shell
The connection between your PC and the router is established and set up – it's time to go into the router settings. Now and in the following instructions we will use the router D-Link DIR-300 as an example:
-
Copy with Ctrl + C one of the local addresses: 192.168.0.1 or 192.168.1.1. In a new tab on any PC browser, paste it into the line at the top and press "Enter". We gave two addresses, as only one of them will work for your router.
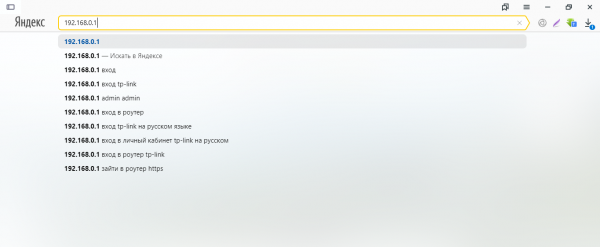
Your router's interface can be located at one of these addresses: 192.168.0.1 or 192.168.1.1
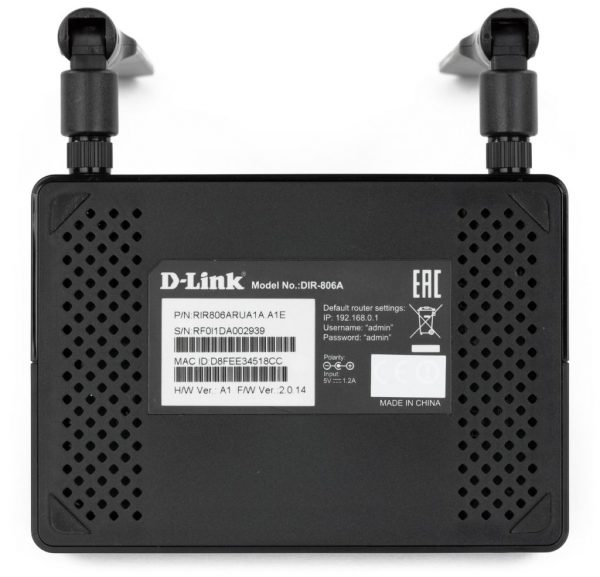
Read the label on your router carefully
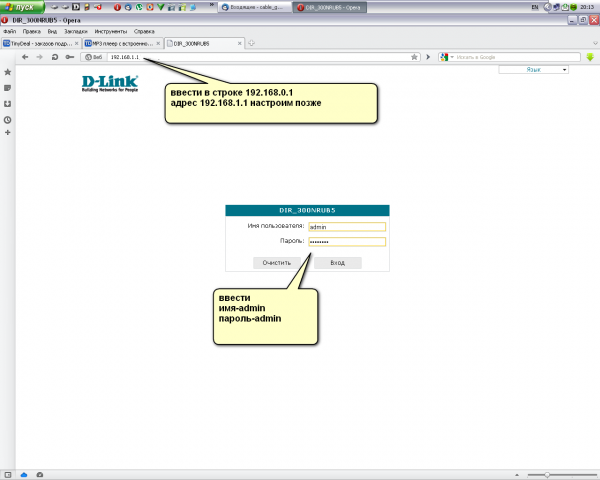
Use admin as your login and password to enter the router settings
How to change your router settings password
Change the password so that no one but you can log in to the web interface and change your network settings:
- After logging in, you'll likely see a message in the interface prompting you to put a new password on the web interface. Agree to the change.
- If there is no message, go to Advanced Settings (bottom right panel). On the System tile, click on Administrator Password.
Configuration via the built-in wizard in the web interface – suitable for beginners
Web-based router shells usually have quick setup wizards that ask you to specify only the most important settings. If you're a novice user, use such a wizard. Let's take the D-Link shell again as an example:
-
In the Quick Setup tab. Click the link on the "Network" tile.
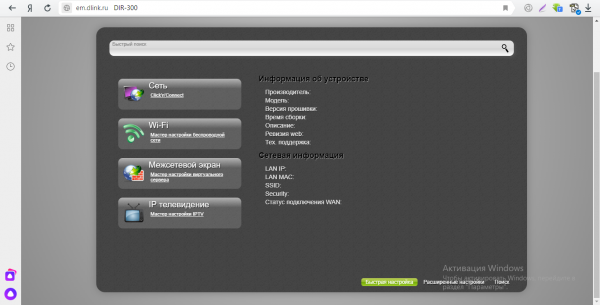
Open the "Quick Setup" section, and in it, the "Network" block.

Correctly specify the type of connection your ISP uses
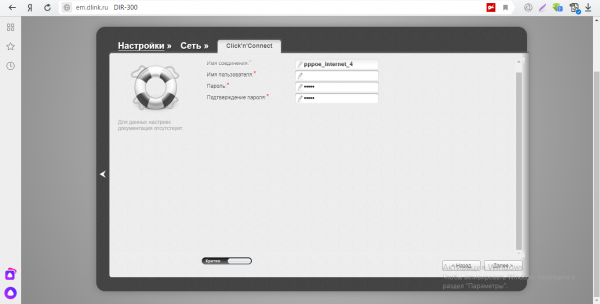
To enable the router to log into your ISP's network, write the authorization information from your contract
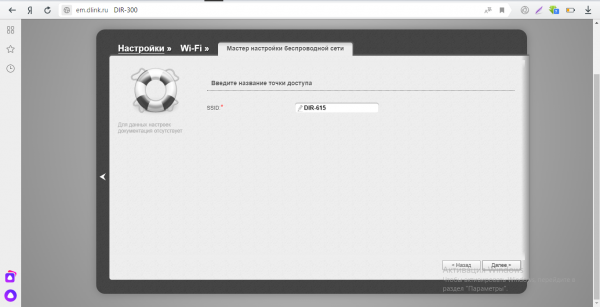
Type in the network name or leave the default name
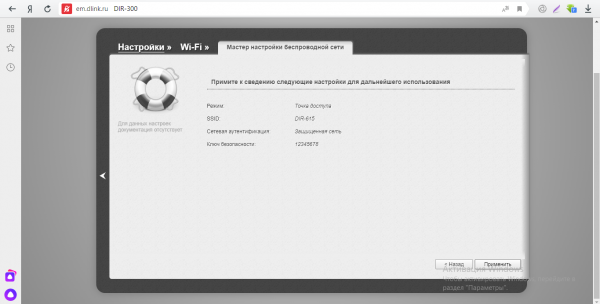
Apply the changes you just made to the access point settings
How to connect a router to another router
For office space and large houses, it is the practice to create a network from more than one router. In this way, the area covered and signal quality increases many times over, and the cost of pulling wires is reduced.
There are two ways to connect two routers into one network: wired and wireless.
The first one is simple: you take a cable, plug it into the socket of the router that is giving out, and put the other end of it into the receiving socket of the second router. No additional settings are needed in this case, both devices just do their job, receive and distribute traffic.
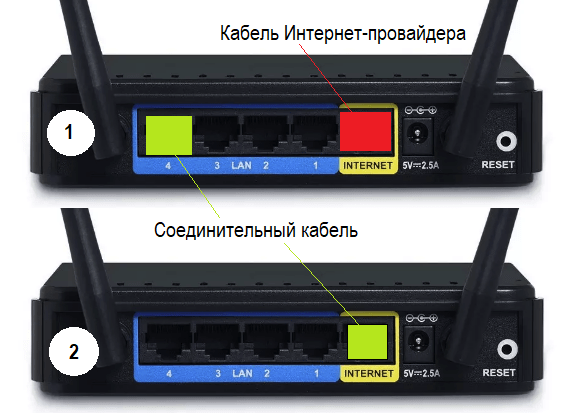
To distribute the Internet between two routers, take the connecting cable out of the distribution port of the main router and plug it into the receiving slot of the client router.
However, the wireless connection requires a little digging in the settings of the web interface to get the proper result. The settings on all routers are about the same, so here's a rough guide.
- In the address bar of the browser enter the address of the router's admin panel, which is indicated on the sticker of the router, and enter into its settings.
- Open "Settings", "Wireless Mode", Wi-Fi.

Using the authentication label on the router, open its settings

In the wireless settings, set it to "Client" or WDS
Possible problems: what to do if the computer does not see the router
All possible problems with connections to the router can be summarized in two main reasons: physical failure of the connection cable or the router itself, as well as software failure of the router or the computer's network card.
There is only one way to check the physical causes at home without special equipment and skills. You need to try to connect the router to another computer and preferably use a different cable. This way you can quite easily find the root cause of the problem, as there are only three links: the router, the cable (if using a wired connection) or the computer's network card. If the other computer was able to detect the network and the router without any problems, then the problem is in the network card driver or Wi-Fi adapter of the first PC. If the problem is similar on two computers, you need to contact the service center or your ISP to explain the reasons with the router not working.
But if during the diagnostics it was found that the cause is in the computer, you need to do three things:
Now there are more than enough Wi-Fi adapters and external network cards to do without repair and internal replacement of these devices.
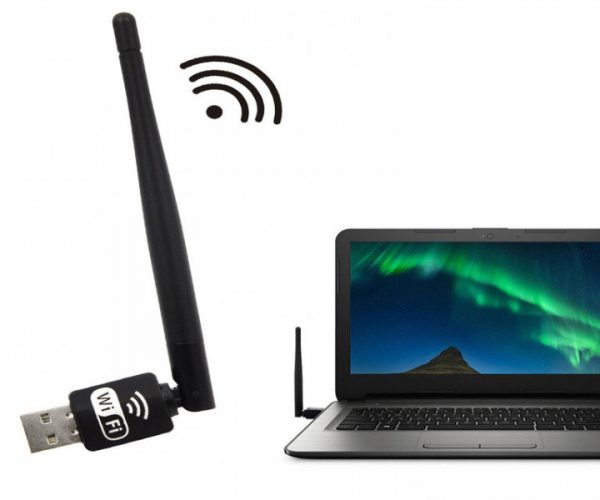
In the case of a hardware malfunction, you can do without repair with additional equipment
Connecting the router to the receiving Internet device is very simple. It is only necessary to use one of the possible methods. At the same time connection errors are very rare and very easy to solve.
Connecting directly via network cable from your provider
This is basically the same as the previous method. If your ISP uses "Dynamic IP" (ask the support for details) you just connect the cable to the TV and everything will work.
But if your provider uses PPPoE, then here it is a little more complicated. For example, on my LG 32LN575U there is no way to configure such a connection. There is only one option here, to install a router and raise the connection on it. And then you can connect the TV with a cable or via Wi-Fi.
But as far as I know, some Samsung TVs, for example, are capable of raising the PPPoE connection. See the specifications, check with the manufacturer.
Set static IP and DNS on the TV
It is possible that you need to set static IP and DNS (ISP can also use this technology), this can be done. I show you how 🙂 .
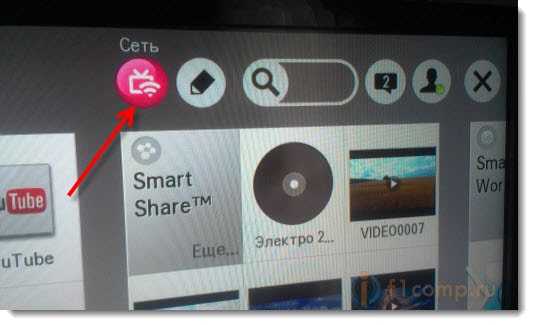
Go to Smart TV and select the network icon (you can do it via settings) .
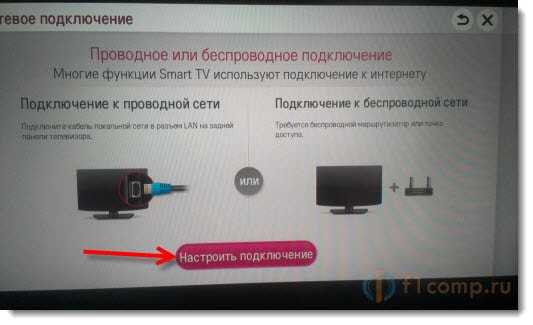
Press the button Set up a connection.

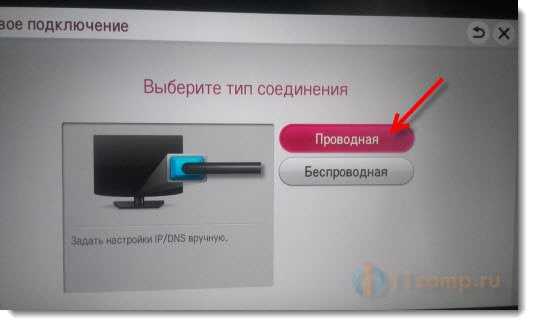
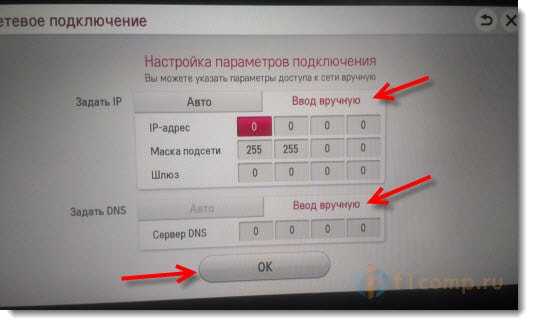
Next, set the desired IP and DNS, manually. Press Ok.
The TV will build a network map and give you the results of the connection to the Internet. Here's how (you may have a different map, this is normal):
A simple algorithm to configure the router
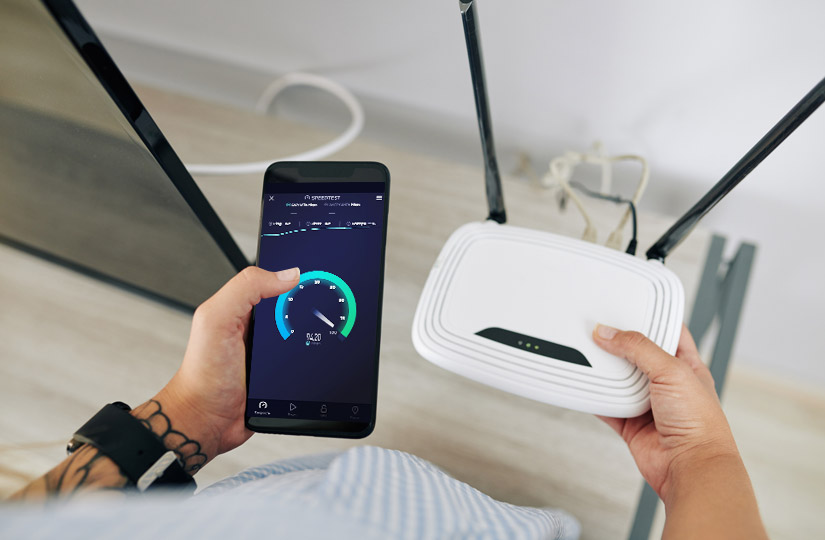
Before setting up your new router, decide right away where it will be located. If you occasionally plan to connect to devices via cable, make sure it is long enough and has a power outlet nearby. If you are using the router solely for Wi-Fi, try to place it in the center of the apartment. Walls, some appliances (such as a microwave oven) can noticeably reduce the quality of the wireless connection. It is better not to hide the router in the upper compartments of the hallway closet – at least so that you always have easy access to it.
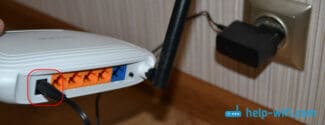
Once you've found a place for the router, plug it in, connect the wire from your ISP to the WAN port, and proceed with the settings. You can do this either via cable or Wi-Fi. Let's look at both options.
Setting up a new router via cable
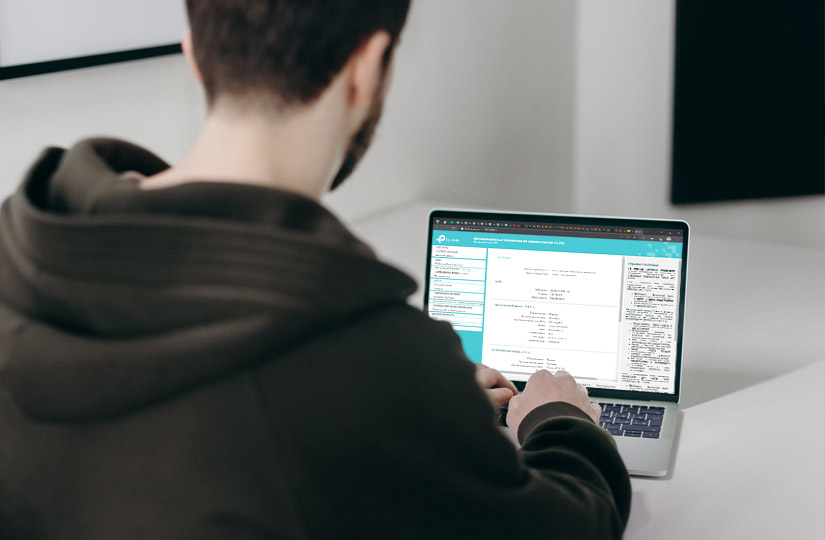
If you have a computer or laptop, and your chosen location and cable length allow you to connect the router to the device directly, it is always easier to do so.
1. Connect one end of the cable to the LAN port and the other end to your computer or laptop.
2. open any browser. On the back of the router, there is default login information: username (login), password, and network address (IP). You must enter the latter in the address bar of your browser. If not, enter 192.168.0.1 or 192.168.1.1. This will bring up the admin panel, where you can enter your router username and password.
3. In the admin panel, there are tabs for quick setup, Wi-Fi settings, security settings and the network itself, where you can configure the connection with your ISP according to certain parameters. The automatic quick configuration options are quite sufficient for the normal operation of the wireless network.
Possible errors when configuring and connecting the router
- The local network is not connected. Go to "Adapter Management" (right-click on the connection symbol and go to "Network and Sharing Center" – "Change adapter settings") and check the "Local Area Connection" tab. If the adapter is off, turn it on.
- There is no automatic acquisition of IP address and DNS server. To enable them, go to "Control Panel" of your computer/laptop – "Network and Internet" – "Network Connections" and check the properties of the active connection (the "IPv4" tab – the "Properties" drop-down tab when double-clicking). If automatic IP and DNS retrieval is turned off – turn it on.
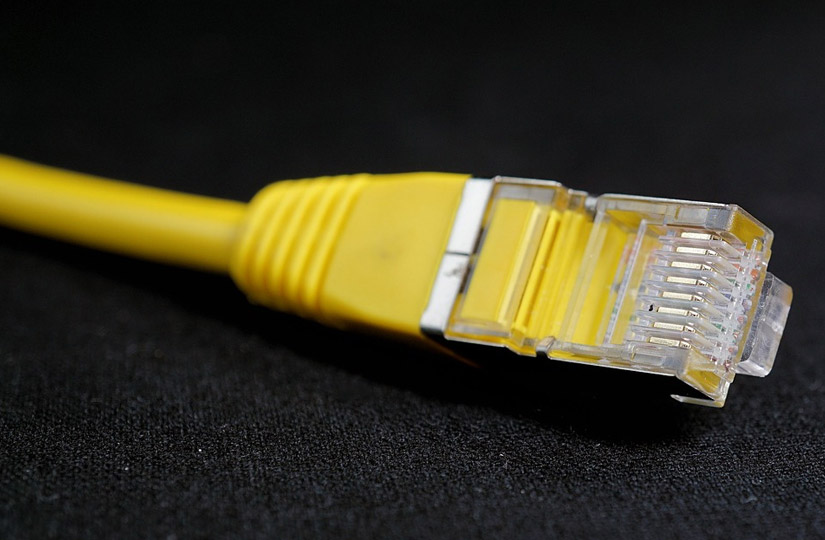
- Faulty cable or LAN-port, in which it is connected (if the configuration is done via cable). In this case, when connecting to a laptop/PC, the status will not change, but remains crossed out with a red cross. Try moving the cable to an adjacent port (or test a different cable).
- The network card driver is not working. In this case, update or reinstall it.

- Unfortunate location of the router: physical obstacles, household appliances nearby.
- Network congestion: if your router's capabilities allow it, switch to the less congested 5 GHz band (we wrote about this above).
- If you don't see any reason for a weak signal, contact your ISP.
You don't need to have super-secret knowledge or skills to set up a router yourself. Anyone can do it, even on an ordinary smartphone. However, for convenience and simplicity, we recommend that you always use a laptop or computer to configure it.
Read More:
