Hi! Today I will show you how to connect a Wi-Fi router to anything in your house. But in the simplest case, let's start with a computer – it's often used that way, and it's more convenient to configure on a computer than on a phone. There's no particular difference in the wired connection between a computer and a laptop – everything is the same. Let's get started.

- How to connect and configure a Wi-Fi router? Step-by-step instructions for all models
- How to connect a router?
- Step 2: Define the standard Wi-Fi data
- Step 3: Connecting your computer to Wi-Fi
- Method 2: Wireless connection
- Configuring – very briefly
- Step 1 – Login to the panel
- Step 2 – configuring the Internet
- Step 3 – Wi-Fi setup.
- Step 4 – router password
- Step 3: Setting up the Internet
- Step 4: Setting up Wi-Fi
- How to Install a Router and Connect to the Internet
- Connecting to a Wi-Fi network
- No access to the Internet when connected via cable
- What to do if my computer doesn't respond to a network cable connection?
- Wi-Fi connection and settings
- IP TV setup
- Algorithm of settings
- Possible errors
- Wi-Fi
How to connect and configure a Wi-Fi router? Step-by-step instructions for all models
Now on sale there is a huge number of different Wi-Fi routers from different manufacturers. And it is good, there is something to choose from. But immediately after buying a router, we need to install, connect and configure it. And if the connection process is practically the same depending on the model, the setup process and the router settings page can be different even for the same manufacturer.
It is very difficult to give detailed and step-by-step instructions on setting up different models in one article. But I will try. In this article I will describe and show you in detail how to install and configure your Wi-Fi router. Regardless of what your manufacturer and model is. This universal instruction will work for setting up a new router as well as for reconfiguring it. You can do everything yourself. And you don't have to pay a specialist to set it up at all.
If you haven't chosen a router yet, you might find this article with tips on choosing a Wi-Fi router for your home or apartment helpful.
Be sure to visit this page. It contains detailed instructions on setting up popular routers. There may be a guide on how to configure your particular device.
Some detailed instructions you can use as an example: TP-Link – on the example of TP-Link TL-WR841N, ASUS – on the example of Asus RT-N12, D-Link – on the example of D-link DIR-615, ZyXEL Keenetic Start – configuring the Keenetic Start model.
The setting algorithm is almost always the same. It doesn't matter for any router – TP-Link, ASUS, D-Link, ZyXEL, Tenda. Similarly, it doesn't matter what kind of Internet provider you have: Dom.ru, Beeline, Rostelecom, TTC, Volia, Kievstar, etc. All that depends on the provider is the type of connection. Which you need to select in the settings of the router and set the necessary parameters. About this I will explain in detail below in this article.
It is clear that the settings page itself and the sections differ depending on the manufacturer and model of the router, but the order of settings will always be about the same:
How to connect a router?
I will describe all the steps step by step. It will be easier for both you and me.
1 First you have to choose where to install the router. You will most likely have to install it where the cable from your ISP goes. You can install it wherever you like and wherever works best for you. If you want to be more serious about where to install it, you can read where to install a Wi-Fi router in your apartment or house.
2 If your model has removable antennas, screw them on. Plug in the power adapter and plug it in. If the indicators on the router do not light up, check if the power is turned on by the button on the device itself.
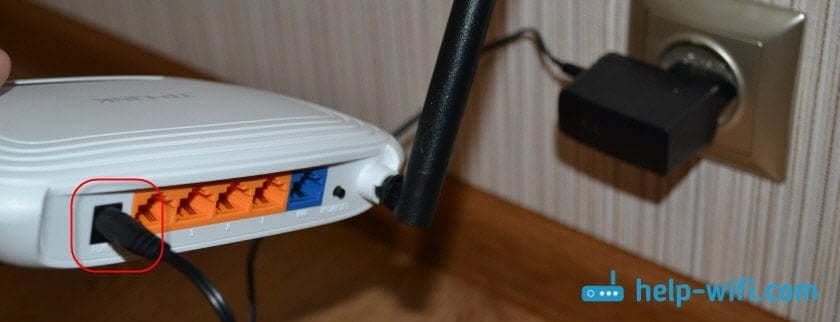
The main thing is that the indicators (or one indicator) light up.
3 Connect the Internet and a computer (laptop) to the router. If you do not have a PC/laptop, and you will connect to configure it via Wi-Fi, see the next step.
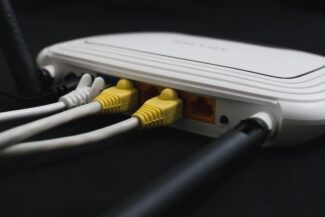
- The cable from the Internet provider (or from an ADSL modem) must be connected to the port that is signed as "WAN", "Internet", "Internet". It is often highlighted in blue.
- Using the network cable that comes with the router, connect the router to your computer, or laptop (if you have one). On the computer, connect the cable to the network card, and on the router to the LAN port. It can also be signed as "Home Network". Usually there are four of them.
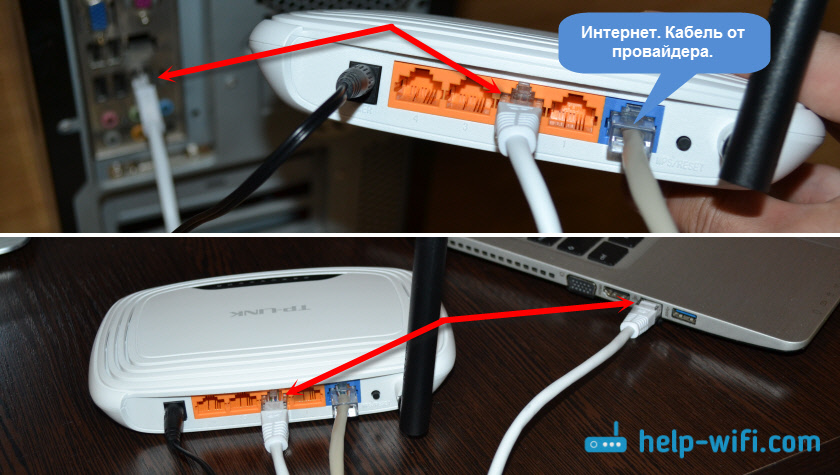
If you are connected to your computer via cable, you can go to the next section, where I will show you how to get into the control panel.
4 Only for those who don't have Cannot connect to the router via cable for configuration. In this case, you only connect the Internet and power.
Step 2: Define the standard Wi-Fi data
A computer or laptop must be connected to the router in order to access the settings. In our case, this must be done through the wireless network, which in many models is active by default and has standard authorization data. These can be found on the back label of the router, recognizing the password and Wi-Fi name. If this information is not available, then the router does not support automatic wireless network activation and you will need to skip to the last section of this article to resolve this situation.
Step 3: Connecting your computer to Wi-Fi
The password for the wireless network has been found, so all that remains is to connect to it directly in your operating system. To do this, open the list of available networks, select the necessary one, enter the access key and confirm the connection. Make sure that the indicator at the bottom changes its appearance and you have access to the access point.
In addition, we recommend that you read the separate article on our site, which is dedicated to connecting the computer to the Internet. It will help to understand all possible difficulties and also shows alternative connection options.
Method 2: Wireless connection
Perhaps you do not want to spoil the appearance of the room with all kinds of wires, then you can use another way to connect your computer to the router – via Wi-Fi network. Some motherboards are equipped with a wireless module. In other cases, you need to buy and install a special card in the slot PCI computer or plug into any USB-port of the PC so-called Wi-Fi modem. Laptops have a Wi-Fi access module by default.

- Install the external or internal Wi-Fi adapter in the computer, switch on the PC and wait for the device drivers to be installed.
- Now you need to configure the wireless network configuration by entering the router settings. Open any Internet browser, in the address bar write: 192.168.0.1 or 192.168.1.1 (other addresses are possible, see the manual) and press Enter.


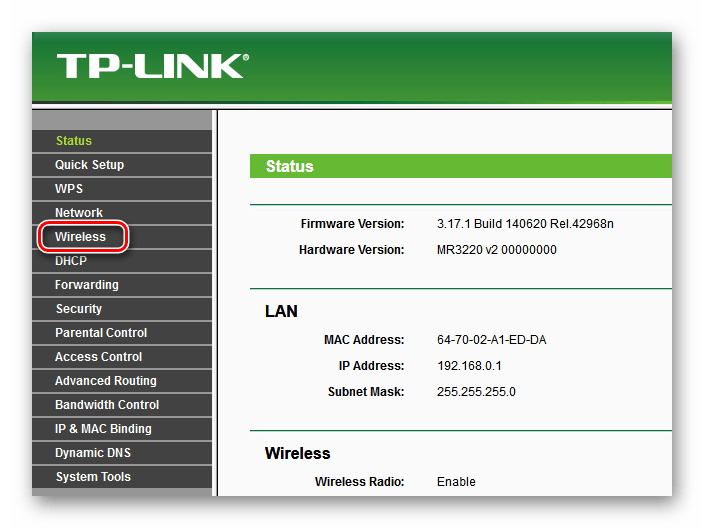
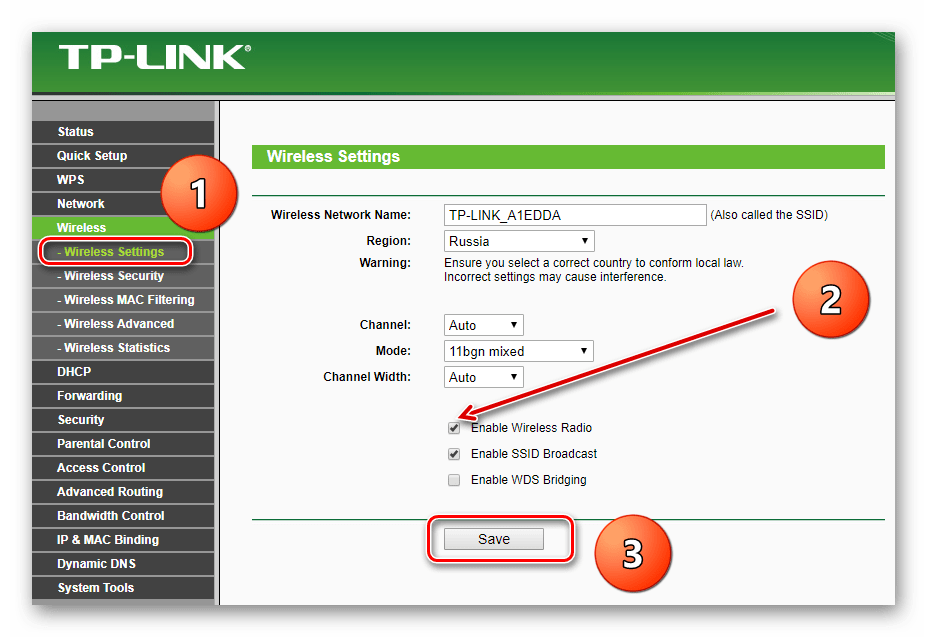
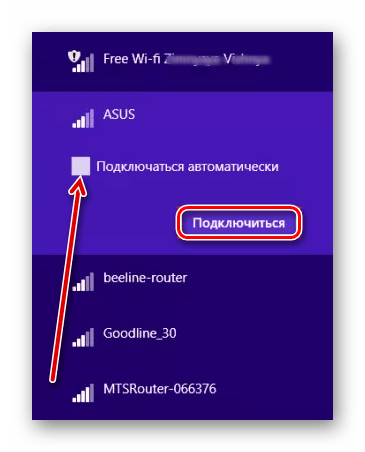

Configuring – very briefly
Why very brief? Yes, because the setup process itself differs from router to router. So if something is not clear – write in comments, or better go to the article about setting up your router model on our site – there will be everything in detail and with all the nuances. Here is a universal algorithm for all models.
Step 1 – Login to the panel
First you need to enter the web configurator. The best way is to look under the router and look at the sticker to see the actual data to enter the control panel, login and password. It looks something like this:
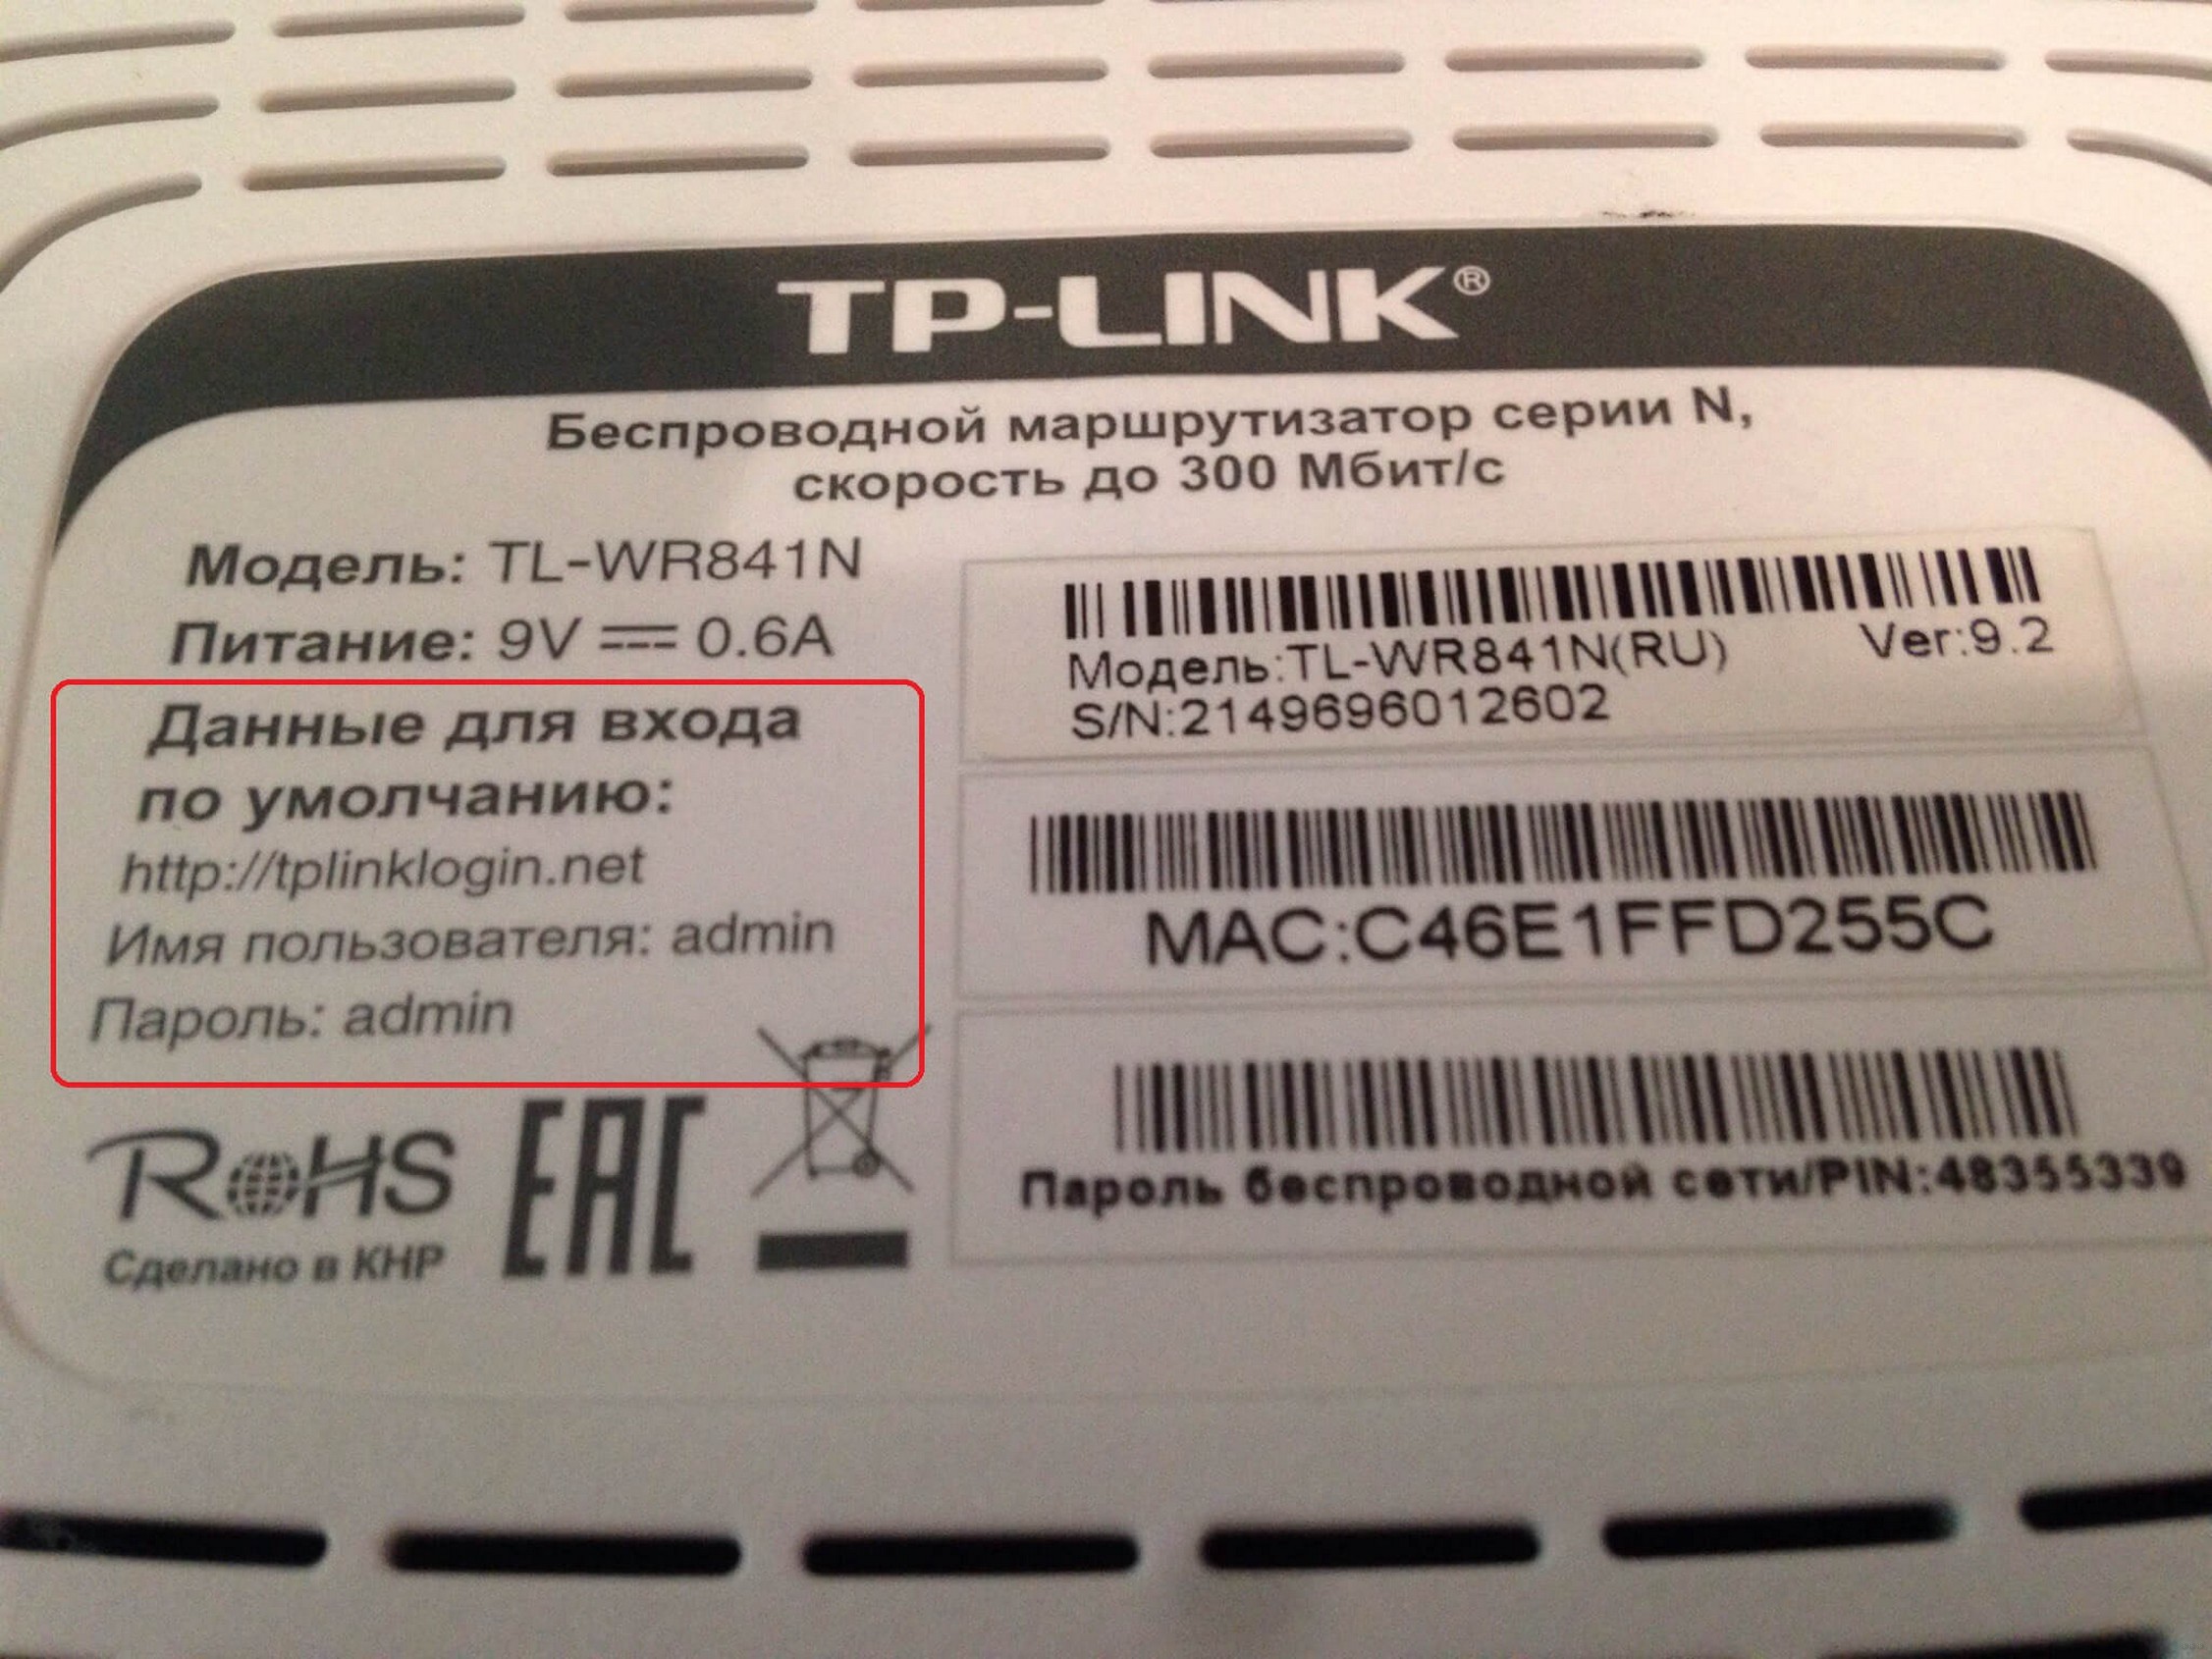
If nothing helps, go to the following links, one of them should appear a box to enter the username and password:
Login and password are on the same sticker, but usually they are standard almost everywhere admin и admin.
Step 2 – configuring the Internet
And here begins a big discrepancy. Once you get into the configuration, look for the setup wizard. He will walk you through the steps and set everything up himself. What is important here is to find the contract with your ISP, where the username and password for the Internet itself are. In the setup process, you will have to enter them here. In the end, the router should connect to the Internet.
Step 3 – Wi-Fi setup.
If you use the setup wizard, you will also go through this step. The main thing here is to set the name of your Wi-Fi network – make it clear to yourself. And very important – change your wireless network password so that no neighbor can connect.
Step 4 – router password
And at the end of the setup it is very important not to forget to change the router password (which is the same for all admin) – so we will protect our apartment from foreign interference of evil hackers, and we will live happily ever after.
That's all! Nothing more can be thought up here. The details need to look specifically for your model or just ask a question in the comments below. We'll answer it for you!
Step 3: Setting up the Internet
Now let's move on to setting up the Internet on the router. Of the most important, if you have successfully completed the previous steps, we will definitely need the ISP login and password to connect to the Internet. It can be found in the contract – so it's time to look for this paper.
Almost any modern router has a setup wizard, which will walk you through all these steps step by step – setting up the Internet, setting a password on Wi-Fi, changing the password of the router itself. Many routers and put it on their home page. Usually have names something like "Quick Setup Wizard," "Quick Setup," or "Quick Setup." Look for something like that. For me, it looks like this:
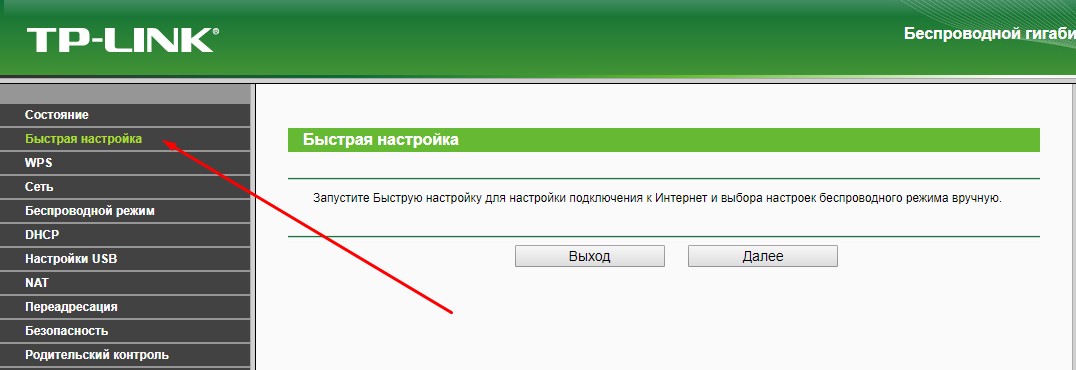
Don't be afraid to go through all the steps yourself. I'll leave notes below on some controversial points, but you'll still be asked the same thing on any router model. So do it once and learn for the rest of your life!
One of the important points is to choose the type of connection. It depends on what your contract says. Usually these technical points are specified there. The most common is PPPoE, there are Dynamic IP address and Static IP, L2TP, PPTP. The main thing here is to choose your type (but usually at Rostelecom PPPoE), enter login and password – that's enough to make internet appear on all devices automatically.
Usually settings are in the WAN section. I show you my work, you have to enter your login and password.
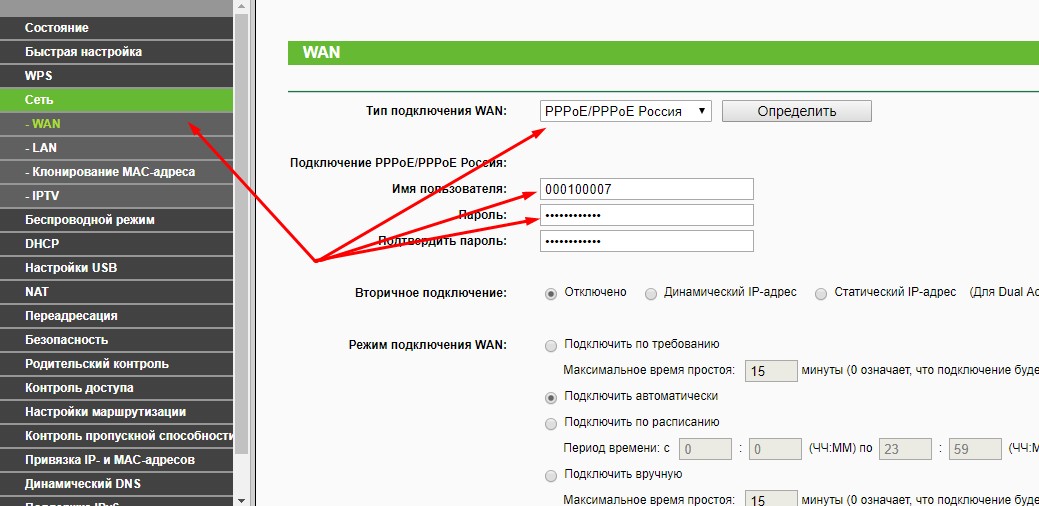
Read More:In the case of Dynamic IP address, where the ISP Internet is tied to a line – the Internet will appear as soon as the router is connected. Check if you don't already have it. Maybe you don't need to configure anything?
Step 4: Setting up Wi-Fi
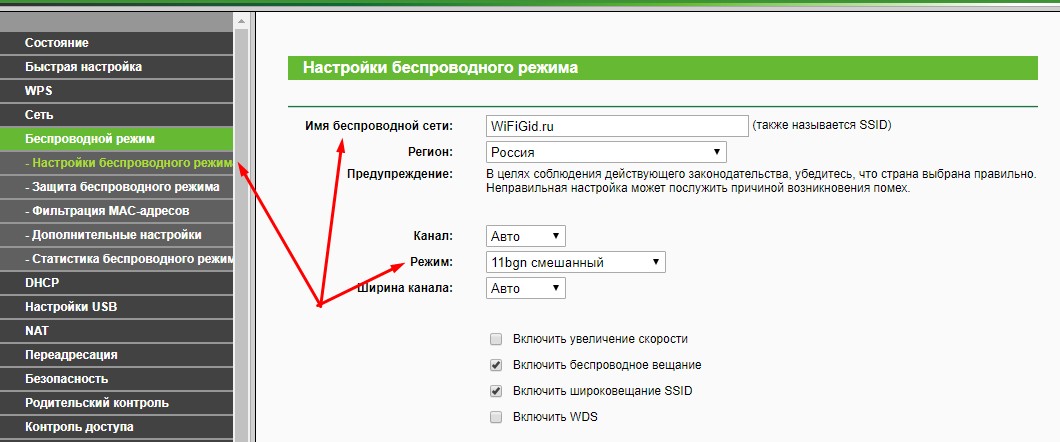
Another important step encountered with wireless routers. The main point of this setting is either to start Wi-Fi (if it suddenly did not start at the factory settings), or to change the network name and password to be both clear and safe. Here are the basic settings:
- Network name or SSID – as it will be visible to everyone, its name, spelled in English letters! It is better to write it clearly for yourself.
- Security type – WPA2 – this is the most current type of connection security. The standard WEP is absolutely leaky, and WPA is simply the previous version. So it is better to immediately stop at WPA2, the default is on any modern device.
- The password is the password, by which you connect to the Wi-Fi network. Do not forget to change it! Otherwise any neighbor will be able to freely connect to you. The length is from 8 characters. I recommend coming up with something more complicated, and ideally generating it.
These settings can be on a single tab or on several tabs, like mine:
Don't forget to save any changes. Other times, you may change a lot of values, forget to save in a hurry, and then wonder why it all does not work. After saving you usually get kicked out of the network, because the network name becomes different, so you have to restart with a new password.
What should be to continue: The device successfully gives out Wi-Fi. Everybody connects and surfs the Internet without any problems.
How to Install a Router and Connect to the Internet
Let's start with the most basic task: installing and connecting the router itself. The process will be the same for both a newly purchased device and a used one.
The first thing to do is to choose a place to install the router. Do not forget that routers have a limited range: most modern routers designed for home use have a range of 50 meters. It seems that this should be enough even for a multi-room apartment, but it is important to understand that the range decreases when there are physical obstacles in the way of the signal: furniture, other appliances and walls. Therefore, to ensure that all your gadgets will be in the coverage area, it is worth observing two rules. Firstly, install the router as close as possible to the center of the apartment at an equal distance from its borders. Secondly, it is best to put the router itself as high as possible so that the signal goes above other obstacles. A good place for a device would be the top of a closet, a hanging shelf or even a refrigerator. And especially zealous adherents of an uninterrupted signal and even set the router in a hinged position directly on the wall. Just do not forget that to the device will still need to pull wires. Speaking of which.
To connect your router to the Wi-Fi network, you'll only need two cables. The first is a power cable to connect it to a regular 220 V outlet. A power supply is always included with new routers. But if you have a used device, it is easy to find the right power supply by the port size and the markings on the housing. Most routers use a 12V power supply, and more rarely a 9V or 5V power supply.
The second most important cable is the Ethernet cable. The one that was brought to your apartment by the Internet provider and through which your home will be connected to the Internet. And here the unprepared users may encounter the first difficulties, because the router will almost always have several ports suitable for the ISP's cable plug. The port you need, as a rule, will be different from the others in color and will be marked as WAN (Wide Area Network) or "Internet" in case of routers with Russian-language markings. The other ports in this form are for wired connection of devices to the network with a LAN (Local Area Network) cable.
Connecting to a Wi-Fi network
So, our router is up and running, it's glowing with various lights and even distributing Wi-Fi. But what to do next? You will not be able to configure the router by yourself: you will need a third-party device. Preferably a home computer or laptop, as they will be easier to operate the router's web-interface. But at the worst, a tablet or smartphone will do.
First, you need to connect the selected device to the Wi-Fi network. All the necessary information for this should be located on a sticker attached to the router case. There will be a bunch of useful information (so as not to twirl the router in your hands, it is easiest to take a picture of the sticker), but at this stage we are interested only in two points. Firstly, the SSID (Service Set Identifier) or "Wireless Network Identifier" abbreviation line is the name of the Wi-Fi network that will be displayed when trying to find wireless connections. Remember it, find it in the list of available networks on your computer and select it. Next, you will need a password. Look for it on the sticker as well, and it is usually labeled with the word Key or "Wireless Key.
If the computer doesn't offer the option to enter a password, you may have already connected to this Wi-Fi network. In that case, right-click on the network name and select "Forget Network" from the drop-down submenu, then connect to it again.
Finally, if the network name and the key indicated on the sticker are not suitable, the router can be reset to the factory settings (we will tell you about it in the corresponding section).
No access to the Internet when connected via cable
It can happen that after connecting the Internet will not work. The connection will be "No access to the Internet", or "Restricted" (in Windows 8 and Windows 10). If the problem is not in the router (it distributes the Internet), then you need to check the settings on the computer itself.
Right-click the connection icon and select Network and Sharing Center. In the new window, select Change adapter settings.
Next, right-click on the adapter Right-click on the adapter and select Local Area Connection., or Ethernet, and select Properties.
And set it like in the screenshot below. You must set it to get IP and DNS addresses automatically.
After that, restart your computer, and everything should work.
What to do if my computer doesn't respond to a network cable connection?
It may be that after you connect the cable to the computer, the connection status will not change, and there will be a computer with a red cross (no connection).
- Connect the network cable on the router to a different LAN connector.
- If possible, replace the network cable. It is possible that the problem is in the cable.
- Install or update the network card driver.
- Go to Adapter Management, and check if the Local Area Connection adapter is enabled. Right-click on it, and select enable.
- If Internet via cable doesn't work on your Windows 10 computer, see this article https://help-wifi.com/reshenie-problem-i-oshibok/ne-rabotaet-internet-v-windows-10-posle-podklyucheniya-setevogo-kabelya/.
As practice shows, by cable everything works immediately after connecting. Without any problems or settings. If you can not connect your computer to the router, then describe the problem in the comments. Be sure to answer and help with advice.
625
930107
Sergey
Different tips for Windows
Wi-Fi connection and settings
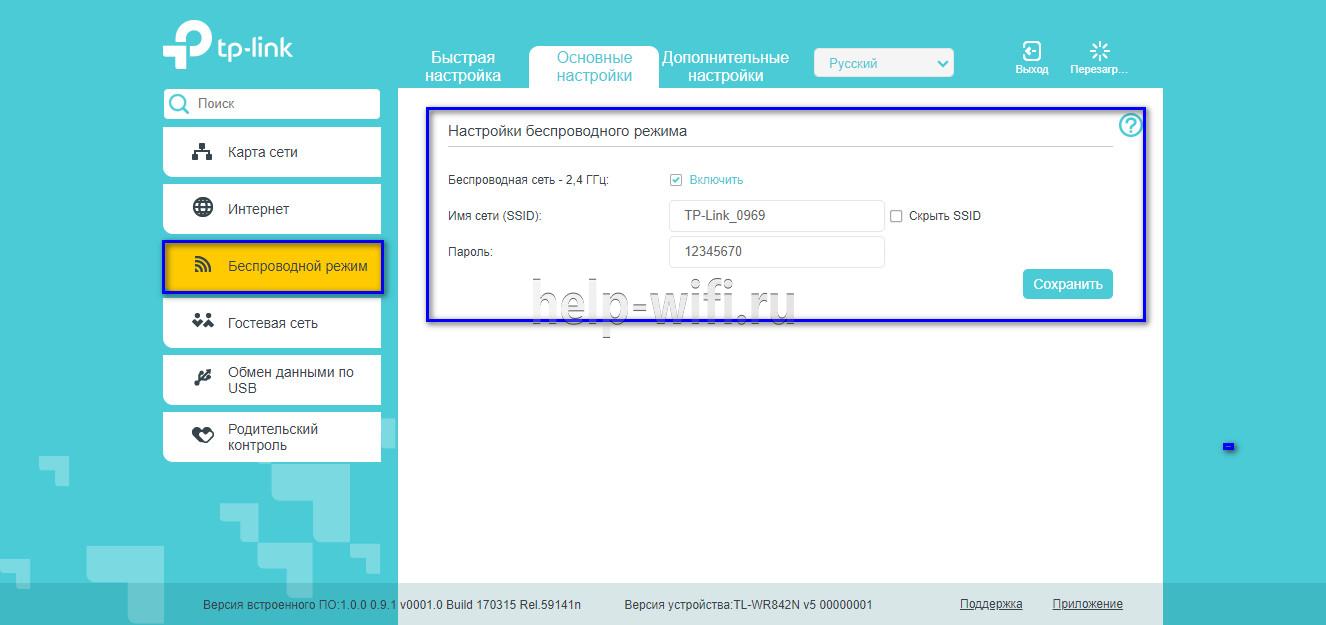
The wireless network creation on TP-Link routers is performed during the quick setup process; however, if the user didn't do it, he can set up his Wi-Fi network later in the router's WEB-interface.
TP-Link routers can operate in one or two bands, which means you can create one or two wi-fi networks on them.
A guide using the Archer C20 dual-band router as an example:
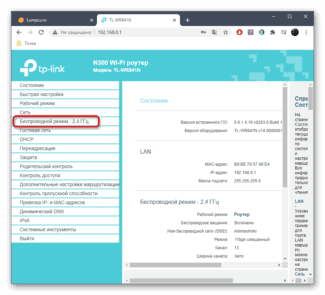
- Click "2.4 GHz Wireless Mode." Set the label in the "Enable" field, enter the network name, enable SSID broadcasting so that the created Wi-Fi network will be visible in the search on the connected devices. If you remove the label, the network will not be seen by outsiders, but you will need to enter its name and password manually on your equipment.
For single-band routers, you don't need to select a working frequency. In their web interface you need to click "Wireless mode", turn on the network, enter the name and password and choose whether to hide the SSID or not.
IP TV setup
If the router supports IP TV, the user will be able to set up watching interactive TV on all his devices connected to the wireless network.
- Connect the IP TV set-top box to the LAN socket on the router.
- Open "Network" – "IP TV" in the web interface.
- Turn on the "IGMP Proxy" (if there is no button, skip this step).
- Select the LAN socket to which the device is connected.
- For most providers select "Bridge" mode and save the changes.
- Some service providers (Rostelecom) require the VLAN ID value to be specified when connecting. You need to check this parameter with a support specialist, and then select "802.1Q Tag VLAN" instead of "Bridge" mode.
- Disable "VLAN TAG for Internet", in the field "VLAN ID for IP TV service" enter the value received from the provider. Select a port for IP TV. Save your changes.
Depending on web-interface, to open IP TV tab you have to go to "Advanced settings" and then to "Network".
Algorithm of settings
To configure the router, you do not need to invite a representative of the provider. The user can do it himself. You need to have a browser on your computer and a willingness to figure it out.
- It is necessary to find a convenient place so that neither the wires nor the router do not interfere with the user.
- Connect the Internet to the router, and the router itself to the mains and the computer (remember that the ISP cable is plugged into a different color port).
- In any browser installed on your computer enter 192.168.0.1. or 192.168.1.1. Numbers can be different, it depends on the brand and model, the correct address is indicated on the sticker on the bottom of the router).
- In the window that will open enter the login and password (factory default values admin in both fields).
- If prompted to change the password (recommended for security), do it. Sometimes this step can be skipped, but then it will appear at any transition in the admin panel.
- Use the quick setup wizard. This option may have different names, but always appears when you first turn on the device. You have to go through the installation, according to the wizard's prompts. Some data to be entered (e.g. connection type) can be found in your contract with your ISP. Automatic configuration is usually enough.
- The more delicate manual configuration of the router is a topic for a separate conversation (follow the link, there are all the details).
- Use the Internet.
Possible errors
Since the connection process is quite simple and comes down to connecting multiple cables and ports with each other, there are usually no mistakes. Sometimes it's carelessness: plugging the cable into the wrong jack, screwing the wrong settings in the OS.
Still, let's look at a few of the most common mistakes.
If after configuring the router Internet does not appear it is necessary to check the settings of Windows.
- Click on the Internet icon in the lower right corner and select "Network and Internet Options".
- Then select the item "Adapter settings".
- Select the desired adapter and right-click to open "Properties". Turn it on if it is disabled.
- Click on "IP version 4" and open its "Properties".
- The IP address and DNS server must be obtained automatically.
Wi-Fi
Before you connect a wi-fi router, you need to find a place for it so that all home devices get a good, strong signal.
- Some devices do not see the network.
If some devices do not see the network – you must try to connect while being closer (with your phone to the location of the router). If the network appears nearby, and with the distance gradually fades to a complete disappearance, you must find another, more convenient location for the router.- The signal is weak.
To solve this problem, you need to try to bring the device so that the antenna is located exactly under it. If the signal is stronger at this position, the antenna must be turned (usually this is provided in the design) towards the signal receivers. This often happens if the router is hung up somewhere in the hallway (the very physics of the antenna is arranged so that the best signal is at the point above it and diverges spherically).
This is not provided for all models, but sometimes in the configuration interface is the ability to adjust the transmitter power. For the test set it to maximum, then experimentally find out the required value.- I do not see the network at all!
If after setup, no device (ALL!) can find the router, it may just have the wireless network turned off. And if it is on, the "broadcast" function is not set (the exact name depends on the firmware). If the feature is off, the internet is working but not wirelessly distributing and new devices (which all will be if you're setting up the router for the first time) just won't see the Wi-Fi.- There are too many networks around.
This sometimes creates a problem in the settings, too. If the router is modern enough, try switching to another band (from 2.4 GHz to 5). This band is less common and you will probably be able to connect and work normally in it.

