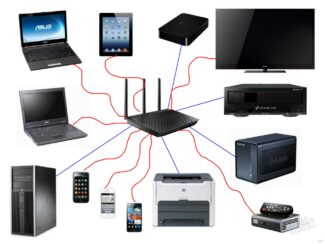
To define what an access point is, you need to understand how it differs from a router. A router is a network device that allows you to organize a connection to this very network (Internet) for one or more devices. The router determines the temporary IP addresses for each connected device, connects them to the LAN and organizes the connection to the Internet through the provider.
- How does a router become a Wi-Fi access point?
- Setting up an ASUS router in AP mode
- How to connect and install?
- Zyxel Keenetic
- Router configuration
- Zyxel Keenetic
- TP-Link
- The procedure for setting up the main router
- Additional router configuration procedure
- Connectivity problems
- Incorrect APN.
- How to detect a hidden APN
- ASUS
- Zyxel Keenetic router as Wi-Fi access point
- TP-LINK router as a Wi-Fi access point
- Connecting with cable
- Network router cascade LAN-WAN.
- Wireless connection
- Wireless bridge based on WDS
- Configuring the main router for WDS mode
- How to distribute the Internet from a mobile device
- Setting up an Android device as a router
- Using apps
- Causes of lack of Internet in hotspot mode
- Step 1: Turn on the access point on your smartphone
- Step 2: Configuring the router
- TP-Link
How does a router become a Wi-Fi access point?
Let me start by saying that the router itself, which you want to make an access point, is an access point, only more functional. It runs a DHCP server that distributes IP, there’s probably a firewall, and it roughly builds routes between connected devices, so it’s a router. So, to turn a router into an access point, it is enough to disable some functions in it, and connect it to another router or a modem by cable.
In a separate article, I already wrote about what an access point is and how it differs from a router. You can read it if you’re interested. There, I promised to show in detail, using various examples of routers to show the settings that must be made to use a router as a Wi-Fi access point.
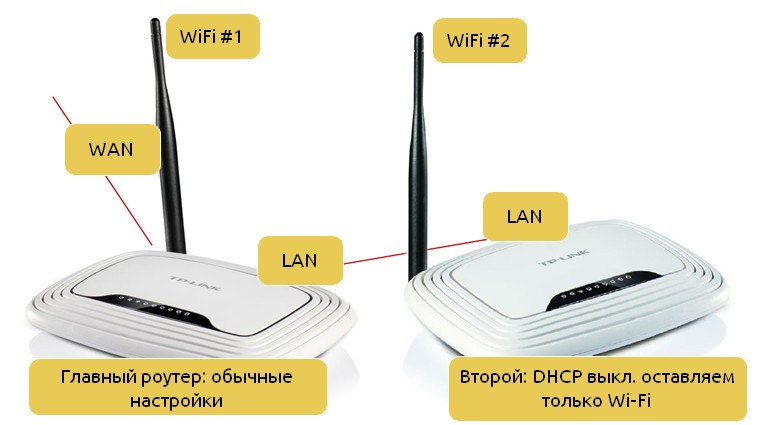
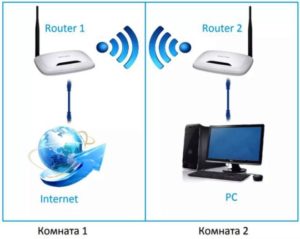
Let’s use the example to find out for what purposes this mode of operation could be suitable. Let’s say you have a modem or router installed on the first floor, or at one end of the house. It may or may not be giving out Wi-Fi, it doesn’t matter. So, and at the other end of the house, or on the other floor, we need to put an access point to give out Wi-Fi. The connection between the router and the access point will be over a network cable.

If we put an access point at the second end, the IP addresses will be distributed by the main router, and the devices will be in the same network, which is often very important. Also, access point mode can be useful for distributing Wi-Fi from a modem that does not have such a feature. In fact, there are a lot of applications. Otherwise, access points would simply not be sold as separate devices. Because there would be no point in them.
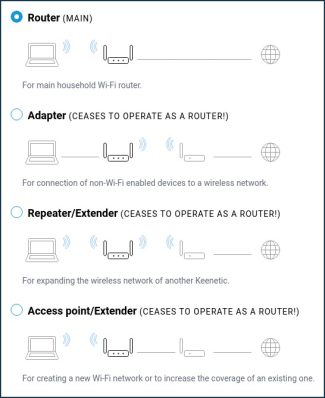
Note that most routers can operate in other modes which may work best for you:
- Repeater mode – is appropriate if your goal is simply to extend your existing Wi-Fi network with another router. On our site there are instructions on how to set up the repeater mode on ASUS routers, we also set up the repeater mode on Zyxel Keenetic devices and on Netis router. After configuring there will be one Wi-Fi network, just amplified. Internet via cable from the “repeater” will be the same.
- WDS wireless bridge mode – is almost the same as access point mode, but here the connection between routers is not via cable, but via Wi-Fi network. For more information on how to set up this connection, see my article: Setting up two routers on the same network. Connecting Two Routers via Wi-Fi and Cable. It is shown in detail on the example of popular routers: ASUS, TP-LINK, D-Link, Zyxel. There is also a detailed guide to configuring WDS on TP-LINK routers.
Setting up an ASUS router in AP mode
On ASUS routers, as a rule, the AP mode is turned on in the control panel. After that, simply connect it to the router or modem and everything is ready. On some models, like the old RT-N13U, the modes are switched with a special switch on the device case. I will show you how to set up the access point by the example of the Asus RT-N12 router.
Let’s connect to the router and go to 192.168.1.1 address and enter its settings. In the settings, go to the “Administration” tab. And at the top of the tab “Operation mode”. Put a switch next to “Access Point (AP) Mode”. Read the description of the mode, and click “Save”.

In the next window, we need to set the IP settings. It is possible not to change anything and just click “Next”. But in this case you will need to use a special utility “Discovery” to define the IP address of the access point. Or you can set “Obtain IP automatically” to no and change the last digit. For example, to 192.168.1.2. Now, the settings will be available at this address. DNS, if needed, can be specified as on the screenshot below. Or, you can leave it to obtain automatically.
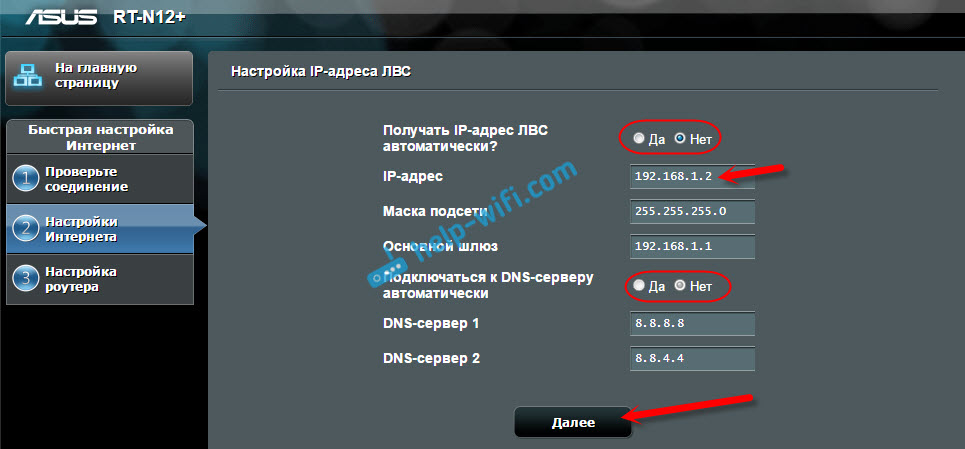
In the next window, if necessary, change the Wi-Fi network settings of our ASUS access point, and click “Apply”.

The router will reboot and go into AP mode. If you go to its settings, at the address that you may have specified yourself, or that can be determined by the utility “Discovery” (you can download from this link), you will see a stripped-down control panel. Where you can change the necessary settings, or, for example, return the device to the mode “Wireless router”.
How to connect and install?
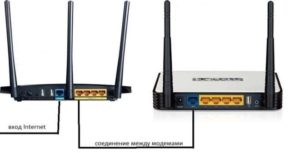
Here we come to the solution to the question, “How do I connect an access point?” The connection goes through the standard LAN ports.
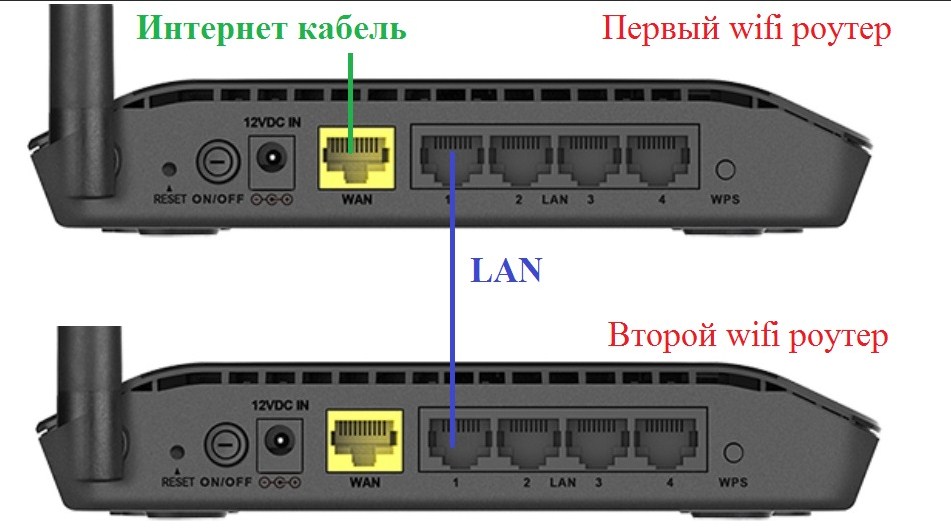
The upper device on the picture will be the main one, and the lower one will act as an access point and just distribute Wi-Fi and the related routing settings from the first one. We will connect via cable. If the cable goes through the street – make sure that it meets the standards of a street tight cable with an extra braid. By the way, you can plug the cable into any port – it doesn’t matter. Now on to configuring the router.
Zyxel Keenetic
On newer firmware, go to the “General Settings” page, and after that click on the “Change” operating mode. Set our mode. Confirm the action by clicking on the button “Switch mode”.

Then you will see the process of changing the configuration of the system. It will be possible to connect to this Internet center by a new address – it can be seen in the menu of the main router in the list of client devices.

If you have an old firmware – click on “pinion, go to the mode and change it. Press . “Apply”. After connecting to the main modem or router, you will see the address of this transmitter in the menu of the main device.

Router configuration
Each manufacturer uses their own variations of the web interface and feature names in their products. So choose from the list the manufacturer of your device and follow the instructions.
Zyxel Keenetic
Many routers from the manufacturer Zyxel Keenetic can be used in repeater mode. To go to:

TP-Link
How to connect 2 routers in bridge mode is described in the following video:
To configure a router to receive Wi-Fi from the primary router, you need to:
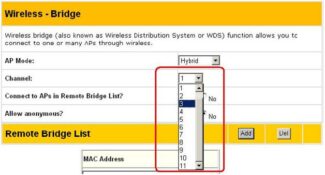
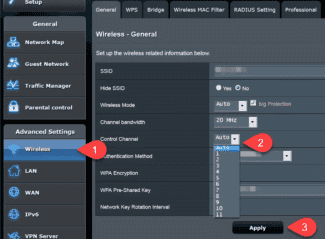
- Go to the settings of the first router and change the wireless network channel. For example, by setting a static value of 5.
- Then connect the second TP-Link router to your computer and enter the web interface.
- Go to “Wireless Mode Settings” and select “Channel” 5.


- Save and re-enter the web interface at the new address. Go to “Wireless mode”, select “Network name”, and under “Wireless security”, set the security key and password.
- Activate “Enable WDS”.
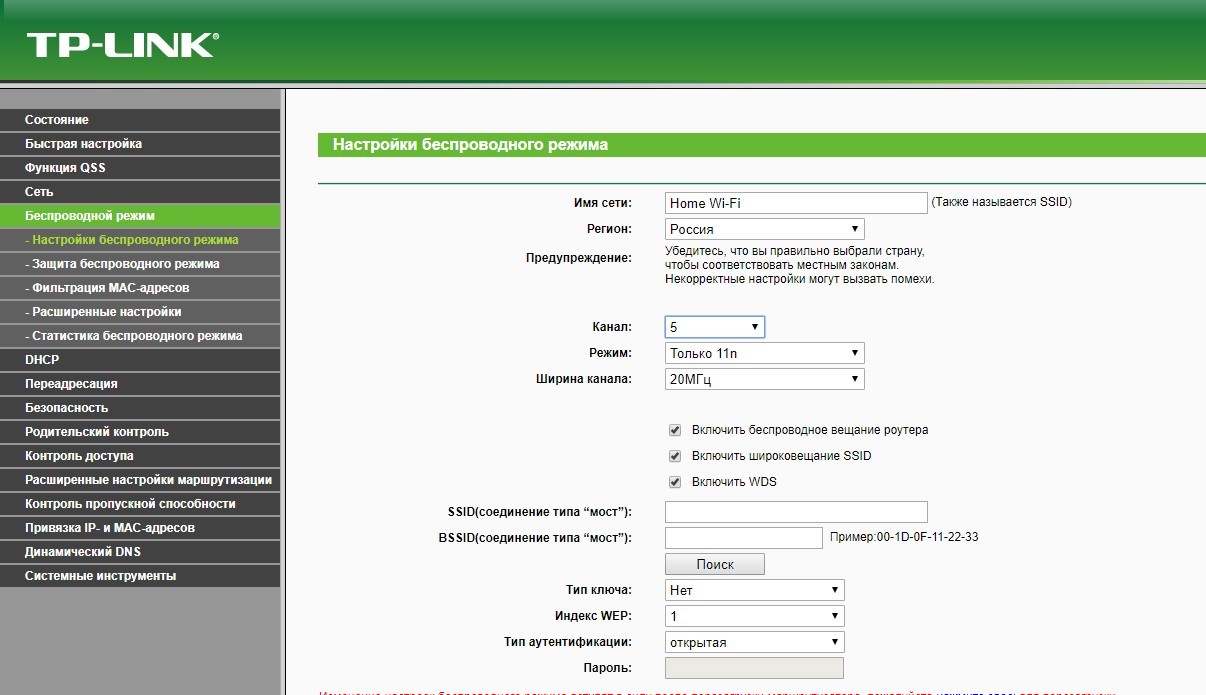

The procedure for setting up the main router
The prerequisite for the correct operation of the routers in WDS mode is the presence of this mode in the factory settings of the devices themselves. When setting up a wireless connection, you first configure the main router with access to the Internet service provider. To do this, you need to:
- Connect the device to your computer.
- In the router settings menu, change the source IP address of the device in the Network-LAN. Save the changes.
- In the column Wireless – Wireless Setting activate the WDS .. To do this, enter the network name, find the desired channel and select the Enable Bridges.
- In the Mac of AP1 enter the address of the additional router. The address can be found on a sticker on the device itself or in the user manual of the device. Save and restart the device.
Additional router configuration procedure
For the correct operation of the two devices, it is important that the order of their connection should be strictly followed. When setting up a Wi-Fi connection, it is important that the router, whose signal you want to enhance, be pre-configured, distribute Wi-Fi and had access to a gateway to the World Wide Web. After that, the wireless connection of the main router must be made on a static channel, instead of an automatic channel. Then the second router is configured. In bridge mode the second device is configured according to the following algorithm (the example is based on the router model TP-Link):
If the devices have the same IP, and they are in the same network, the devices will conflict. The created network will not work. That’s why the second router in the settings Network/LAN change the last digit of the IP address. For example, the IP address of the main router 190.160.1.1. Then the secondary router is set to 190.160.1.2. and save the given settings. In this way both devices will be listed in the same subnet.
- In the tab Wireless/Basic Settings the field Wireless Network Name field, enter the name of the wireless network. It is important that all routers have the same channel in the Channel.
- Check the checkbox in the Enable WDS and click on Scan.
- In the list of channels, select the network through which the router will connect to the Internet. Press Connect.
- Enter a password for the configured network. Save the settings.
- Reboot routers.
Read More:If everything is correct, the WDS status of the second router will be set to Enabled .. This value demonstrates successful pairing of the router with the main router and configured Wi-Fi sharing.
Connectivity problems
Common errors that interfere with streaming.
Incorrect APN.
For mobile Internet to work, it is pre-configured through the APN. What it is, APN is the configuration of the network access, which is stored on the SIM or set up manually. On a device with 2-3 configurations created manually, there may be a failure and you can not connect 3G/4G. In that case:
- Via “Settings“Open “SIM cards” or “Mobile Data».
- In the advanced menu select “Mobile Networks“, from there navigate to “Access PointsAPN».
- Switch to another add-on or create a new one.
By default, APNs are stored on the SIM card and are enabled automatically. If there are no APNs, call the operator’s technical support.
How to detect a hidden APN
On smartphones, hidden Wi-Fi is not visible in the general list:
- Open the “Wi-FiFi/WLAN“. Go to “Advanced Settings».
- Select “Add Network».
- Specify the data encryption type, name, and password.
On Windows 10, the connection will appear in the general list at the bottom.
ASUS
On the “Administration” click on the mode and select «AP.” Now a very important point, you just press save and the system will reboot. Now the secondary router will catch the DHCP settings from the main device: the router or modem. In particular, we are interested in the subnet – the third digit of the IP address.
You can configure the IP manually at this point if you know the address of the primary device. The subnet can be found from the IP address of our gateway. Usually this is 192.168.1.1 or 192.168.0.1. If you set it manually – then you need to put the second router address, the same as the main, but change the last digit. For example: 192.168.1.3 or 192.168.0.3. Usually number 3 is set, but you can set any number (just not 1 or 255).


Zyxel Keenetic router as Wi-Fi access point
Zyxel Keenetic routers can be easily turned into this mode. In the menu first you need to enter wireless network name and password. After that you can proceed with the AP.
- In the opened window of Zyxel Keenetic the item “SystemSystem».
- Then menu “Mode».
- Find the column “Access point – Wi-Fi zone extension …“. Apply.
- Restart the device.
- Connect the device to another router or modem.
This is how Zyxel Keenetic turns on Access Point. When you need to make any changes to the equipment, you first need to open the settings of the main unit and find the IP address of the Zyxel Keenetic router in the list of clients. Only after that you can open the interface of the router working as AP by IP. Or go the easy way and reset all the settings. After that, the router will return to work in the wireless format set by default – “Internet Center«.
Of all the router models of the company, only Zyxel Keenetic III has a special button on the device casing to enter Access Point mode.
TP-LINK router as a Wi-Fi access point
TP-LINK Wi-Fi devices require manual data entry for Access Point mode. They do not have a special button on the casing, so the configuration algorithm is as follows (TP-Link TL-WR740N):
- Open the interface of the router that you decided to assign as an “access point” in any browser by entering the IP address of the device in the address bar. In the open window, log in, that is, enter your username and password.
- The old IP address of the router is not suitable for AP mode, so in the tabs “Network» – «LAN“it must be changed. IP should coincide with the IP of the main router or modem, except for the last digit, which must be changed! For example: If modem IP 191.165.1.1., you must enter the following in the TP-LINK IP address 191.165.1.2. After the corrections you have made, restart the equipment.
- After the restart open the menu of the router’s interface with the new IP.
- Configure the wireless network operation for the access point: in the tab “.Wireless“Enter the connection name and the security password.
- Be sure to disable the DHCP server! On the tab “DHCP“Set “Off” / “Disable“. Save the changes.
After rebooting, plug the network cable into the LAN sockets of the paired devices. Check the working status of the access point, use Wi-Fi.
Connecting with cable
To connect the router to the router, most often a LAN cable is used. It is easy to do: it does not require certain skills, and it does not take much time. But not everyone knows how to connect the router to another router via cable. It is naive to believe that it is enough to connect one device to another, and everything will work. No, of course, you will need to delve into the process a little bit and understand the intricacies, because there are two completely different connection schemes. Before taking any action, you should get acquainted with both, and then choose for yourself the most suitable option.
Network router cascade LAN-WAN.
This scheme is preferable for the bulk of users, in any case, it is used more often. To begin, you will need to figure out how to properly connect two routers via cable: from LAN-socket to WAN-input. This is done for a simplified method of setting up the Internet, which will be an easy task even for beginners in this business. This is the principle used to build a tree-like “Wi-Fi bridge”: in this way you can connect countless routers using a single access point.
But first, this chain needs to be set up. It is noteworthy that the last device in this chain uses the settings of the previous one, this is the simplification of the task. The process of how to connect and connect two routers, in fact, boils down to the fact that you need to turn on the main router function dhcp:
- On the secondary router, open the web interface using the IP address 192.168.1.1.
- It is necessary that the IP addresses of both devices do not coincide, otherwise it will cause a “conflict”. Since a second router is being configured, its IP address must be changed to 192.168.1.2.
- In the settings, against the line “Connection Type”, select DHCP, also sometimes referred to as IPoE or Dynamic IP.
- Check the box next to NAT – “Save”.
Wireless connection
There is another recognized option for connecting a router to another router via wifi. Connect them to each other by creating a wireless “wi-fi” bridge, as a result, it is possible to install the routers at a great distance from each other, while increasing the coverage area. Cables are not needed in this case, this is a positive thing: they will not interfere. But this option is not without its negative sides: it is easy to connect, but the network loses stability, which is accompanied by a decrease in speed. If there are good reasons not to use cable to connect, it will not be the worst option. Applying the wireless method of connecting and connecting routers, you should take into account that not all devices support WDS mode, mostly it concerns outdated models.
Wireless bridge based on WDS
Network bridge without wires is created simply by connecting two routers into one “wi-fi” network, but the process itself is complicated and time-consuming. The way of setting up in detail differs on different routers, but the principle of creating such a bridge with your own hands is the same: it requires WDS support.
To extend the coverage, it is recommended to connect and connect one router to another via “wi-fi”, using devices of the same brand. In other words, if the main router, for example, Asus, operation and connection will be more stable when using an additional device of the same brand.
Configuring the main router for WDS mode
Different routers have their own settings; there are quite a few manuals on the subject. But the process and the sequence of actions described in them are so complicated and confusing that a novice user gets lost. And the principle of how to configure a router (main) in order to connect to an additional one, boils down to one, regardless of the model of the device:
How to distribute the Internet from a mobile device
The access point can be a phone or tablet. You can do this using the standard features of the Android OS or using special programs. It is worth noting that you can only distribute mobile Internet via GSM, 2G, 3G, 4G connection. It is not possible to set up distribution from WiFi.
Setting up an Android device as a router
Starting with Android 2.3, the operating system allows you to act as a connection translator for other phones, tablets, and laptops with WiFi module. Before creating the AP, you need to make sure that data transfer in the mobile network is enabled.
The following sequence of actions was performed using LG smartphone with Android 5.0 version as an example:
- Find the Settings shortcut in the menu, enter them and select the item with Networks;
- Then select “Modems and networks” – Creation of access point;
- Press “Create…”;
- Assign all the parameters to the mandatory fields: search name, security and encryption protocols;
- Set the password from 8 characters long;
- Determine the number of devices able to connect to the network at the same time;
- When finished, you can go back and activate the point.
Important! To enable data transfer via mobile network, you need to go to Settings (Options), select Wireless networks and go to Mobile Internet (data).
On the system of the earliest versions you can configure as follows:
Creation occurs once. After that, an icon will appear on the notification panel, and you can turn on the point by activating the slider in the network connection settings.
Using apps
In addition to the standard tools of Android, there are many programs that allow you to organize a hotspot. The most popular are: MyPublicWiFi, mHotspot, Osmino and others. On the example of the last program below will be given instructions on how to configure it.
Causes of lack of Internet in hotspot mode
Having done everything correctly, a person can still encounter difficulties, which are moments related to:
Antivirus programs that protect the device in real time often block all connections to the network. You should configure or disable the firewall in the same settings before creating and enabling a TD.
Viruses can get into the device with applications that were not installed from official sources. To eliminate them, on the contrary, antivirus should be turned on and check the system with a simple scan. If this does not help, you can install a “stronger” program.
Important! You can track the virus program on your own. To do this, go to the application manager (tasks) and find out what non-system software has the rights to control network connections, remove it. After that, turn on the device again and check the connection.
Another option is to reset all phone settings to factory defaults. To do this, you need to:
Step 1: Turn on the access point on your smartphone
Setting up the router takes place after the access point is activated on the mobile device, so first you need to perform this task. To do this on the Android smartphone itself, do the following:
Expand the notification panel to go to
“Settings”
by clicking on the corresponding gear icon.
- There, select the menu called “Network and Internet.”.
- Open the category for setting up access point and modem mode.
- There you will be interested in “Wi-Fi hotspot” mode.which will be used to broadcast the wireless network or mobile Internet.
- A special switch is responsible for turning on the access point, which must be moved to the active state.
- Pay attention to the advanced settings, where you change the name of the access point, set a suitable password and, just in case, turn off the automatic shutdown, so that you do not have to repeatedly turn on this function on your smartphone when configuring the router.
Step 2: Configuring the router
Let’s move on to the tricky part of the task at hand, which is configuring the router. All actions are performed in the web interface, so regardless of the model of network equipment, first of all perform authorization in this menu, which is described in more detail below.
Let’s describe the setup process on the example of router models by three different manufactures so that each user can form a complete picture of what has to be done in the web interface.
TP-Link
TP-Link is one of the largest manufacturers of routers, which devices are purchased by many users when connecting to the Internet, so first we will consider this particular version of the web interface. Connecting to an existing access point is no problem at all.
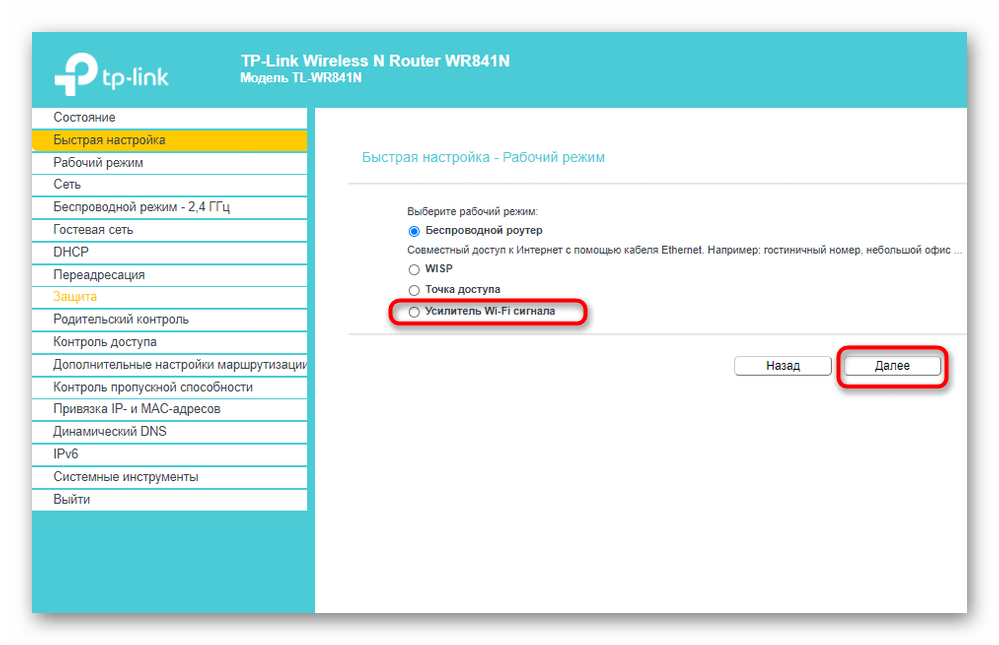
- In the left panel go to “Quick setup”..
- Launch “Quick Setup Wizards”.by clicking on “Next.”.
- As a working mode specify “Wi-Fi signal booster”., by marking the corresponding item with a marker.
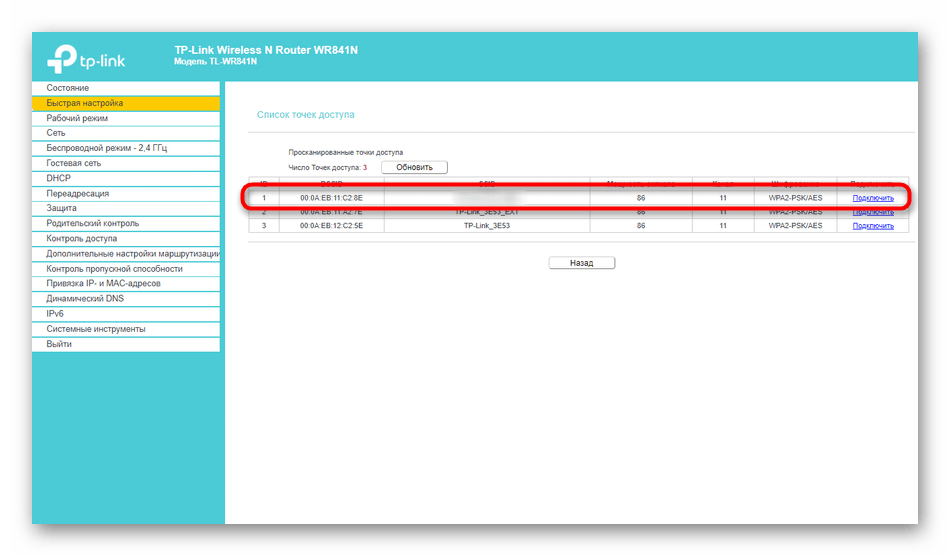
- From the list of available networks, select the one you want to connect to. If necessary, click “Refresh”to start rescanning the networks.
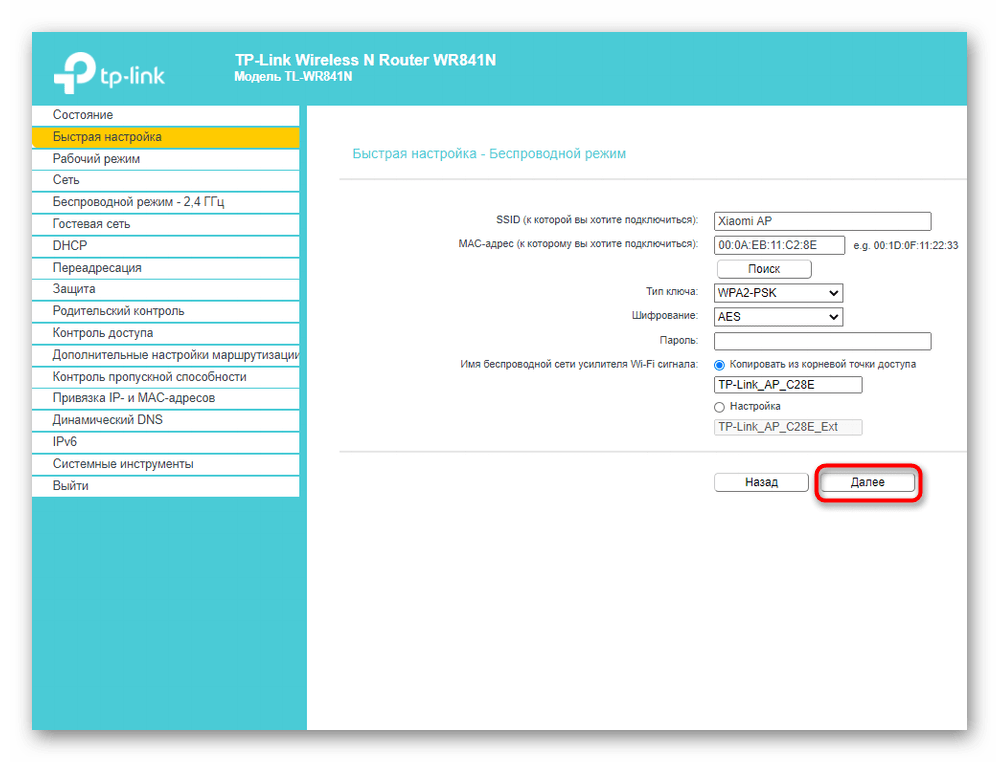
- Do not change the name of the wireless network or its MAC address, because these parameters come from your smartphone.
- However, it is mandatory to enter a password if the network was protected with one when it was created on your mobile device.
- When you are finished, click “Next.” to confirm the connection.
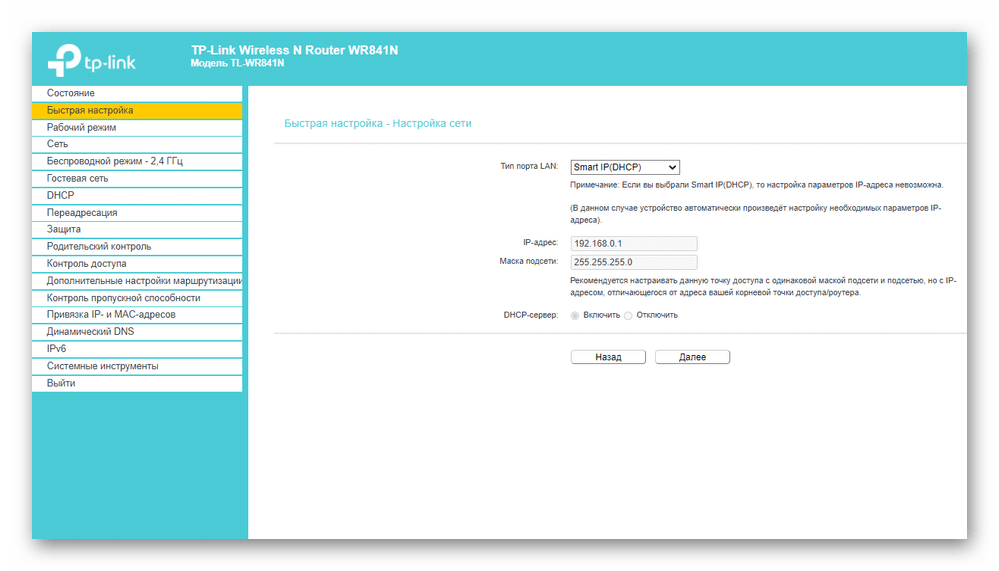
- Additionally, you are prompted to change the local network settings, but it is better to leave the defaults as they will be suitable in most cases.
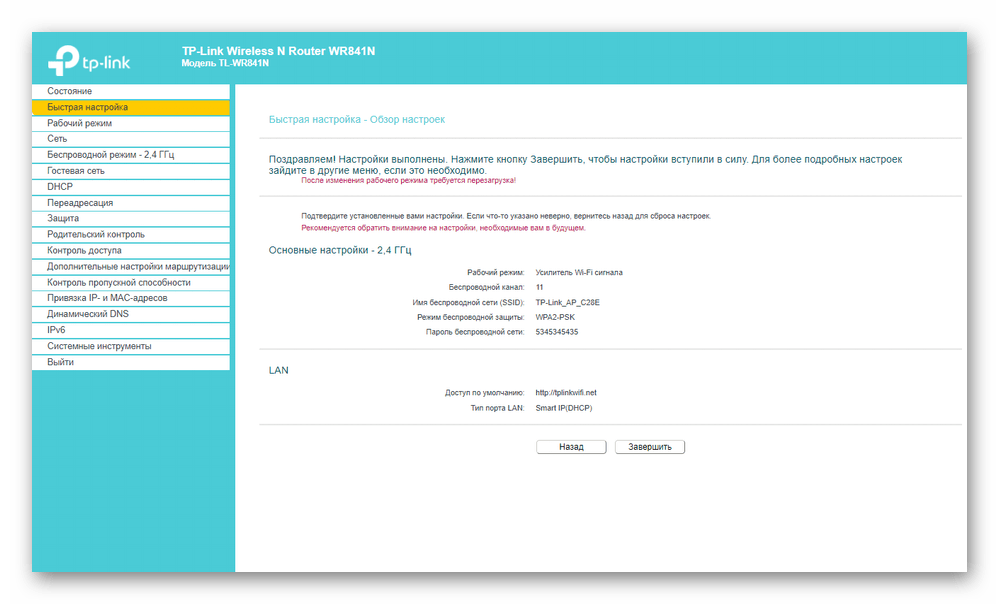
- You will be notified if the configuration is successful and you can proceed to connect other devices to the router using the created SSID.


