Then you need to open "Internet Protocol Version 4 (TCP/IPv4)" and open its properties .

- 168.1.1 or 192.168.0.1 – access to the settings of Wi-Fi router
- 168.1.1 and 192.168.0.1 – what these addresses are and how to use them
- How do I know the IP address of my router?
- Step-by-step instructions: connecting and setting up a Wi-Fi router
- Connecting the router to the computer
- How to find out the IP and enter the settings of the router.
- How to determine the IP address of your router in Windows 7.
- Main settings
- Login problems
- Find the IP-address of the router to log in
- Internet Protocol
- Popular network addresses by the device vendor and information for logging into the web-interface
- Defining
- D-Link
168.1.1 or 192.168.0.1 – access to the settings of Wi-Fi router
Many users ask how to enter the settings of Wi-Fi router. It is a very popular topic and I have written a few articles on it. Many people simply enter 192.168.1.1, or 192.168.0.1 in their browser and get directed not to their router's control panel, but to a page instead. Where they see a lot of sites, and already try to log in to their router according to the instructions.
I decided to prepare a detailed article on how to connect, how to find the address to enter into the settings of the router, what these addresses are 192.168.0.1 and 192.168.1.1, where to enter them, and how to even go to the page with the settings of the router.
If you have just bought a router (or a modem) and want to configure it, something has broken, the Internet has stopped working, the settings are lost, you want to change some parameters (Wi-Fi network name, password, etc.), then you need to open the settings, and there to do it all. In this article we will go through all the steps. I have already prepared detailed articles for different router manufacturers: Tp-Link, D-Link, Asus, Tenda, ZyXEL, Linksys, and even a general article on logging into the router's web interface. And in this article I want to tell in more detail about the addresses, through which you can access the settings page of the router or modem.
168.1.1 and 192.168.0.1 – what these addresses are and how to use them
Router (or modem) is a device which has its own little operating system (software) . It is clear that these devices have a lot of settings. If you do not set delicate settings, the Internet will not work, there will be no password to Wi-Fi, etc. Therefore, each router has settings. These settings are opened through the browser, at a certain address. You can say that this is such a page, or a site with the settings of your network device.
As a rule, on all routers, the settings can be accessed by IP-address 192.168.1.1 or 192.168.0.1. Also, many manufacturers use addresses like my.keenetic.net for accessing the web interface. But even in these cases you can use the numbers I mentioned above.
Often, network device manufacturers give you special programs on the CD-ROM with which you can configure and change the settings of your router. For example, Linksys emphasizes this way of setting up. It seems to me that it is better to do everything via a browser, so as not to get confused. It makes more sense that way.
In any case, you can open the settings of your device simply by typing 192.168.0.1, or 192.168.1.1 in any browser. With the router connected. Now we'll look at this in more detail.
How do I know the IP address of my router?
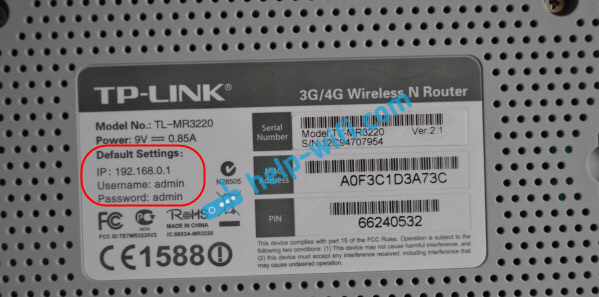
It's very simple. On almost all devices, the address for access to the control panel, and the standard username and password are listed at the bottom of the device itself. Here, for example on Tp-Link devices. The IP address that you have to type in your browser is http://192.168.1.1 (There are a few models that have http://192.168.0.1) . The user name and password are admin and admin.


Step-by-step instructions: connecting and setting up a Wi-Fi router
One mistake many users make is not paying attention to where they are installing the router. No, for testing and initial setup – it is not so important, but for the permanent operation of the device – it is not good in all cases.
The fact is that depending on where you will be located Wi-Fi router – will greatly Depending on where you place your Wi-Fi router network reception in different corners of your home. The following are the factors that significantly reduce the Wi-Fi signal: supporting thick walls, mirrors, metal doors, etc.
Therefore, place the router router should be placed so that it was equidistant from all devices that will connect to its network (and also so that there were a minimum of obstacles to the network signal).
An example of both unsuccessful and successful placement of the router in a 2-bedroom apartment is shown in the layout below.
To the question of choosing and placing the router in the apartment
In general, I think the message is clear: depending on the location of the router – will depend on the quality of the network signal, speed, errors, etc.
Connecting the router to the computer
A typical router setup consists of (example pictured below) :
- The router itself;
- Power supply;
- A network cable (usually 1-2 m long). Used to connect the router to your PC (laptop) and configure it;
- Operating instructions;
- antenna (there may be no antenna – in some routers it is built into the device housing).
That is, there is everything you need to start connecting and configuring the device.
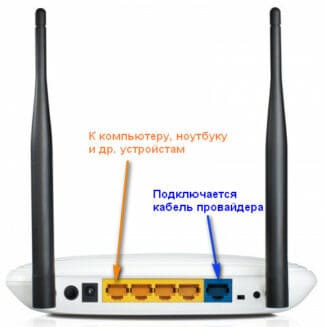
- connect the router with a network cable (which comes with the router) to your computer or laptop. By the waynote that the router, as a rule, has 4 LAN ports (usually marked yellow). On some routers the marking may be Ethernet instead of LAN;
- Disconnect the Internet cable (coming from the provider) from the computer system unit and connect it to the router: to the WAN or Internet port (usually marked blue) ;
- connect power to the router and turn on the device;
- if everything is done correctly – various LEDs on the device will start blinking.
To show schematically, the Wi-Fi router becomes a kind of intermediary between your computer and the Internet cable from the provider (see the picture below).
Important! Connect the router to the PC (laptop) with a network cable is necessary for the initial setup of the device. Later, you can disconnect the cable and place the router in a more convenient location.
How to find out the IP and enter the settings of the router.
To enter the interface of the router, you need to enter its IP in the address bar of your browser, press "Enter" and authenticate. You can find out the IP address of the router, the user name and password to enter the control panel from the documentation that came with your network device. This information is also duplicated on the sticker on the bottom of the router.

It should be said that if the device has not previously changed the data for authentication, the default name and password are usually set to admin, and their IP address may vary slightly. For example, popular world brands of network equipment set such IP:
All you have to do is enter the IP address corresponding to your manufacturer into the address bar and fill in the authentication form (name, password).

If access to the interface is obtained, then it remains to configure the Internet connection with your provider and set a password for the wireless Wi-Fi network. Otherwise it is better to read the article to the end. By the way, if the router will have a weak Wi-Fi signal, then I recommend to find a free channel with a free program inSSIDer.
How to determine the IP address of your router in Windows 7.
If for some reason you do not have the attached document and you do not have the necessary information on the sticker, you can find out the data for logging into the control panel through the network connections. For example, for Windows 7 operating system, you can see the IP address of the network device via the following path:
Windows 7 – Start > Control Panel > Networks and Internet > Network and Sharing Center > Change Adapter Settings > double-click on the "Local Area Connection" icon and in the window that opens click on "Information…". In the new window, the IP address of the connected router will be displayed in the "DNS server" line.

In addition, you can determine the IP of the router via the command line. To do this you need to press the key combination on the keyboard Windows +R (free reference on keyboard shortcuts here) and in the opening window "Run" enter the command CMD (command line), click "OK".

After that you open a command line where you have to type the command ipconfig. Like this:

Now you have information about the network connections on the local network. Find the line "Default Gateway", it shows the IP address of the router. In my case, it is 192.168.1.1. That is all. Now you just insert the address into the browser, get authenticated, connect the router to the Internet, and configure the wireless network.
Main settings
The current state of the device is displayed on the main page of the Rostelecom router web interface.

Using the second tab (depending on the interface) configure the network connection – click "Add connection".

In the menu that opens, enter the data from the contract. The main configuration of the wi-fi is made on the tab 4, where we enter the name of the Wi-Fi, make up a password, set the type of encryption at your discretion (WPA/WPA2 PSK for the home network). After entering the data, click on the "Apply" button. Rostelecom router settings are ready.
Login problems
When logging into the web interface of the Rostelecom router, there are some problems, the most common:
- The device from which you log in to the Rostelecom router is not connected to the router's Wi-Fi network, so it is impossible to open the desired authorization page;
- If address 192.168.1.1 is not suitable, log into Rostelecom router after searching for the IP address via command line (about this later);
- Unsuitable login admin, password user for authorization.
Find the IP-address of the router to log in
Usually such data is provided by provider to its subscribers. Find out the IP-address of the device via PC:
- Open the command line with the "Start" button of the desktop.

- Copy and paste into it the command ipconfig/all, press "Enter".

- Observe the line "Default Gateway", where against the ip address 192.168.0.1, to log into the router Rostelecom.
When entering the address in the address bar of the browser, pay attention to the connection of the device to the router's network. It is important that the number 1 is not replaced with the letter l.
Internet Protocol
The Internet Protocol is the basis for the data transfer, network connection.
- Through the "Control Panel" go to "Network and Sharing Center".
- In the window that opens, click "Create and configure a new connection or network".

- The next window that appears suggests selecting the line "Connect to the Internet". Press the "Next" button.

- The next window suggests selecting "High speed (with PPPoE)".

- In the console, enter the user name and password from the contract of the service provider, and click "Connect".

- After that, the configuration of the Internet protocol is ready.
Popular network addresses by the device vendor and information for logging into the web-interface
TP-Link 192.168.1.1 or 192.168.0.1. Login password: admin-admin.
D-link 192.168.0.1 or 192.168.8.254. Login password: admin-empty.
Netgear 10.0.0.1. Login password: admin-password.
If the username and password have been changed, the default username and password will not work. In such a situation, you must enter the newly set parameters to log in to the router. The only option is to reset the router to the default login and password by pressing the Reset button. However, please note that all other router settings will be reset along with these settings, in particular those used when connecting to the Internet.
In addition, it may take you much longer to find the forgotten settings to log into the router than it does to look up the router's documentation. So, first of all, put all your efforts into finding the lost documentation, and only then start searching for the web address, login name, and password. Don't forget that some router models are more prudent in this regard – a sticker on the bottom of the device duplicates the data needed to enter the administration panel. So don't forget to look there as well. Good luck!
Hi friends, this is a general topic and will be especially helpful for those who have just started to look into networking equipment. In almost every article you come across the phrase "enter the router settings". Those who have been reading us for a long time already know what it means. And for absolute beginners, I will tell you all about the WEB-interface of the router. Ready? Let's get started!
Defining
The most important thing! You don't need an internet connection to get into the router's "admin interface"! During the initial setup it is recommended to connect the router to your PC or laptop with a patch-cord. If this is not possible, feel free to use Wi-Fi connection.
The first thing we need to open the WEB-interface is to know the router IP. The easiest way is to turn the device upside down and examine the sticker.
If it is missing, you can see the necessary information in the network connections (using Windows 10 as an example):
- In Windows Settings, go to "Network and Internet".
- Select "Adapter settings".
- Click on the desired network connection, then "Status".
- Select "Information". Look for "Default Gateway". The IP address is specified there.
How to access the WEB-interface of the router? Open any browser and in the address bar (not a search!) type in its IP address. Then you will open authorization window in administrator's cabinet, where you have to enter your login and password. That's it.
Now let's have a look at the "admin area" of routers from well-known manufacturers.
D-Link
To log into the WEB interface of the D-Link router use IP – 192.168.0.1 (if not – dlinkrouter.local), login – admin, password – blank (sometimes admin).
- Network menu. In the "Connections" section the connection to the Internet is carried out by connection type (you remember – PPPoE, PPPTP, L2TP).
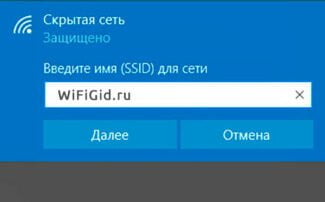
- Menu "Wi-Fi". There are sections where the access point is enabled, it is possible to hide the network, the mode of operation is set, the password is set.
- The System menu. First of all, you need to set/change the administrator password. There is also an item "Software update".
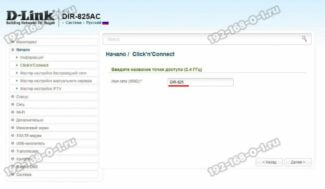
- After entering the WEB-interface, the system will offer a quick setup of the router.
- In the advanced settings, pay attention to the menu "Internet". In the "Connection" tab you can configure the connection to your ISP.
- In the "Wireless Network" section, the "General" tab configures Wi-Fi – SSID, frequency, mode, channel, encryption, password.
- In the "Administration" section you can change the login information for the control panel, update the software.
- In the general settings there is an interesting section "Guest network". For it the name and password are also set. What is the trick? Devices that connect to the guest network do not have access to the local network.
- If necessary, there is also a "Parental Control".
- An interesting feature is "AiCloud". Provides access via the Internet to the drive, which is connected to the USB port of the router.


