I've been asked very often in the comments if it's possible to set up a router with just a phone, or a tablet. What to do if you don't have a computer, laptop, netbook, etc. in the house. And it is not difficult to imagine a case where you don't have a computer, but there are a lot of mobile devices that can connect to the Internet via Wi-Fi. And you decided to buy a router to distribute the Internet to your devices.

- Wireless ISP (WISP) – Setting up a Router as a WiFi Adapter for a Computer or Laptop
- How to configure an Asus router as a wireless network client (Wirelss ISP)?
- How to configure your own Wi-Fi router
- How to configure the router
- Interaction with the interface
- WiFi
- Setting up
- Setting up a Wi-Fi connection
- Setting a wireless network password
- How to configure the router – algorithm of actions:
- Step 1. Go to the web interface.
- Step 2: Configure the Internet connection (WAN).
- Method 1. Connection via WiFi.
- Connecting your Asus router to the network over WiFi
- Method 2. Connection via LAN-cable.
- Preparation: connect the router
- Let's start setting up the router from your tablet.
- Configure the router through the browser on the tablet
Wireless ISP (WISP) – Setting up a Router as a WiFi Adapter for a Computer or Laptop
Today we will talk about how to set up a router as a wifi receiver, or wireless network adapter. In professional terminology, it is also called "client mode" and is referred to as "WISP" or "Wireless ISP" – Wireless Internet Service Provider. This feature is most useful when you need to connect a computer or TV set-top box that has an Ethernet network cable connector but no built-in WiFi module. You also do not have an additional USB wireless adapter or port to connect it to. In this case, you can set up a conventional wifi router as a signal receiver and stream the Internet to your computer.
WISP (Wireless ISP), or client mode, is a special function of the router, which works to receive wifi signal and transmit the Internet further via cable to another device. Read more about the technical part in WiKi.
In fact, in the receiver mode, the router turns into a kind of wifi adapter. That is, it does not wirelessly distribute the Internet, received by cable, as it happens in its most familiar role. On the contrary, it receives the Internet via wifi from another access point and transmits it to a computer, laptop, printer or TV using a network cable.

The main condition for turning the router into a wireless network adapter mode is the presence of the receiver function built into the firmware. It is not present on all models; therefore you have to check the technical specifications.
The general algorithm for setting up the second router as a wifi receiver is as follows:
And voila – it already has wireless Internet, although originally it has only a LAN port for cable connection.
How to configure an Asus router as a wireless network client (Wirelss ISP)?
And now I want to show in detail, how exactly to set up a router as a wifi receiver in client mode on the example of the model from Asus. Surprisingly, the manufacturers still haven't decided what to call the WISP mode of the router as a wireless adapter. Each company has a different name for it – WISP, WDS, Bridge, Bridge.
This is especially noticeable at Asus, where in each model it can be called differently. For instance, on Asus EA-N66 it is called "Wireless Network Adapter". To activate it you have to go to the "Administration" section, the "Working Mode" tab and check the necessary item.

The WISP client mode in very many cases is not available in official firmware installed on routers from the factory. For example, like on my home Asus RT-N10U – this mode doesn't exist officially. So if you are planning to use this type of connection, make sure the model you buy has a client mode – usually it is indicated as "Client mode".

But if you have already bought it and it turned out that the router has no WISP function, all is not lost – you can use unofficial firmware, for example, mine comes from DD-WRT group, which opens this possibility.


How to configure your own Wi-Fi router
There are quite a few subtleties in setting up a wireless router. They are associated with differences in the software used and even in the design, which constitute the know-how of the manufacturer. However, there is a number of basic features that every experienced user should know, regardless of which manufacturer's range the device belongs to.
Due to the peculiarities of the propagation of radio waves, which transmit the signal of the router, there may be problems, conflicts with wi-fi. They are connected with the presence of insurmountable obstacles, such as walls, as well as objects with reflective properties like mirrors. That is why it is especially important to carry out the correct installation.
It is complicated by the fact that the cable carrying the network signal from the provider is often of short length. But you can't skimp on it, because saving a dollar or two on the cable that goes to the router's input, you can significantly lose the quality of the wireless signal within a single apartment or house.
The additional limitation is the proximity of the power supply. For instance, routers are usually installed near the nearest power socket, since the power cable is rarely more than a meter long. And if you own a two-story house, you will probably want to install it closer to the ceiling to provide a quality signal on both floors.
To do this allow special mounting holes on the cases of most models, with which you can fix the device in a hanging position on the screws fixed in the wall.
Another important detail in the placement settings is the position of the antennas that transmit wi-fi. Many users try to redirect them due to the tilt that is usually available in the design of modern antennas. But there is no need to do this.
It is recommended to expose the antennas strictly vertically so that the signal propagates evenly. Additionally, to avoid signal loss from the side of the wall on which the device is mounted, install a proprietary accessory – a reflector, although it can be made yourself if you have free time and the necessary improvised materials.
How to configure the router
Not every router has a functionality that allows you to automatically obtain the necessary settings. In most cases with a router, the user has to prescribe them manually. But now this process is not complicated, thanks to modern software tools, which can be accessed with a browser like Opera, Mozilla, Chrome or Edge in Windows 10.
Such devices – routers – are configured according to the same principle. The user or system administrator enters the coveted combination of numbers into the address bar of the browser. Depending on the router model, these may be the following combinations of numbers:

- 192.168.0.1.
- 192.168.1.1.
It is the one that gives access to the software firmware (similar to the operating system in a computer).
To get to the settings, the user must enter the password (password) and alias (login) when using it for the first time. They are written by the manufacturer on a special sticker that is glued to the bottom of the case. Also on it is important additional information such as MAC codes, IMEI and SN (serial number).
All of this data is inconvenient to look at every time on the bottom of the case, so it is recommended to copy them or take a picture of them on your smartphone. It is better not to remove the sticker, but to keep it on the case, because not all manufacturers duplicate the data on the packaging or in the manual, which is also better not to throw it away.

Interaction with the interface
The software interface is developed independently by each manufacturer, so different manufacturers have significant differences in it in terms of usability and functionality. But at the same time the interface of the firmware within the range of one manufacturer is usually the same and possible differences are minimal.
WiFi
Now configure WiFi. Go to the appropriate section – in my case it's "Wireless Mode" – "Wireless Mode Settings"

and specify the network name you want to use, for example:

Go to the WiFi security settings section, at TP-LINK: "Wireless Mode" – "Wireless Security"

Select the safest security method (now WPA2) and enter your password, for example:

Click "Save." You can now connect to your router via WiFi.
This was a basic router setup instruction that will allow you to distribute Internet over secure WiFi to all the devices in your apartment, cafe, or office.
If you need advanced settings, write and I will help with advice or instructions.
Setting up

Finally we take a mobile device and read how to configure the router via the phone. Note that we are working without a network cable, which is called a patch cord (you need it to connect the router to a PC or laptop). Go to search for a wireless network and in the list click on the network of our access point. Connection to it must be without a password for now. In rare cases, you will need a code to log into the selected network. It is easy to find since it is written on the back of the router.
Next, on your device turn on any browser and in the address bar write IP – by default 192.168.1.1, or 192.168.0.1 and go. The address of the device can usually be found on a sticker that hangs on the back cover.
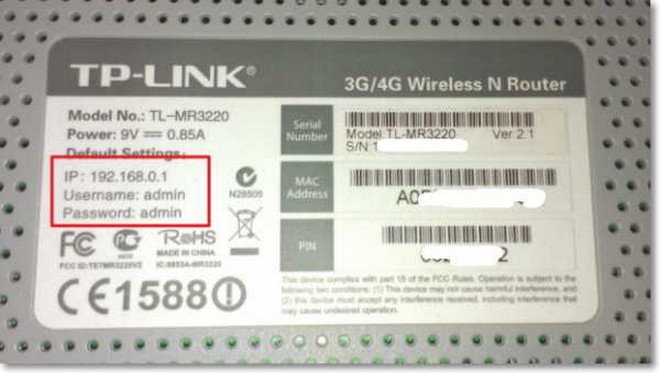
Then we get to the settings menu, or a window pops up asking you to enter your username and password. Usually, the login and password are standard – admin and admin. Enter them and get into the router's web interface. And then there is the usual configuration.
It is better to configure the router so that it works correctly with any Internet provider, hence there will be no problems when connecting to the network and accessing Wi-Fi for your devices. To perform this task, we need to know a few criteria that we could be informed by the Internet service provider when signing the documents for connection to the Internet service.
First, we need to know what technology is used to make the connection. Let's list the options:
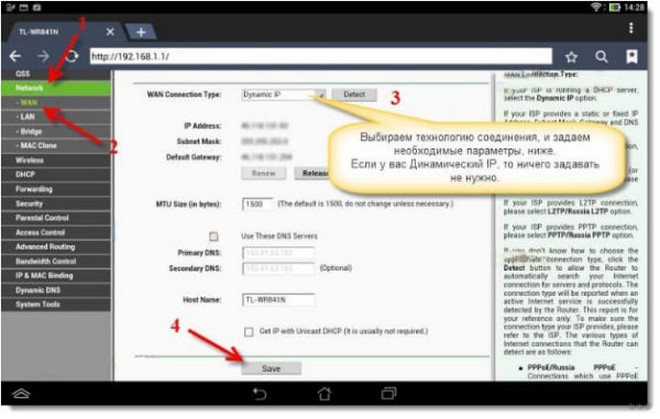
Setting up a Wi-Fi connection
Now we will tell you how to configure on the router access to Wi-Fi via phone or tablet:
- Consider the tab called "Wireless."
- In the "Wireless_Network_Name" field, you need to assign a name to our new network. You can use Latin characters and numbers for this.
- In the "Region» select the country of residence.
- Then click "Save. Sometimes a window with a notification appears. Ignore it by clicking the OK button.
Setting a wireless network password
Setting up Wi-Fi on the router requires setting a password. This must be done in any case, through the phone you set up a connection or from a PC.
- In the tab "Wireless" select "Wireless_Security».
- Check the box "WPA/WPA-2" – "Personal (Recommended)".
- In the PSK_Password» you must enter the password. You have created it yourself and you should remember it, as you will have to enter it each time you make a new connection. It is important to observe the requirements to the password: more than 8 characters, use capital and small Latin letters and numbers. If the password is complicated, it is better to write it down. If you lose it, you will have to reset all the equipment settings and start all over again.
How to configure the router – algorithm of actions:
Any action should be considered, any operation should have its own algorithm. No, of course it is possible to act "from a flashlight" and as if it were possible, but then you can simply achieve that as a result of such actions the device will work unstable, lose network, etc. Here is my sequence of actions, which I do myself.
Step 1. Go to the web interface.
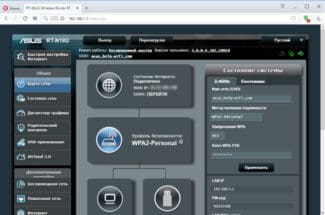
For easy setup all modern SOHO-level routers have a special interface, which many call "Modem Site". To get to the web interface, you have to run your web browser (the best is Internet Explorer or Google Chrome). In the address bar, type the IP address of the router in the local network. As a rule, it is 192.168.1.1. The exception is devices from D-Link, Tenda and some models TP-Link . – Their IP is 192.168.0.1. If the web interface is not available – study these articles: for 192.168.1.1 and for 192.168.0.1. If it is accessible, but you can log in with the standard login admin and the default password admin or 1234 If you can't, this article will help.
Step 2: Configure the Internet connection (WAN).
All the main parameters of the Internet connection are in the section of the web-interface called "WAN" or "Internet":
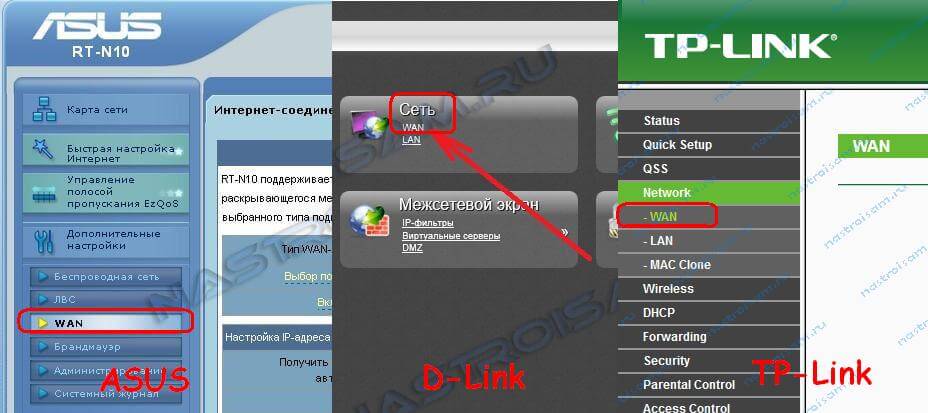
To connect to your ISP you need to specify the type of connection – PPPoE, PPTP, L2TP or IPoE (Dynamic or Static IP) in this section. If you do not know what type you use, you can clarify this with the technical support of your provider, as they must provide such data. If you use PPPoE, PPTP or L2TP connection type, then you must have a card with login and password for Internet access. If you do not have their data for authorization, then it makes no sense to do further steps – first you have to go to the subscriber department of the provider and restore the details. Also, in most cases, you should check "Enable WAN Service", "Enable NAT" and "Enable Firewall".
Example of setting up a D-Link DIR router for Rostelecom via PPPoE:
Method 1. Connection via WiFi.

This way, in my opinion, is the most correct – one device simply extends the coverage area of another device's WiFi network. Generally, initially there was just a repeater mode, which was either supported or not. Then a new technology came along – WDS .which wireless device manufacturers began to actively integrate into their products.
WDS (Wireless Distribution System) is a special technology which allows expanding wireless Wi-Fi-network coverage by combining several access points or several WiFi routers into one network without any wired connection between them. The main requirement for organizing such a network is that all base stations of a WDS network must be configured to use the same frequency, encryption method and encryption key.
As a result, in order to connect a router via a router over WiFi, the first must simply distribute a wireless network and no additional settings need to be done on it. And the second one should be able to work in the repeater mode, or support WDS technology, which is almost the same thing. You can find out if your device can do this either by visiting the manufacturer's web-site or by looking through the settings. As an example, I will take two wireless routers that you can connect to other routers via WiFi. The first is. The first one is Asus RT-N12 D1.Asus RT-N12 D1 which can work as a repeater. The second one is a TP-Link which supports WDS technology (TL-W741ND, TL-W841ND, TL-W941ND, TL-W1043ND).
Connecting your Asus router to the network over WiFi
To put Asus in the repeater mode you have to enter the web interface, find the "Administration" section and in the "Mode" tab tick the "Repeater Mode" box:
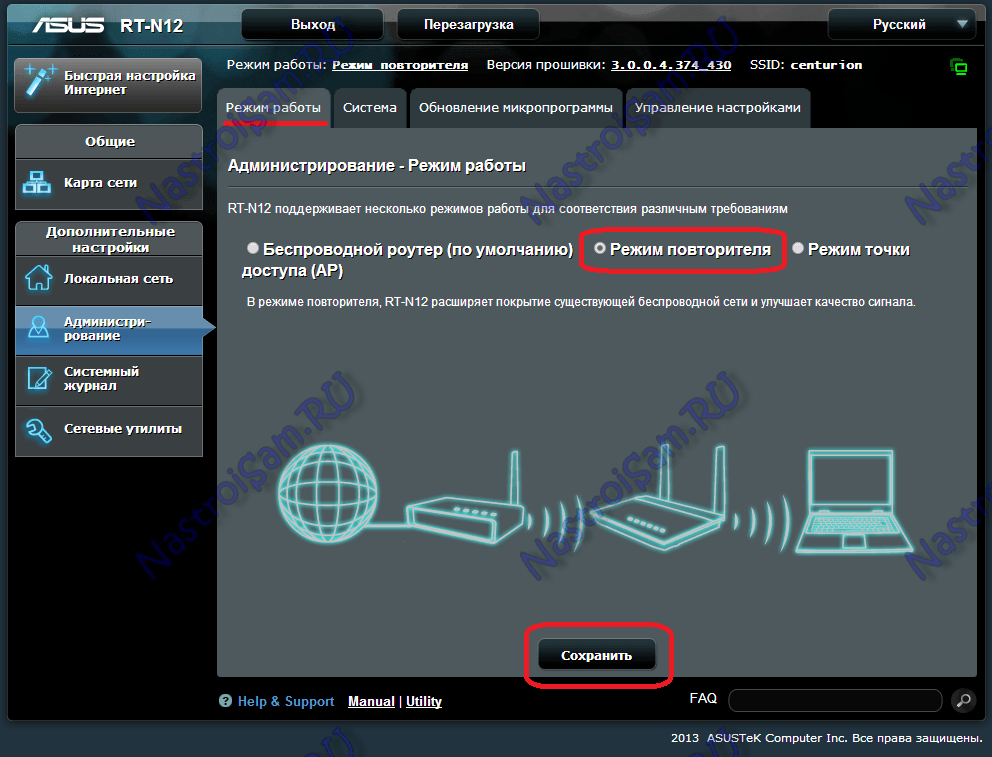
Press the "Save" button and wait for a reboot. After that, click on the "Quick Internet Setup" button. This will open a tab like this:
Method 2. Connection via LAN-cable.

The method of creating a wired network router-router will suit you if the distance between them is more than 30 meters. There are two options for connecting routers with a network patch cord:
– Option 1. Connect the LAN port of one device and the WAN port of the other. The second device will work as a simple client of the first one and will have its own separate WiFi network. It is important to correctly connect the devices to each other. Connect the ports as shown in the photo:
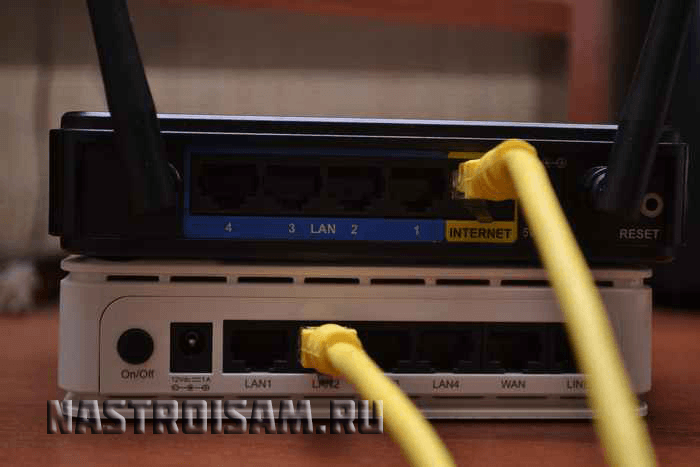
That is, you must connect one of the LAN ports of the first device, where the ISP cable comes in with the Internet (or WAN) port of the second. I would not advise to connect them via LAN ports (although I have considered this option below), because it is not quite correct. After that you have to configure everything properly. On the first router you don't need to do anything. The only thing is to check that the DHCP server is enabled in the LAN section. On the second one, you have to go to the WAN section and select "WAN Connection Type – Dynamic IP":
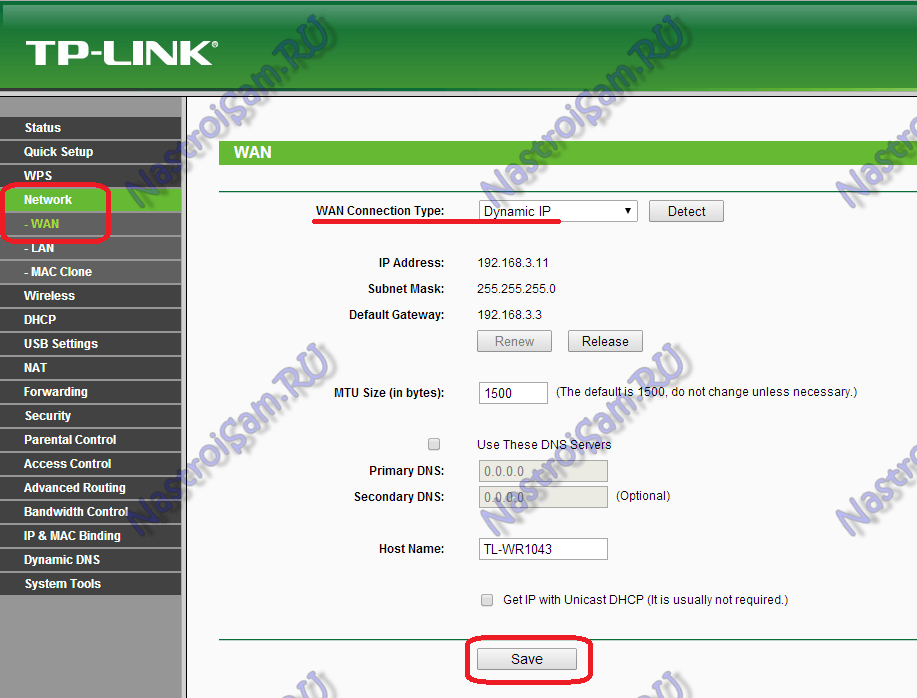
After that, you will need to configure the WiFi network in the usual way, save the settings and reboot the device. After that, the second device must get an IP address from the first one's network and work as one of its clients, distributing it to its clients.
By the way, on some WiFi routers the "Dynamic IP" connection type is used by default in the factory settings. These include devices from D-Link:

Here, to connect it to another, you'll just have to plug in a cable and configure the WiFi network.
– Option 2. Connect the LAN port of one device and the LAN port of the other. In this case both devices will logically be in the same network segment. In this case, the wireless networks of both routers will have the same addressing, but different network names – SSIDs. Setup: The first thing you need to do is to disable the DHCP server on the second device:
Preparation: connect the router
First of all, I advise you to do a complete reset of your router. It doesn't matter if it's new from the store, or if it's already worked somewhere, the settings need to be cleared. It may have already been configured, and some old settings we don't need. Because of them, a lot of problems can arise. Therefore, see the article "How to reset the password and settings on a Wi-Fi router?", and do as it says. Have you done it? Great, let's get on with it. If it doesn't work, let's keep going, but hopefully there are no settings we don't need.
Screw the antenna to the router (if they are removable), then connect the power cord and plug it into the outlet. In the blue WAN connector connect the network cable and the Internet. Which provider brought into your home (it's a good idea to be sure that the Internet works and is paid for. Otherwise, in the process of setting up problems may arise, and you will think that the router, or the way it is set up, is to blame.
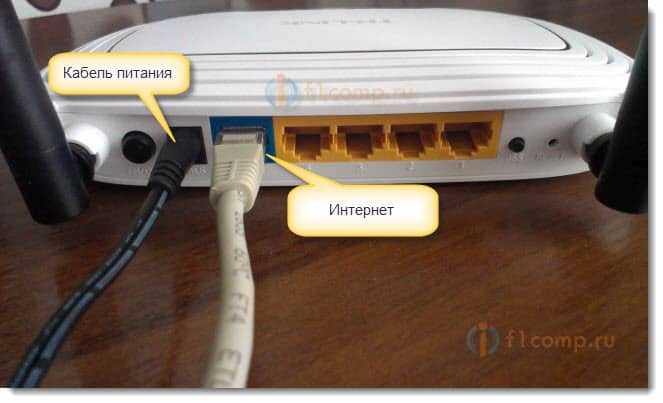
Plugged in, lights flashing, everything is fine. If after turning on the network, the indicators on the router did not light up, then it is possible that it is turned off by a button, which may be on the router itself. Check it out.
Now take your tablet, smartphone, phone (whatever you have) , and proceed to the next point of our instructions.
Let's start setting up the router from your tablet.
By default, the Wi-Fi protection is not set and your network is open. Now we connect the tablet to it (this is in my case, when I will continue to write the tablet, I will be referring to the device from which to configure).
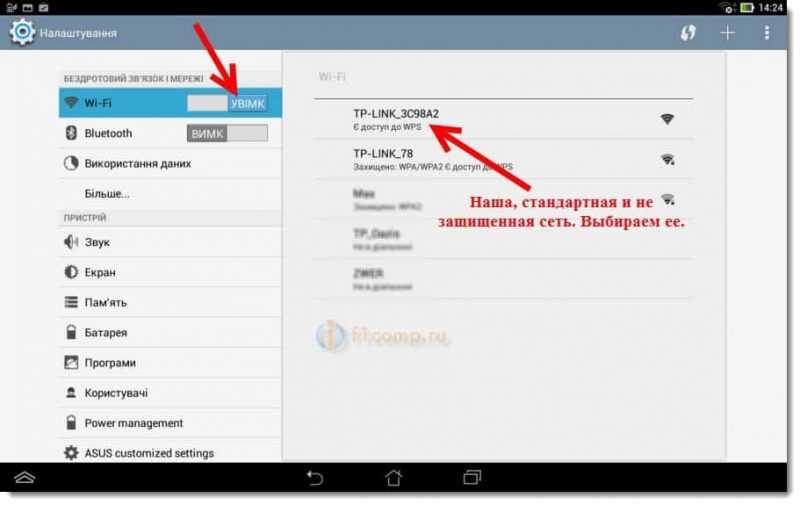
Go into the network connection settings (we need to enable Wi-Fi) .
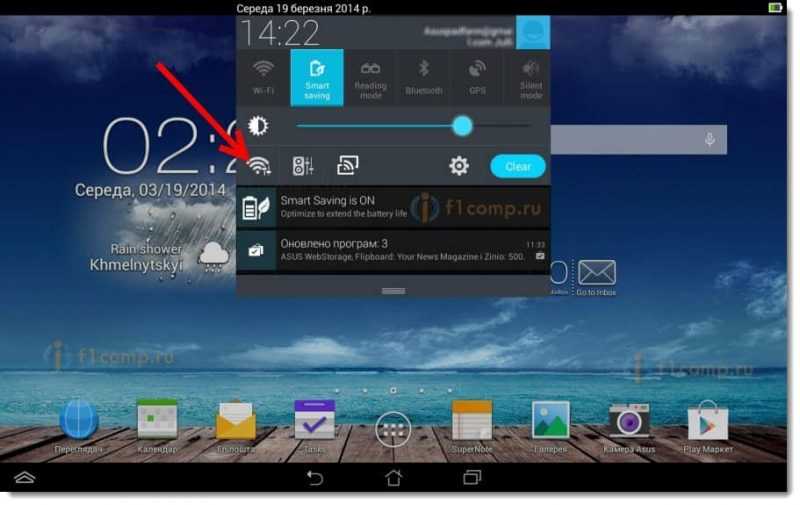
Next, turn on the Wi-Fi network and on the right in the list look for our network.
Here, pay attention! It will have a standard name and will be open. It is important to select our network. If you are in doubt, just unplug your router (turn off and on the Wi-Fi on the device itself) , and see if the network disappears. If so, it means that this is your network, select it.
A window will appear. Simply, click on Connect.
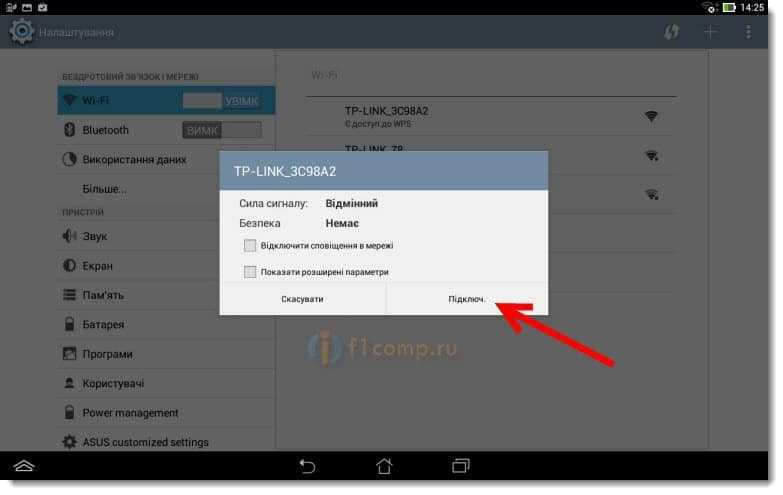
If all is well, then next to the network will appear status "Connected" and an icon with network divisions will appear at the top.

That's it, our tablet is connected to our wireless network. We can proceed with the settings.
Configure the router through the browser on the tablet
We need to launch any browser. It is definitely available on your device. It can be Google Chrome, or some other, standard one.
In the browser, press your finger on the address bar and enter the IP address of our router. Usually, it's 192.168.1.1, or 192.168.0.1. You can see this address, and the default login/password, on the bottom of your router. They should be listed there.
Read More:

