That's why each router should have its own Wi-Fi channel – this will help to significantly reduce the amount of interference and get rid of the problems mentioned. In this case, several routers can be a meter away from each other, continuing to communicate each with its own wireless network participants. That is why any user should know how to change the Wi-Fi channel.

- How to change the Wi-Fi channel on a router
- Changing the channel on the Wi-Fi router
- ASUS RT-N65U router
- Router D-LINK DIR-625
- TP-LINK Archer C1200 V1 Router
- ZyXEL NBG334W router
- To another ISP
- To another channel or frequency
- How to change the channel on my TP-Link router?
- Why is it important to change the channel on a TP-Link router?
- How to change your router frequency: software search for a free channel
- How to change the channel on your TP-Link router
- What is a Wi-Fi network channel and why change it?
- How do you find a free channel with inSSIDer, or WiFiInfoView?
- Logging into the web interface
- How to change the channel on the router
- Asus .
- D-Link
- Keenetic
- What is a router's WiFi channel
- Changing the channel in your router or access point settings
- Changing the channel on the router
- The modification process
- Channels selection
How to change the Wi-Fi channel on a router
Many users find that their Wi-Fi works very slowly. The reason for this can be too busy the channel on which your Wi-Fi network is running. In order to fix this, you need to change the Wi-Fi channel on your router. In this article, we will tell you how to select a channel that is not busy and how to make the necessary changes in the router settings. The article will be relevant for ASUS, D-LINK, TP-LINK and ZYXEL routers.
Simply changing the channel on the Wi-Fi router is not enough, you must first find the least congested Wi-Fi channel. If you do not do this, and just change blindly, then there is a chance to get on an even busier channel and further deteriorate the quality of the signal from the router.
You need to use a special program to search for unloaded channels. If you have a laptop or desktop PC with a Wi-Fi module, you can use the free program Acrylic WiFi Home. This program scans all the existing Wi-Fi networks around you and creates visual graphs based on this information, which show which channels are busy and which are free.
For example, in the screenshot below you can see that channels 1 and 6 are the busiest, while channel 11 is almost empty and is perfect for putting your own Wi-Fi network on it. By the way, channels 1, 6 and 11 do not overlap with each other. Therefore, Wi-Fi networks on channel 6 will have no effect on the Wi-Fi network located on channel 11.

Let's look at another screenshot from Acrylic WiFi Home. This is a different configuration of Wi-Fi networks. In this screenshot, channels 6 through 13 are loaded the most. While channel 1 is almost empty.

Changing the channel on the Wi-Fi router
Changing the channel is a very simple procedure. Usually you just need to go into the Wi-Fi router settings, open the page with Wi-Fi network settings, change the channel to the one that is least loaded, and then save the router settings. Below we'll show you how to do it using examples of several popular routers.
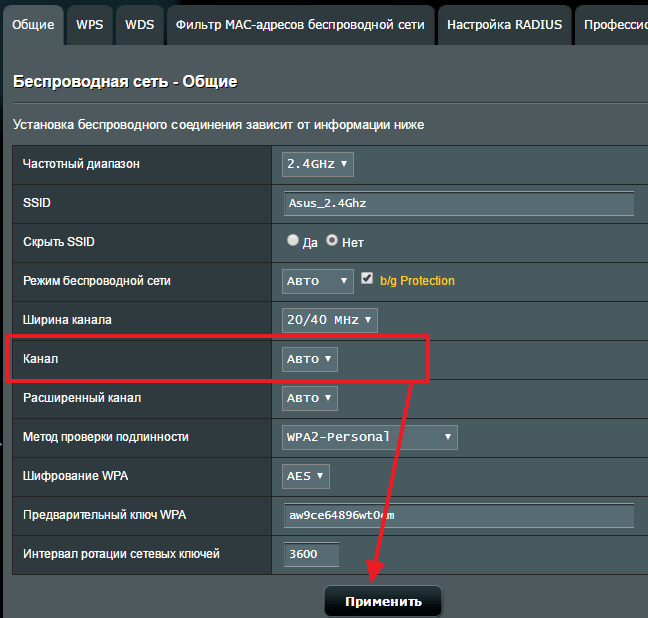
ASUS RT-N65U router
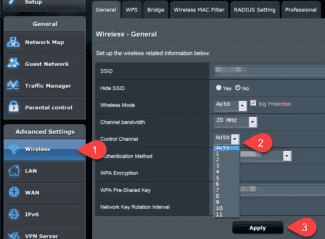
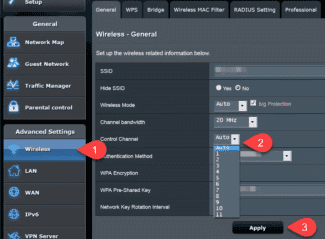
On the ASUS router you have to enter the settings and go to the "Wireless Network" section. Here, in the "General" tab, you can change the channel on which your Wi-Fi network will work. After changing the channel, you need to click on the "Apply" button and wait until the router saves the necessary settings.
Router D-LINK DIR-625
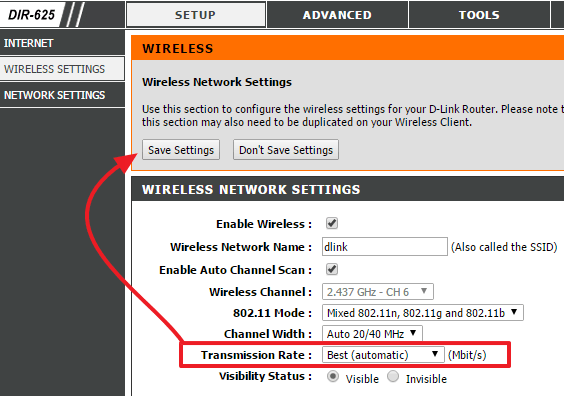
On the router from D-LINK you need to open the section "SETUP – Wireless Settings" and change the channel using the drop-down list "Transmission Rate". After that, you need to save the settings using the "Save Settings" button at the top of the page.
TP-LINK Archer C1200 V1 Router
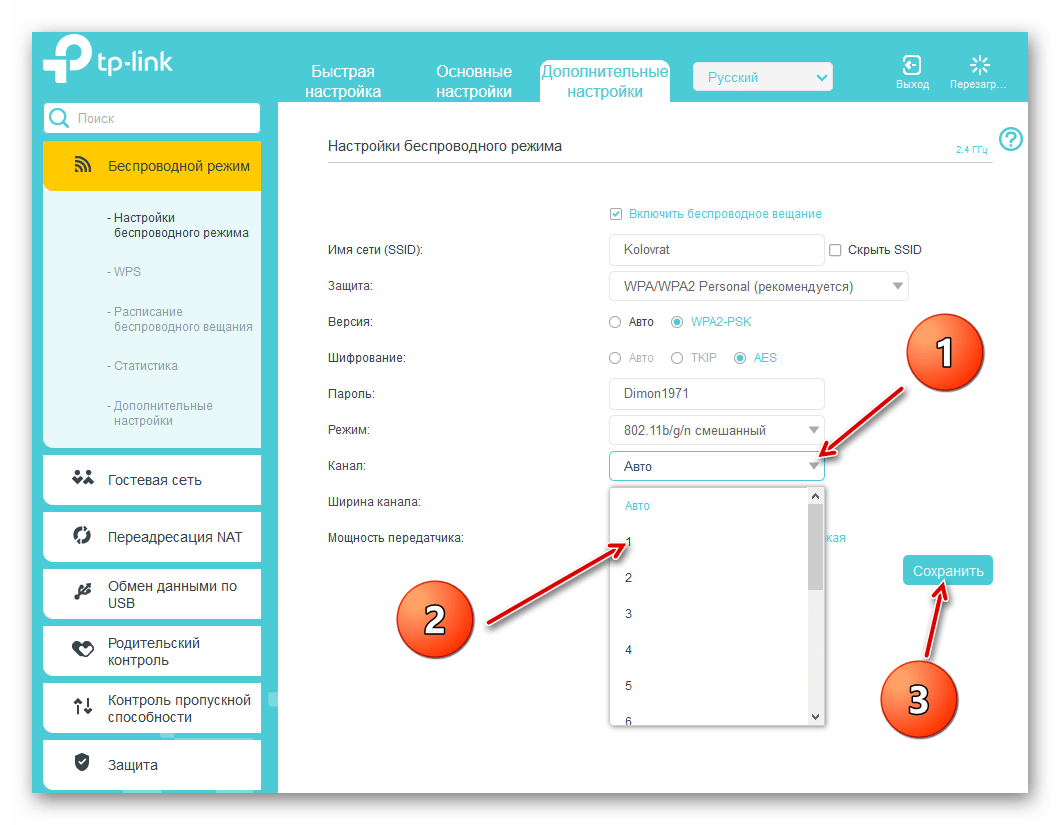
On your TP-LINK router, go to the "Advanced" tab and open the "Wireless – Wireless Settings" section. Here you need to change the channel using the "Channel" drop-down list and save the settings by clicking on the "Save" button.

ZyXEL NBG334W router
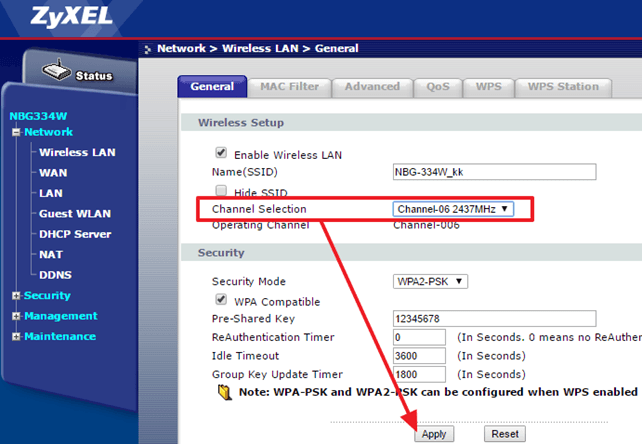
On the router ZyXEL you should open the section "Network – Wireless LAN", change the channel with the help of the drop-down list "Channel Selection" and save the settings by clicking "Apply".
To another ISP
If you already had a router installed and you just changed your ISP (specialists brought another cable into the house, or switched you to an existing cable) These same specialists, as a rule, immediately connect the Internet to the router and set it up on their own. But if you for some reason had to reconfigure the router yourself, you do not need to do the reset, change the name of the Wi-Fi network, password, etc. Enough to go into the router settings, the section with the Internet connection settings and change the connection parameters to a new Internet service provider.
Important! To configure everything correctly, you must have the information you need for the settings. You need to know what type of connection the new provider uses and whether he binds by MAC-address (it is rare, but it happens). This information should be in your Internet Service Agreement. Or on the ISP's website. In any case, you can always call support.
- Go into the router settings according to these instructions.
- Go to the section with the Internet connection settings. Usually it is called "Internet" , or "WAN".
- Next, select the type of connection used by our provider and set the parameters (if necessary). For the "Dynamic IP (DHCP)" nothing need to be set up additionally (choose it and save your settings). For PPPoE you have to write your user name and password. And for PPTP and L2TP – user name, password and server address. All these parameters are provided by your ISP. Take the TP-Link router as an example:
 On TP-Link with the old web interface.
  On TP-Link with the old web interface.
 Readjusting an ASUS router:
 ZyXEL reconfiguration:
  ZyXEL reconfiguration:
 D-Link router reconfiguration:

- If you have a different router, or its web interface looks different, then look for the manual specifically for your model. You can use the search on our site (search box in the upper right corner) .
To another channel or frequency
Here everything is simple. If you want to change the Wi-Fi network channel, here is a detailed instruction – How to find a free Wi-Fi channel and change the channel on the router?
If you're talking about reconfiguring to 2.4 GHz or 5 GHz, I'm not quite sure what you want to do in this case. If you have a single-band router that doesn't support 5 GHz, there's no way to add or configure it. You have to change your router. If you have a dual-band router that supports 2.4 GHz and 5 GHz, you can configure your Wi-Fi network in each band in the router's web interface, in the appropriate section.
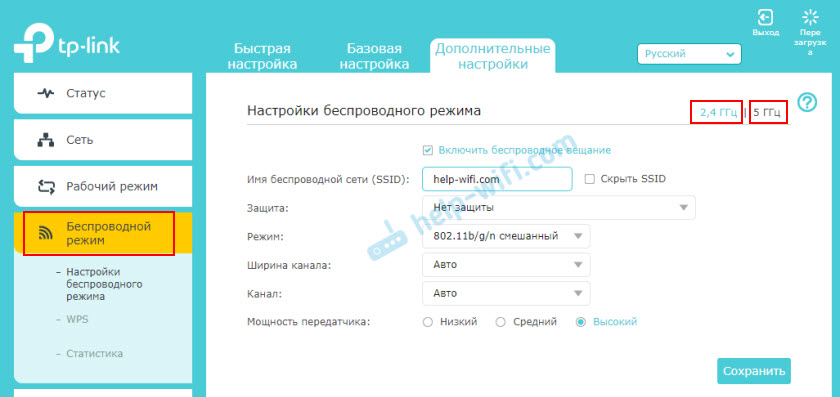
Separately change the settings (name, password) for each band.
Perhaps I have misunderstood something. If anything, please add or correct me in the comments.
How to change the channel on my TP-Link router?
Friends, now you will learn how to change the channel on your TP-Link router, and we will start by defining the channels, the width, the basic settings and generally tell you what they are for.
If your wireless Wi-Fi network has a bad signal or disappears, it may be due to interference caused by other devices. Thus, most of your home network transmits signals in the 2.4 GHz frequency band; very often devices operating on the same 2.4 GHz frequency interfere with the wireless signal. Some electronic devices such as baby monitors, microwave ovens, and cordless phones may use the same frequency band. It is very easy for such devices to interfere with your wireless home network to slow down network connections.
Generally, the wireless networks that most people use have the same radio frequency. Homes that share walls with each other can cause interference between different home networks and result in a bad signal. The good part is that most wireless routers give you the option to change the wireless channel. Different frequency helps routers avoid interference.
Why is it important to change the channel on a TP-Link router?
Most TP-Link routers use 2.4GHz for 802.11n and 5GHz for 802.11n and 802.11ac. There is also a choice of "Channel" on each frequency. The user can select from eleven different channels depending on what other networks are broadcasting on the neighboring network. Multiple Wi-Fi networks often overlap each other, resulting in a slow signal or no signal. By switching to a less busy channel, you can improve the speed of your Wi-Fi.
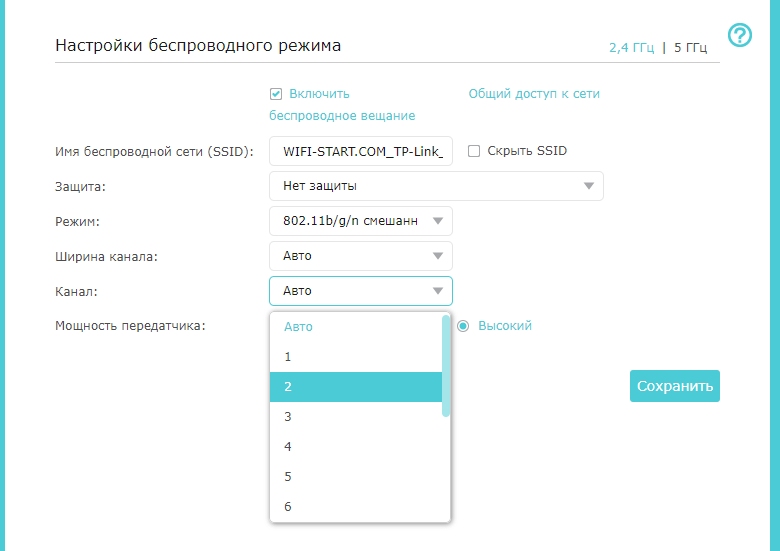
You can change the channel on your TP-Link router by logging into the web interface of your router. This is done by launching a web browser and entering the default IP address into the address bar. You can find your router's default IP address in the printed manual that came with it or by searching on Google. Using the default username and password, log in to your router's settings page.
After logging in, go to Advanced Settings, select "Wireless", and then go to the "Advanced" to change the channel in the drop-down menu. Most routers have this option under the menu called "WLAN". For the changes to take effect, your router may reboot automatically.
It is very important to see nearby wireless networks and their channel, as this gives you the clarity to change your channel and see what other channels are set to.
How to change your router frequency: software search for a free channel
Open the list of available networks on your tablet, smartphone, or laptop. If there are too many networks available to connect in the list, then it is better to use free channel search software. Users like to work with the program inSSIDer. It is free and quite accessible, although the interface is in English. You can also use another simple program, WiFiInfoView.
Consider step by step how to find a free subfrequency via inSSIDer:
- Download and install the program on your computer or laptop.
- After installation, launch inSSIDer.
- Check whether the Wi-Fi is activated.
- In the program, select the Networks tab.
- The table in front of you will display all the available wireless networks, including yours.
- Click the Channel tab. This contains information about the channels used by each network.
- Find a free channel and select it.
You can find out your free channel using a second program, WiFiInfoView. This has the advantage of not requiring installation. Download and open the archive on your computer. After running the file WifiInfoView.exe. you can get to work right away. In the Channel column you can check the data of each network. Check all occupied channels and select the freest one.
How to change the channel on your TP-Link router
If you are working with a TP-Link brand router, the sequence of steps is as follows:
- First, you need to connect to the router wirelessly or wired.
- Open your computer's web browser and enter 192.168.1.1 in the address bar. If this address is not available, try entering 192.168.0.1.
- You will see a window asking you to authenticate. If you have changed these data before, specify the actual login and password. If you are logging in to the router's web interface for the first time, use admin in two fields.
- In the main menu of the control panel, find the category that is dedicated to the wireless mode, here you need to select the settings.
- In front of the Channel item select one of the thirteen static channels. But first, double-check whether your region of residence is set correctly.
- Save the changes you made and restart the device, and then you can check the network operation.
Setting a new sub-frequency on your TP-Link router is easy. It doesn't require any deep programming knowledge.
What is a Wi-Fi network channel and why change it?
In order to better understand the situation, let's first understand what's what. Right now, almost all routers broadcast wirelessly at 2.4 GHz. There are newer routers out there that broadcast at 5 GHzbut there are not many of them yet. They are expensive, and not everyone is willing to throw out their router and buy a new one, so that only the network was at 5 GHz. This is understandable. So, on a frequency of 2.4 GHz, in Ukraine and Russia are allowed to use from channel 1 to channel 13. This means that every Wi-Fi network operates on channel 1 through channel 13. In America, for example, only 11 channels are allowed. Because of this, by the way, there are problems when connecting to wireless networks devices that were brought from America. They simply don't see Wi-Fi, which works on channel 12, or 13.
Typically, the problems start when two (or maybe more) Wi-Fi networks are on the same channel. If you live in a private house, you're likely to have no other networks within the range of your Wi-Fi at all, and even if you do, they will be few and the signal will be weak. But in an apartment, there can be a lot of networks. And very often they will be on the same channel. Why? Let me explain. For example, you set up your router, and in the settings choose a static channel, let it be the 6th. Your neighbor sets up his router and also sets up channel 6.

By default, the router is set to automatic channel selection mode. This means that when the router is turned on, it chooses a free (or less busy) channel. Reboot it, and it can already choose another channel. Whether this thing works, I do not know, but I think that even with automatic selection to 1 channel can stand up several networks. Especially if there are a lot of networks. They simply have nowhere to go.
How do you find a free channel with inSSIDer, or WiFiInfoView?
If you open the list of free networks on your device (laptop, smartphone, tablet) and see a lot of networks available for connection, then to find a free channel for your network is best to use special programs. The most popular of course is inSSIDer. It is free and the interface is in English, but everything is clear there. I also really like the free, simple and small program WiFiInfoView (I recommend using it). I will now show you how to use these programs.
First, we need to download inSSIDer. You can find it on the Internet. To install the program, simply run the installation file from the archive and follow the instructions. After installation run inSSIDer (shortcut will be on the desktop). If I'm not mistaken, this program can also be installed on a tablet or phone that runs on Android/iOS. Look in the branded application stores.
For these two programs to work, you must have Wi-Fi enabled. The device must see the available networks. I wrote about setting up Wi-Fi on the laptop, in this article.
Run it means inSSIDer, and immediately go to the tab NETWORKS. You will immediately see in the table all available Wi-Fi networks and your network. If you are connected to it, you will see an asterisk next to it.

We need to look at the Channel tab or more precisely at the information that is displayed under it. It shows which channel each network is using.
Look, and choose the freest channel for your network. By the way, I forgot to write: there are three channels that never intersect.. These are 1, 6, and 11, if according to the program they are not busy, then first try to set them. If the network works for example on channel 10, it captures two more channels on each side. For example: 8,9,10,11,12. You may be asking why the program shows two channels in front of almost every network. 1+5, 13+9, etc. They write that this is because one channel is set manually, and the second selects the router for better coverage. Couldn't figure it out myself, but I checked and figured out why two channels are displayed. It is because the channel width is set to 40MHz in the router settings. Or, it is automatically selected and it is set to 40MHz. If you set it to 20MHz, it will show one channel. Tested.
Logging into the web interface
You can change the channel on the Wi-Fi router through the firmware. To do this, open the browser and type the IP of the device in the address bar. Most routers are available at 192.168.1.1 or 192.168.0.1.

Next, you need to log in to the router's web interface. The default username is admin, and the password for authorization is usually found on a sticker on the bottom of the device. In most cases it is also admin or 12345.Also on the sticker is the login address.
It is recommended to change the login and password after authorization. This will increase the security of the connection. Attackers will not be able to quickly pick up authorization data in the web interface of the router and will not get access to the settings.
How to change the channel on the router
The way to change the Wi-Fi channel is determined by the router model.
Asus .
In order to change the channel on the wifi router, you must:

- Open the section with additional settings.
- Go to the "Wireless Network" tab.
- Find the item "Channel" and set one of the numbers instead of "Auto".
- Click on the Apply button. Make sure that after configuring the channels, the wireless network is working.
For the light version of the firmware all actions are similar.
D-Link
In order to change the Wi-Fi channel in the router settings, it is necessary:
- Go to advanced settings.

- Open the main Wi-Fi settings.

- Choose one of the free channels. Many D-Link router models automatically display radio channel load, but this data is not always accurate. Before you switch the channel, check its load once again in the program.

Click on the "Apply" button. The router will automatically reboot and start with the new settings.

In the AIR interface, go to the Wi-Fi section, then go to the main settings of the desired frequency. Select the desired channel and click "Apply".
Keenetic
- Open the "Home network" subsection of the "My networks and Wi-Fi" tab.

- Open the "Advanced Settings" for the desired band.

- Select one of the 13 channels in the corresponding settings item and click the "Save" button.
What is a router's WiFi channel
Each of the radio frequency bands used by a Wi-Fi network (2.4 GHz or 5 GHz) is divided into a number of radio channels, to make sure that each AP and its clients operate on their own radio frequencies and do not interfere with each other causing interference.
Depending on the legislation regulating radio frequencies, there may be a different number of Wi-Fi-channels in different countries. For example, in Europe (and Russia in particular) in a typical WiFi range of 2.4 GHz there are 13 channels. In the U.S. it is 11, and in China it is 14.
Changing the channel in your router or access point settings
To change the WiFi channel setting on your router, you must first log into the router's web interface. To do that, launch your browser and type the router's ip-address in the address bar. This is usually 192.168.1.1 or 192.168.0.1. After logging in, you will need to find the basic Wi-Fi settings section.
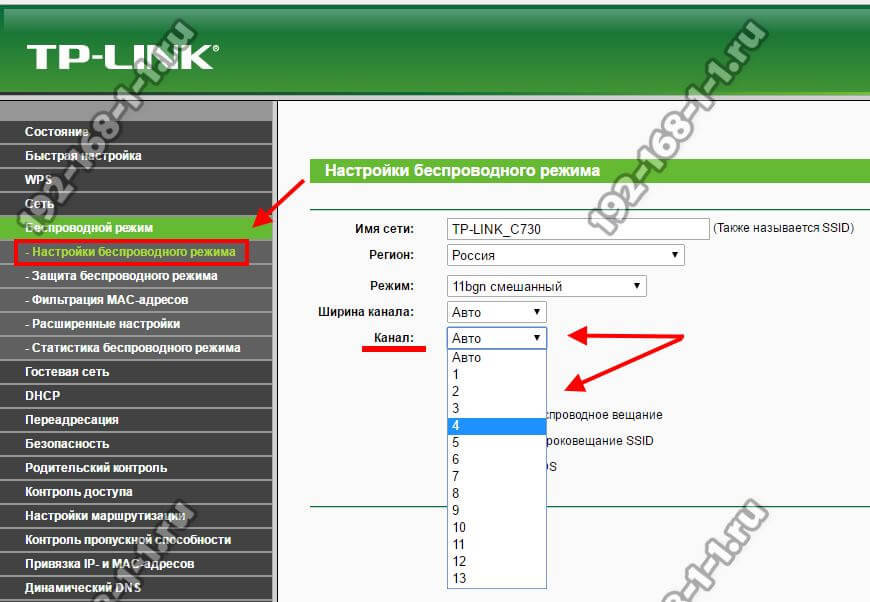
There should be a line "Channel" or "Channel". This is usually set to "auto". Instead, you must select a specific WiFi channel and then save the settings.
Changing the channel on the router
Now we know the available radio channels and can easily change them in the configuration of your router. To do this, you need to log into the web interface of the device and make changes to the settings of the wireless Wi-Fi network. Let's try to do this on a TP-Link router. On routers from other manufacturers our actions will be similar with some minor differences and the general manipulation sequence will be the same.

- In any Internet browser type in the IP-address of the router. Usually it is 192.168.0.1 or 192.168.1.1 if you have not changed it. Then press Enter and get to the router's web interface.
- In the authorization window that opens, enter your username and password in the appropriate fields. By default, they are identical: admin . Click on the button "OK" BUTTON..
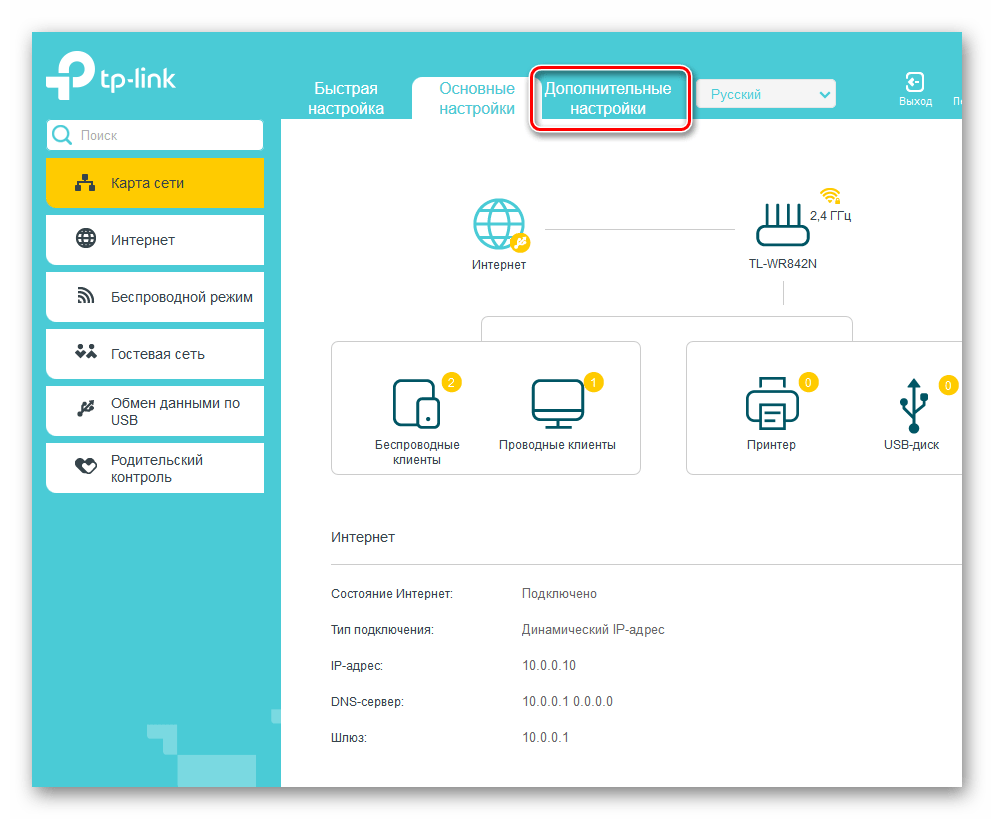

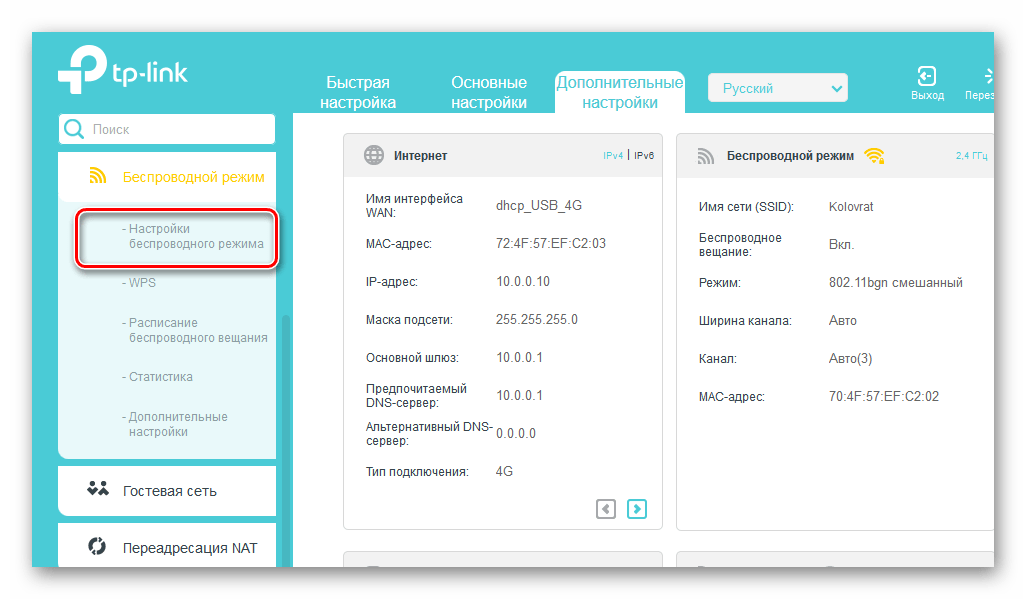
The modification process
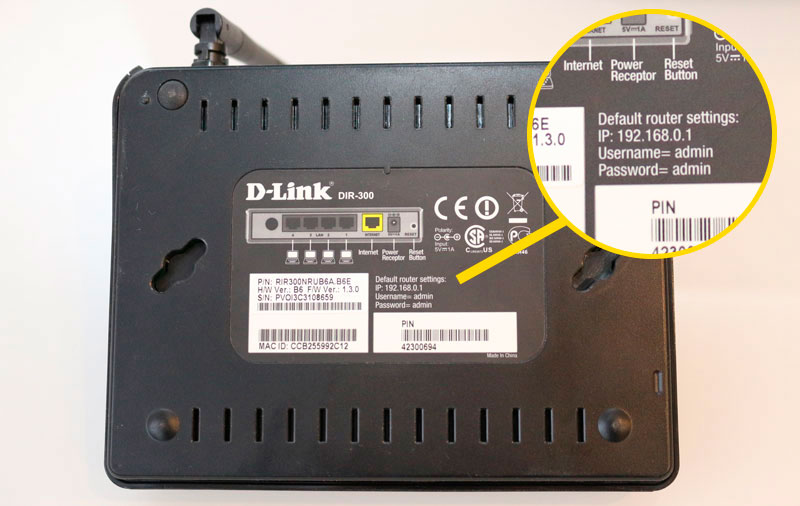
To change any router settings, you will need to connect to its web client. If the device is already configured and functioning properly, this can be done directly through the wireless network. Otherwise you will have to use a wire with RJ-45 connectors, which is supplied with the device. The base address for the connection is 192.168.0.1 and as an alternative a similar combination of symbols can be used where zero is replaced with one. This address is valid for 90% of devices – if entering it in the browser line does not give any results, you need to find the correct combination in the manual.

Login and password can be customized by the router user, but by default you need to enter the word admin in both lines to access any device. Once you have access to the web client, find the menu tab that allows you to change the Wi-Fi channel. In many russified interfaces, it is called "Wireless Network," but the following options can also be found:
Usually such tabs contain many settings, so you will need to select from them two items that allow you to set the desired Wi-Fi channel. Just focus on the words "Channel" or "Channel" to find a drop-down list with numbers and one box-switch where you can check the box. In the list, the channel number is set, but the switch is designed to select the automatic mode of the router. After selecting the channel you only need to reboot the device, using the system settings tab.
Instructions for different manufacturers of network equipment are a bit different, as well as the web-interface of the individual models of the same brand. Let's take a closer look at how to get to the router's parameters using certain brands as an example.
Channels selection
It is logical to assume that randomly selecting a wireless network channel will not give a good result – so the router setup should be approached with prior preparation. Of course, you can always bypass your neighbors and agree with them to use strictly defined channels, but such an approach would be irrational. In a multistory office or residential building you may need to check 30-40 routers, whose coverage areas overlap with the effective radius of your device.
To understand which wireless channel to choose, you need to use special applications. Among the most effective and understandable programs should be noted:
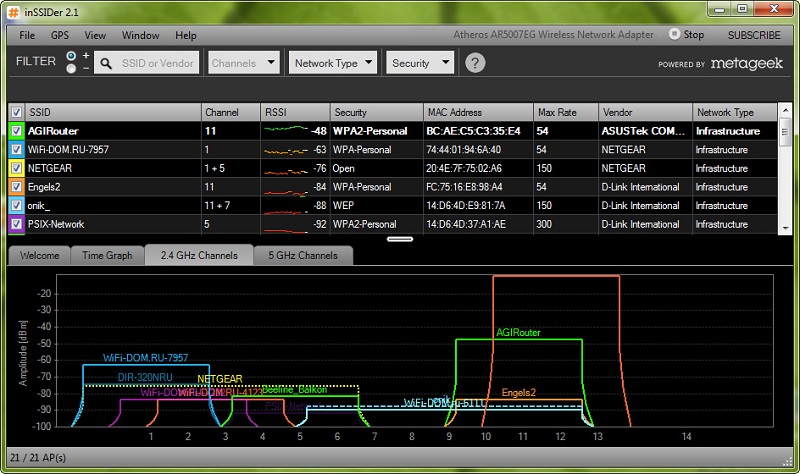
The interfaces of the above applications are different, but all have a channel viewer function that will help you find the frequency that is loaded the least, compared to the others. Having found a free Wi-Fi channel, set the appropriate value in your router by using the appropriate menu item of the web-client.
Now it is necessary to say about automatic selection of Wi-Fi channels. Most of the assemblers use this option in the factory settings. It allows not wasting time in selecting channels with a special program – the router will automatically scan the frequencies and choose the least loaded ones among them to provide the maximum speed of the wireless network. It is highly recommended to enable this option for novice users.
However, master users prefer to manually select the best-functioning Wi-Fi channels, which provides an important advantage. In automatic mode, the router spends some of its antenna bandwidth to scan free frequencies and identify the least busy ones. In addition, practice shows that its choice is not always optimal, because there may be intermittent devices nearby, which also create a lot of interference. Therefore, manually setting the frequency will increase the bandwidth of the wireless network.

