To view the IP you need to open a terminal with Ctrl+Alt+T. After that, type the command $ ip route show. The first line will show the address of the router.

- How to connect and configure Wi-Fi router? Step by step instructions for all models
- How to connect a router?
- IP router
- Configure static IP addresses of local devices
- Can't login to 192.168.0.1 via admin
- IP address 192.168.0.1 – page is unavailable
- Login and password admin on 192.168.1.1 does not work
- How to Install a Router and Connect to the Internet
- Connecting to Wi-Fi network
- On Mac OS
- From a phone or tablet
- Configuring via a mobile app
- Wi-Fi connection and settings
- Connecting the computer to the router
- Standard login:
- Do I need a firmware update
- Possible problems during connection
- Unable to connect to a new router
- Login data does not fit
How to connect and configure Wi-Fi router? Step by step instructions for all models
Now on sale there is a huge number of different Wi-Fi routers from different manufacturers. And it's good, there is something to choose from. But immediately after buying a router, we need to install, connect and configure it. And if the connection process is almost the same depending on the model, the setup process and the router settings page may be different even for the same manufacturer.
It is very difficult in one article to give detailed and step-by-step instructions for setting up different models. But I will try. In this article I will describe and show in detail how to install and configure a Wi-Fi router. Regardless of which manufacturer and model you own. This universal instruction is suitable for setting up a new router as well as for reconfiguring it. You can do everything yourself. And you don't have to pay a specialist to set it up at all.
If you haven't chosen a router yet, you might find this article with tips on choosing a Wi-Fi router for your home or apartment helpful.
Be sure to visit this page. It contains detailed instructions on setting up popular routers. There may be a guide on how to set up your particular device.
Here are some detailed instructions you can use as an example: TP-Link for example TP-Link TL-WR841N, ASUS for example Asus RT-N12, D-Link for example D-link DIR-615, ZyXEL Keenetic Start – configuring Keenetic Start model.
The setting algorithm is almost always the same. For any router, whether it's TP-Link, ASUS, D-Link, ZyXEL, Tenda – it doesn't matter. Similarly, it doesn't matter what kind of Internet provider you have: Dom.ru, Beeline, Rostelecom, TTC, Volia, Kyivstar, etc. All that depends on the provider is the type of connection. Which you need to select in the settings of the router and set the necessary parameters. About this I will explain in detail below in this article.
It is clear that the settings page itself and the sections differ depending on the manufacturer and model of the router, but the order of settings will always be about the same:
How to connect a router?
I will describe all the steps step by step. It will be easier for both you and me.
1 First, you need to choose a place to install the router. Most likely you will have to install it where the cable from your ISP is routed. You can install it wherever you like and wherever works best for you. If you want to be more serious about choosing where to install it, you can read where to install a Wi-Fi router in your apartment or house.
2 If your model has removable antennas, screw them on. Plug in the power adapter and plug it in. If the indicators on the router do not light up, check if the power is turned on by the button on the device itself.
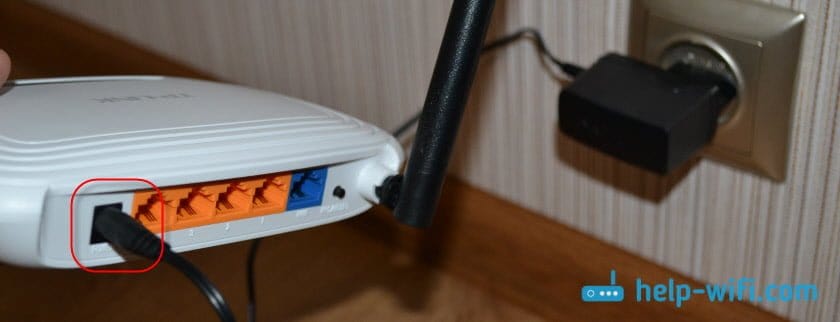
The main thing is that the indicators (or one indicator) light up.
3 Connect the Internet and a computer (laptop) to the router. If you do not have a PC/laptop, and you will connect to configure it via Wi-Fi, see the next step.
- The cable from the Internet provider (or ADSL modem) must be connected to the port that is labeled "WAN", "Internet", "Internet". It is often highlighted in blue.
- Using the network cable that comes with the package, connect the router to your computer or laptop (if you have one). On the computer, connect the cable to the network card and on the router to the LAN port. It can also be signed as "Home Network". Usually there are four of them.
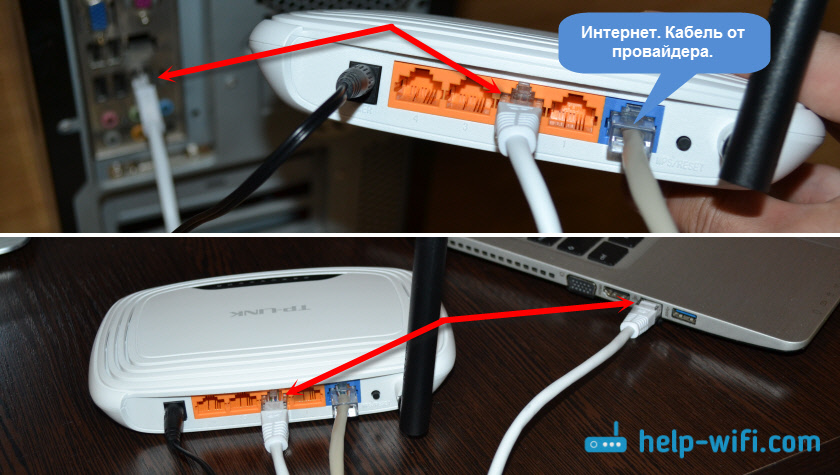
If you are connected to your computer via cable, you can skip to the next section where I will show you how to get into the control panel.
4 Only for those who can't connect to the router with a cable for configuration. In this case, you only connect the Internet and power.
IP router
And at this point it should be made clear that the router has two IPs. Since it is a kind of gateway, it has an external IP and also an internal or local one. It is the local IP that allows it to communicate with other internal devices: phones, tablets, TV, computer, etc.
Initially local IP is already static. But it is logical, because if it was dynamic all devices would fall off the network at one moment. The standard IP can be seen on a piece of paper that is under the case. Or by typing the command "ipconfig" into the computer that is connected to the Internet center.

But the external IP address is just most often dynamic and is updated every once in a while. Only the provider can make it static, but it will cost a little more than the standard tariff. So it is worth checking with your service provider.
Configure static IP addresses of local devices
And here we come to the point of assigning all your local segments a certain IP address. This is often required in the enterprise or for forwarding a port to an internal surveillance camera to have access to it from the Internet. There are quite a few reasons for this.
First, you must already be connected to the Internet center via cable or Wi-Fi. After that you need from the connected computer, laptop, tablet or phone – to open a Web browser and enter the "IP" or DNS of the router. The default address is on the same piece of paper under the case. The following are instructions for different router models.
Can't login to 192.168.0.1 via admin
All modems and routers from D-Link, TP-Link, or Tenda use the default login admin and password admin to log on to 192.168.0.1. You can check this quickly and easily – turn the gadget upside down and read what's written on the sticker glued to the bottom of it.

Accordingly, if this password does not let through, then either it has changed earlier, or the modem or wi-fi router malfunction (electricity surge, malfunction firmware or something else).
In any case, there is only one way out – you have to do a complete factory reset, so that login to 192.168.0.1 via admin login and admin password will be available again. For that you have to use a special Reset button. It is usually located next to the LAN-ports of the network device, on the back of the case. On some models the reset button may be located on the bottom.
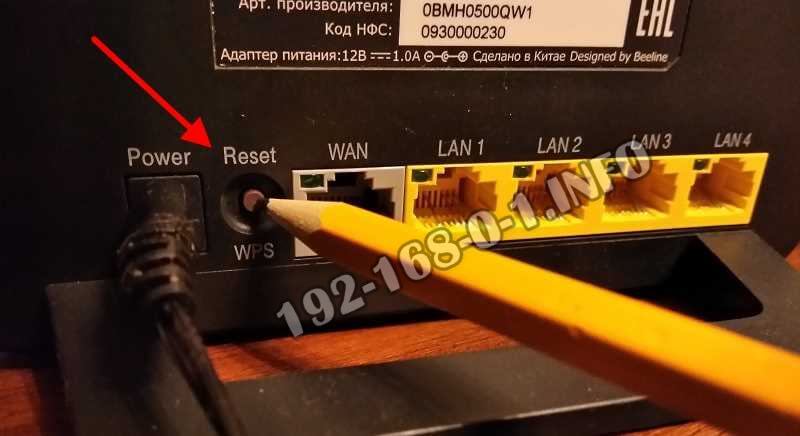
To use the button is very simple – take a pencil or a ballpoint pen and right on the switched on device press the button and hold it. You have to keep "Reset" pressed for a short time – for about 10 seconds and release it! Let's have a look at the LEDs. If they blink and go out, then you are on the right track.
Wait another minute and then try to enter the 192.168.0.1 admin/admin in the settings of the router again.
If even after that they are not available, then most likely the network device "lost its mind" – that is, the firmware is broken or crooked. Then you have to either re-flash it or buy a new one.
IP address 192.168.0.1 – page is unavailable
This scenario is more complicated and has more different options. So, you entered in the browser ip 192.168.0.1, and in response you got the error "The page is unavailable" – what to do?! First, we look whether the computer received ipi from the router protocol DHCP.
To do this, click on the network icon in the system tray with the right mouse button.

From the menu, choose the Network and Sharing Center item. You will see a window like this:
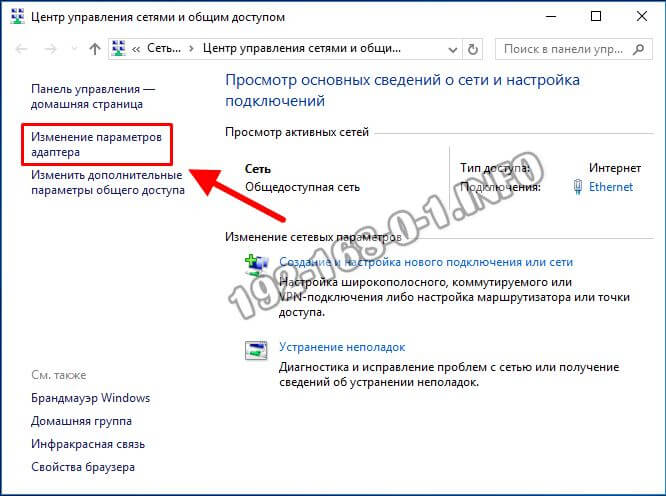
On the left side of it, find the menu item "Change adapter settings" and click on it. This will take you to the list of Windows 10 network connections.
Note: In Windows 7 and Windows 8.1, everything is done in the same way.
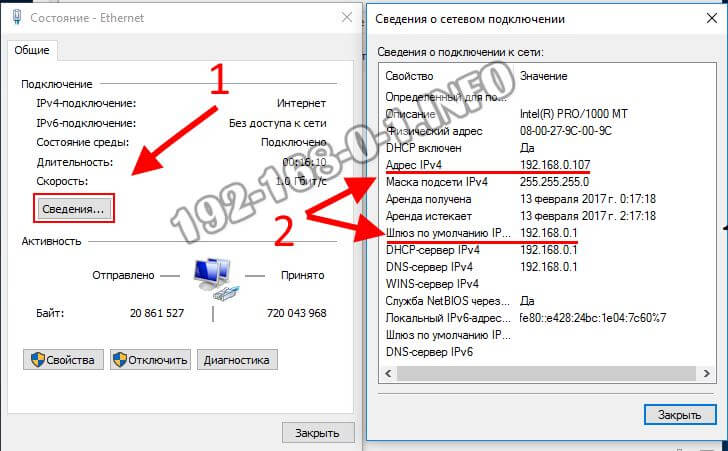
Right-click on the icon of the connection through which the computer or laptop is connected to the router. In the menu select the item "Status".
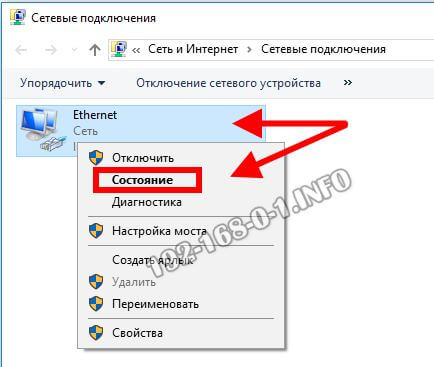
Click on the "Information" button. We will see complete information on the connection parameters.
Look at the line IP address v4 и Default gateway.
The gateway is the IP of the router, it must be 192.168.0.1 In the case of D-Link, TP-Link, and Tenda.
It should be something like this:
If there are zeros in these lines 0.0.0.0.0 or the address from the network 169.xxx.xxx.xxx.xxx – then there are some problems with the DHCP server on the router or the client – on the computer. Then open the properties of this connection:
Login and password admin on 192.168.1.1 does not work
Let's consider another "side of the coin", namely when the router's account itself is available, but when you try to enter 192.168.1.1 login admin and password admin – the device says that the data is incorrect (Bad login, Wrong password, etc.) What should you do in this case?
First, look again at the sticker on the router, where the IP-address is specified – whether or not the login and password admin / admin to log in are exactly specified there. If yes, then either the login password was changed earlier, and now you do not know it, you have to do a complete reset of the router by the way I showed you above – via Reset button. If it does not say anything, I will give you a little cheat sheet on the logins and passwords that are used in the router:
If the "Cannot access the site" error appears again, then you have to try resetting the router to its factory settings.
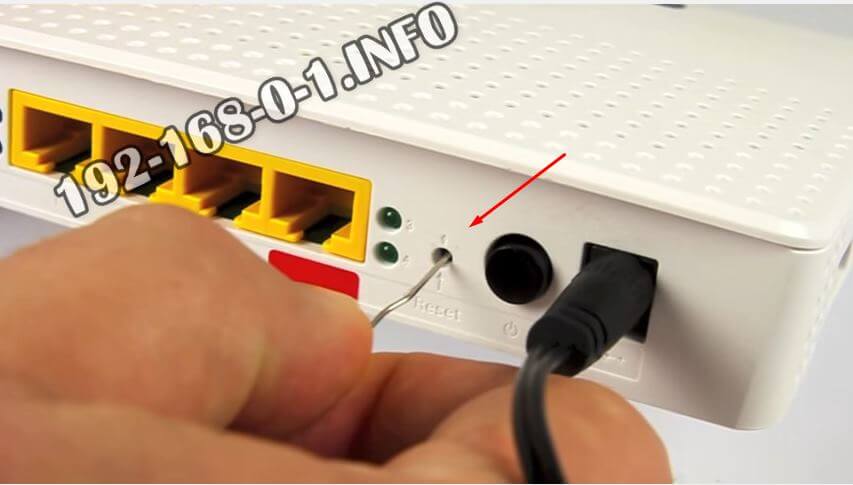
For this purpose, each modem, router or GPON ONT router has a special "Reset" button located on the back of the case. To press it you need to use a paper clip, toothpick or a ballpoint pen stick. When the device is on we press the button and keep it pressed for 10-15 seconds. After that, we wait a couple more minutes until it reboots and then try to enter the web configurator again.

Gone are the dark days when you had to have a computer to configure the modem and the router. Now
How to Install a Router and Connect to the Internet
Let's start with the most basic task – installing and connecting the router itself. The process will be the same for both a newly purchased device and a used one.
The first thing to do is to choose a place to install the router. Don't forget that routers have a limited range: most modern routers designed for home use have a range of 50 meters. It seems that this should be enough even for a multi-room apartment, but it is important to understand that the range decreases when there are physical obstacles in the way of the signal: furniture, other appliances and walls. Therefore, to ensure that all your gadgets will be in the coverage area, it is worth observing two rules. Firstly, install the router as close as possible to the center of the apartment at an equal distance from its borders. Secondly, it is best to put the router itself as high as possible so that the signal goes above other obstacles. A good place for a device would be the top of a closet, a hanging shelf or even a refrigerator. And especially zealous adherents of an uninterrupted signal and even set the router in a hinged position directly on the wall. Just don't forget that you still need to pull the wires to the device. Speaking of which.
You only need two cables to connect your router to your Wi-Fi network. The first is a power cable for plugging into a regular 220 V outlet. A power supply comes with new routers. But if you received a used device, it is easy to find the appropriate power supply according to the port size and markings on the device. The most common power supplies used for routers are 12 V and less common are 9 or 5 V.
The second most important cable is the Ethernet cable. The one that was brought to your apartment by the Internet provider and through which your home will be connected to the Internet. And here unprepared users may have their first difficulties, because the router will almost always have several ports suitable for the ISP's cable plug. The port you need will usually be differentiated from the others by color and marked WAN (Wide Area Network) or "Internet" in the case of routers with Russian-language markings. The other ports in this form are designed for wired connection of devices to the network with a LAN (Local Area Network) cable.
Connecting to Wi-Fi network
Alright, our router is now up and running, it is lighting up with various lights and even distributing Wi-Fi. But what do we do next? Setting up the router by yourself will not work: you will need a third-party device. Preferably a home computer or laptop, as they will be easier to manage the router web-interface. But at the worst, a tablet or smartphone will do.
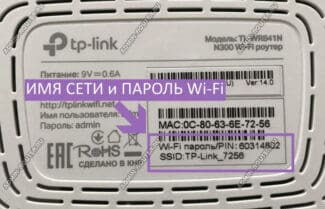
First, you need to connect the selected device to the Wi-Fi network. All the necessary information for this should be located on a sticker attached to the router housing. There will be a bunch of useful information (so as not to twirl the router in your hands, it's easier to take a picture of the sticker), but at this stage we are interested only in two items. Firstly, the SSID (Service Set Identifier) or "Wireless Network Identifier" abbreviation line is the name of the Wi-Fi network that will be displayed when trying to find wireless connections. Memorize it, find it in the list of available networks on your computer, and select it. Next, you will need a password. Look for it on the sticker as well, and it is usually labeled with the word Key or "Wireless Network Key."

If the computer doesn't offer the option to enter a password, you may have already connected to this Wi-Fi network. In that case, right-click on the network name and select "Forget Network" from the drop-down submenu, and then connect to it again.

Finally, if the network name and key on the sticker do not match, you can reset the router to factory settings (we will tell you about this in the corresponding section).
On Mac OS
Built-in OS tools allow you to find out the IP address of the modem connected to your computer. Algorithm of actions:
- Click on the menu button in the upper left corner. Select the "System Preferences" item.

- Select the "Network" item in the window that appears.

- A window will open with general information about all network interfaces of the computer and the network. The IP address will be listed under the connection status.


- Press the Option key on your keyboard.
- Click the Wi-Fi icon while holding down the key.
- A window with the current network characteristics will appear on the screen. Locate the line with the IP address.
You can check the address of the access point through the terminal. Hold down the ctrl key and the space bar to launch the program. In the window that appears type Terminal. Type ipconfig getifaddr en0. The IP will be displayed as soon as the command is executed.


ifconfig |grep inet is another command to determine the IP of the access point. It asks for more information about the current Internet connection.
From a phone or tablet
If you do not have a desktop computer or laptop at hand, you can determine the IP of the router using your smartphone. To do this, go to the "Settings" menu and select the "Network and Internet" section. Turn on Wi-Fi and click on the name of the network to which you are connected.

In the section that opens, look under "Gateway". The numbers indicated there are the IP of the router.

You can determine the IP to connect to the router's web interface using third-party software. Consider their work using Wifi Analyzer as an example.

- Connect to Wi-Fi.
- Launch the program.
- Select from the list the network with which you want to connect.
- Server IP is the address of your router.
Configuring via a mobile app
You can manage your TP-Link router using the Android and iOS application. This is a functional program that does not work with all router models. To see the list of supported devices, you need to open the application page on Google Play or the App Store.
- View the status of the router;
- Set the status of connected users;
- set up parental control;
- creating guest networks;
- managing the router from a long distance;
- router setup: create connection, name and password for Wi-Fi network;
- managing the wireless network in real time: viewing the connected users, blocking unwanted clients.
To work with the router you need to download and install the application on your smartphone, and then run it. The app will require registration via email.
To manage the router, you just need to connect to it via Wi-Fi. If you want to configure a new device, you need to plug it in and then connect to the standard wireless network that appears (the name and password are on the sticker on the bottom of the router).
Now you need to run the application. The router will appear in the list of detected devices. To start managing it, you need to enter your login and password ("admin"/"admin" or those set by the user).

The main page shows the network layout. You can click on any connected device and lock it if it is unwanted.

The Manage tab allows you to enable or disable the wireless network, change the password or name, and make it open.
Wi-Fi connection and settings
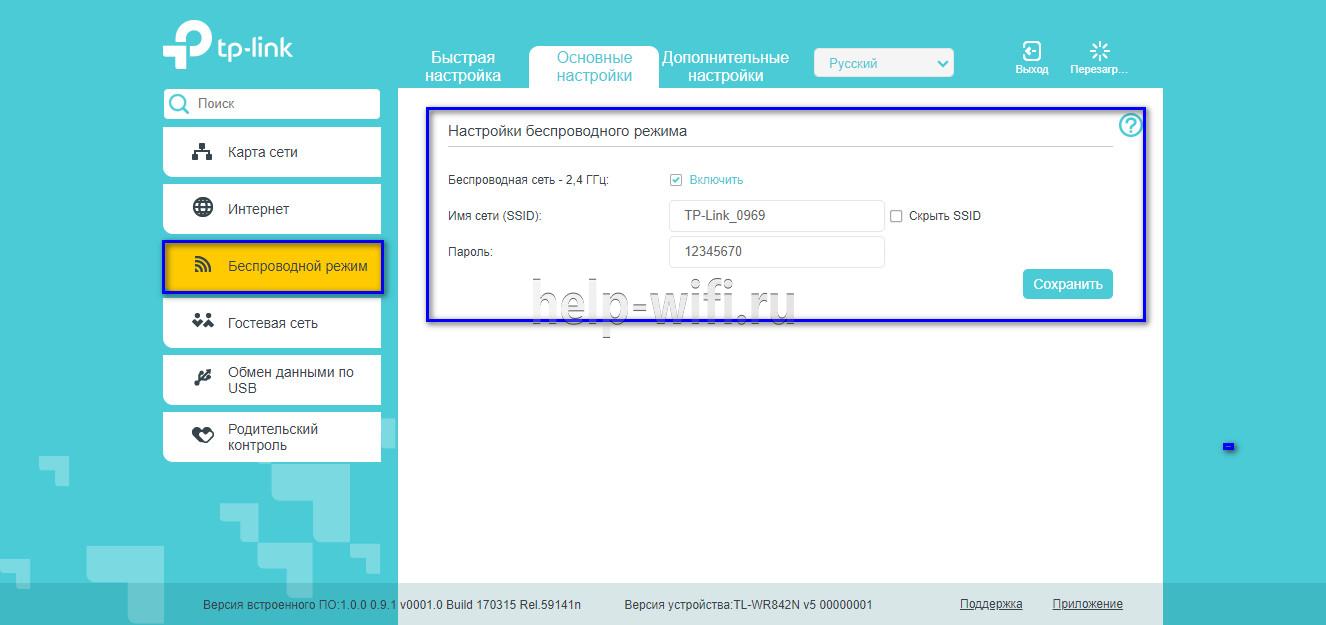
The creation of a wireless network on TP-Link routers is performed during the quick setup process, but if the user hasn't done it, he can configure the Wi-Fi network later in the router's WEB-interface.
TP-Link routers can operate in one or two bands, which means you can create one or two wi-fi networks on them.
A guide using the Archer C20 dual-band router as an example:

- Click "2.4 GHz Wireless Mode." Set the label in the "Enable" field, enter the network name, enable SSID broadcasting so that the created Wi-Fi network will be visible in the search on the connected devices. If you remove the label, the network will not be seen by outsiders, but you will need to enter its name and password manually on your equipment.


For single-band routers, you don't need to select a working frequency. In their web interface it is necessary to click "Wireless mode", turn on the network, enter the name and password, and choose whether to hide the SSID or not.
Connecting the computer to the router
Connect the Internet cable: one side is inserted into the laptop, the other – into the router. Below in the photo you can see how the cable looks like, as well as in what slot it is inserted.
The connectors on the router are usually yellow. There are several of them. You can see what they look like in the picture.
To access the page with the settings, open the browser, in the line enter the address that works for a particular router – 192.168.1.1 (192.168.1.1 – login to the router, detailed instructions), 192.168.0.1. As for the personal data (login and password), and they will be needed to gain access, they can be found directly on the router case. A special sticker contains this information.
Pay attention to the fact that the router must be in the on phase when you change its settings. As mentioned above, go to one of the following addresses (192.168.1.1 or 192.168.0.1). To open the page after entering the numbers, all you have to do is to press Enter. After that, you will see a window in which there are fields for entering data (name and secret password). Standard combinations are admin и admin. Check yourself to see if this is true by looking at the router case – at the same sticker.
It also happens that the standard data does not fit. The reason for this is that they have been changed. Enter yours, which you installed earlier. Such cases occur because users forget the changed data. In that case you must perform reset the routerand then configure the router again.
Standard login:
When there is no information on the body of the router for some reason, you can always use the standard values:
After this step is passed, carry out Log in (Login). Below is an example of the page you should see on the monitor. It may be different, but the essence should be the same.
Have you entered everything correctly? Then you can go to the settings and see your router.
When this does not happen, you need to find out why. We'll talk about that later in this article.
Do I need a firmware update
The initial connection of the home router requires a fresh software update. The firmware update is done manually or automatically (the latter is available for some models).
New versions of free software must be downloaded from the official resources of the manufacturers.
Downloaded software from unknown sources can lead to hardware malfunction, infecting your computer with viruses or getting malicious utilities.
A scheme is used to perform automatic updates:
- Open "advanced adjustments", move to "system tools".
- Then you have to select "firmware update" and "check for availability".
- If the program is found, the system will offer to install it.
- It is necessary to confirm the action, wait for the end of the download and installation.
The procedure online is performed only with a stable Internet via cable. Wireless lines are considered less reliable, and a broken connection can cause equipment failure or malfunction.
- The user should visit the manufacturer's official page;
- choose the device type and the model name;
- go to the page of the device and in the block "firmware" download the latest version of the utility;
- after unzipping the archive, extract the application;
- go to "additional adjustment", from it to the "system tools" block and "firmware update";
- click on the subsection "overview", specify the path to the file and click on "update";
- wait for the process to complete.
Possible problems during connection
To the typical errors include issues arising from the inattention of the user, regardless of the brand of equipment.
Unable to connect to a new router
The problem is associated with an attempt to connect the cable incorrectly – according to the conditions, its socket is marked with a different color by the manufacturers. It is not possible to configure the Internet when turned on in a different input.
The user will not be able to get into the administration panel of the router, and the system will generate an error when trying to access it. The wire has to be swapped and then you have to try to reset the settings.
The equipment from Keenetic has properties to reconfigure the socket, but to make changes you need to properly install the cord leading to the network port of the PC and reconfigure the data.
Login data does not fit
If you can not go to the router debugging and control it, and the web browser constantly gives errors or starts searching for information on the Internet, then you need to recheck the correctness of the entered address.
If it has not been purposely changed, the standard interface of the equipment is located on the path 192.168.0.1, sometimes 192.168.1.1. The exact data is prescribed in the hardware manual or on a sticker on its back wall.
If the page opens, but the ID data is lost, it is necessary to reset the user rules to the factory settings. The procedure is performed through the button located on the top of the housing or in its depth. In the latter case you will have to use a sharp object – a needle, a toothpick or a paper clip.
During the process it is necessary to wait for 10-15 seconds until the indicators blink. Then the transition to the web-interface of the hardware is carried out by the information indicated on the cover of the case. The identifiers have the value admin. Thereafter all the adjustments are made again.
Read More:


