Important! You must know exactly what type of connection your ISP has. As well as all the necessary data for the connection (user name, password), if they are needed. As a rule, this information is specified in the contract that you received when connecting to the Internet.

- How to connect and configure a Wi-Fi router? Step-by-step instructions for all models
- How to connect a router?
- Why do you need open ports on your router?
- Port forwarding in the router – instruction
- TP-Link Archer Router
- Display .
- Possible problems and their solutions
- Connecting via Telnet
- Port Forwarding setup.
- Port Numbers
- Standard services.
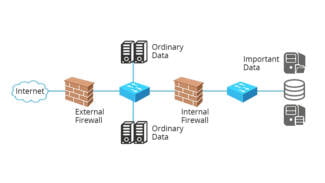
- Firewall
- Connecting to a router with a network cable (LAN)
- No internet access with a cable connection
- Professional routers and ZyXEL
- ASUS, TP-Link, D-Link devices
- D-Link: Combining ports 4, 5
How to connect and configure a Wi-Fi router? Step-by-step instructions for all models
Now on sale there is a huge number of different Wi-Fi routers from different manufacturers. And it is good, there is something to choose from. But immediately after buying a router, we need to install, connect and configure it. And if the connection process is almost the same depending on the model, the setup process and the router settings page may be different even for the same manufacturer.
It is very difficult in one article to give detailed and step-by-step instructions for setting up different models. But I will try. In this article, I will describe and show you in detail how to install and configure your Wi-Fi router. Regardless of what manufacturer and model you have. This universal instruction will be suitable for setting up a new router as well as for reconfiguration. You can do everything yourself. And you don't have to pay a specialist to set it up at all.
If you haven't chosen a router yet, you might find this article with tips on choosing a Wi-Fi router for your home or apartment helpful.
Be sure to visit this page. It contains detailed instructions on setting up popular routers. There may be a guide on how to set up your particular device.
Some detailed instructions you can use as an example: TP-Link – on the example of TP-Link TL-WR841N, ASUS – on the example of Asus RT-N12, D-Link – on the example of D-link DIR-615, ZyXEL Keenetic Start – configuring Keenetic Start model.
The setup algorithm is almost always the same. For any router, whether it's TP-Link, ASUS, D-Link, ZyXEL, Tenda – it doesn't matter. Similarly, it doesn't matter what kind of Internet provider you have: Dom.ru, Beeline, Rostelecom, TTC, Volia, Kyivstar, etc. All that depends on the provider is the type of connection. Which you need to select in the settings of the router and set the necessary parameters. About this I will explain in detail below in this article.
It is clear that the settings page itself and the sections differ depending on the manufacturer and model of the router, but the order of settings will always be about the same:
How to connect a router?
I will describe all the steps step by step. It will be easier for both you and me.
1 First, you need to choose a place to install the router. Most likely you will have to install it where the cable from your ISP is routed. You can install it wherever you like and wherever works best for you. If you want to be more serious about choosing where to install it, you can read where to install a Wi-Fi router in your apartment or house.
2 If your model has removable antennas, screw them on. Plug in the power adapter and plug it in. If the indicators on the router do not light up, check if the power is turned on by the button on the device itself.
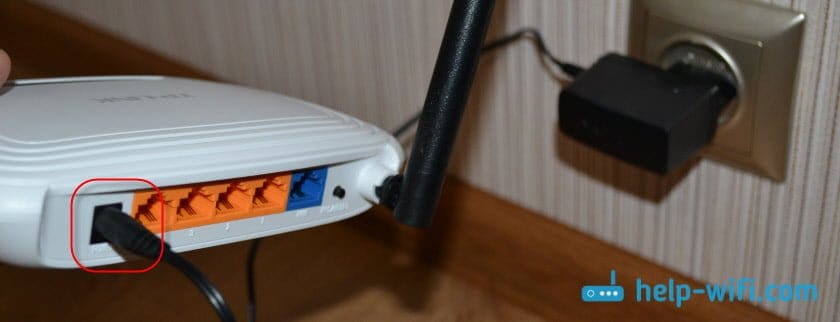
The main thing is that the indicators (or one indicator) light up.
3 Connect the Internet and a computer (laptop) to the router. If you do not have a PC/laptop, and you will connect to configure it via Wi-Fi, see the next step.
- The cable from the Internet provider (or ADSL modem) must be connected to the port that is labeled "WAN", "Internet", "Internet". It is often highlighted in blue.
- Using the network cable that comes with the package, connect the router to your computer or laptop (if you have one). On the computer, connect the cable to the network card, and on the router to the LAN port. It can also be signed as "Home Network". There are usually four of them.
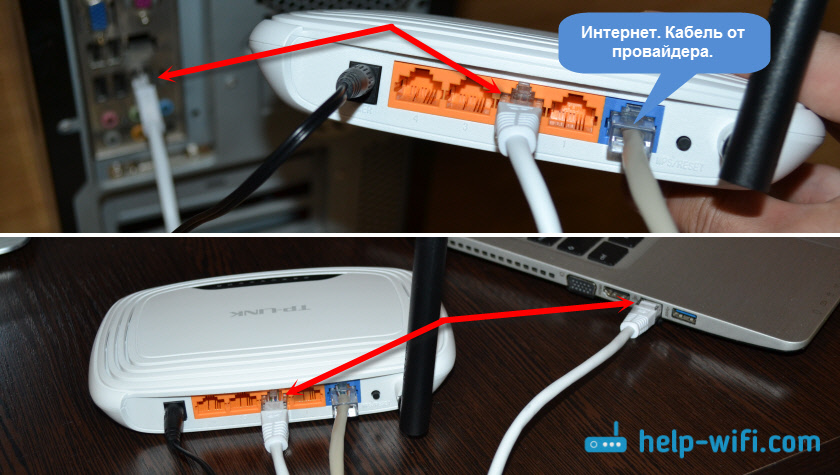
If you are connected to your computer via cable, you can skip to the next section where I will show you how to get into the control panel.
4 Only for those who don't have Cannot connect to the router via cable for configuration. In this case, you only connect the Internet and power.
Why do you need open ports on your router?
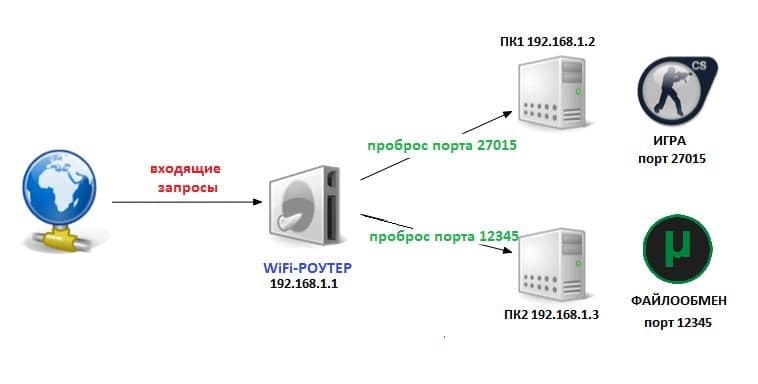
Special data transfer protocols are used to exchange information on the Internet. For example, to open a page of some site your computer connects to the server with the site, and requests to connect to port 80 for http or port 443 in the case of https. If the virtual port on the server is closed, you will not be able to open the site. In the case of torrents or game server already your computer begins to receive incoming connections from other computers in the network. And since the computer is not directly connected to the Internet, but through the home WiFi router, where the original security policy is all tightly closed, then you have to do port forwarding on the router. This is usually done for the following tasks:
You can find out which port the program or server uses either in its manual, or when contacting technical support, or in the settings of this program.
Port forwarding in the router – instruction
On average, it takes a professional 5 minutes to open a port through a router. For a less trained user it will take a bit longer. But in any case, it is quite easy! Now I will show you the general algorithm of actions, following which you can do it without any problems on any modern WiFi router.
Step 1. Connect to your home local network via cable or WiFi and enter the router settings. The IP address of the router can be found on its sticker (usually 192.168.0.1 or 192.168.1.1), as well as the factory password to log in to your personal account.
Step 2. Open the router's advanced settings. On some models it is necessary to enter the expert mode.
Step 3. Find the subsection responsible for port forwarding. This is usually called "Virtual Servers". If it is not there, look for it in your firewall or NAT settings.
Step 4. Create a new rule for Port Forwarding. In this rule specify the desired port number and IP address of the computer you are forwarding to.
Step 5. Save the settings and check the open ports with online services. For example, via 2IP – link.
Although this is a very, very general instruction, it will be relevant to any router model. All you have to do is use your hands and your head and you will be fine!
And now let's look at examples of how to open ports on the router for the most common and popular models today!
TP-Link Archer Router
TP-Link Wi-Fi routers and their latest models from the Archer family are the most popular routers in Russia. According to statistics, in the year 2020, it was the device of this brand that was purchased most often. To open a port on TP-Link, follow these steps.

Display .
On each and WAN and LAN ports there are two LEDs, which can show whether there is a link (link) – whether the response device is connected, the speed of the connection, usually:

Some devices may not have a yellow LED at all. It may be arranged so that one LED only lights green when 1 Gbit/s is connected and the one on the right lights up when a data packet is being transmitted.
In addition to the indicators on the connector, very often they also make indicators on the housing, for the WAN it is usually depicted as a planet, for LAN it is depicted as a computer. If all is well – it lights up or flashes green.
Possible problems and their solutions
The most common problem is that you enter the IP address of the router in your browser, but instead of a login and password request you get a message that this page was not found.
Pay attention to the following points:
- If the connection is established, check its parameters.
- Maybe you've made a mistake when entering the data.
- If you are connected via cable, but your computer has Wi-Fi, turn it off. Conversely, if you are connecting wirelessly, disconnect the cable from the router.
- Check that the cable is firmly plugged into the router and the network card. The problem could also be in the cable itself. If you have a spare one, try replacing it.
If all else fails, reset your router to factory defaults. It is possible that the device itself has malfunctioned or that its settings have been changed, for example, by a vendor during verification.
If you get to the router's page, but after entering your username and password you cannot log in to the web interface, you probably have to reset too.
Connecting via Telnet
Telnet is a communication protocol between network devices, especially designed for remote control. It allows you to change the settings of your router, to change the wireless network, to set other parameters and to reboot the device through a command line.
To be able to connect to the router via Telnet, this option must be enabled in the web interface of the device. If you have purchased a new router and this option is disabled by default, you will not be able to control the device from the command line.
In order to use Telnet, you can use PuTTy. It is also possible to use standard Windows tools. Open the control panel (you can find it by searching on your computer). Here, look for programs and components. Click on "Enable or Disable Windows Features". Select the Telnet client there, click on OK and wait for the installation of the component.


After installation, run the application. You can find it in the computer search "telnet".
Enter the command telnet 192.168.1.1. The numbers are the IP address of your router. Press ENTER.
Immediately after that, you will be asked for your username and password. Once you enter them, you will be able to access the router's settings.
The commands used to configure most devices are the same. For more information, download your router's manual. Some routers use the help command to display a complete list of available commands. However, not all manufacturers have this option. For example, it is not available on ZyXEL routers.
Telnet in most cases allows you to perform full-fledged configuration of the router from the command line.
Port Forwarding setup.
Once everything is prepared, you can set up port forwarding on the router. This is done by filling in the table that specifies:
The router will check all incoming packets. IP-packets coming to the specified router port will be forwarded to the specified port of the device.
In the redirection settings add a new virtual server.

- Port of the service is the port on which you will connect from the Internet;
- Internal port – is the port of the device you want to open access to;
- IP address – is the address of the device in the local network.
- Protocol – you can select TCP or UDP here. You can select "ALL", then both protocols will be redirected.
- Status – here select "enabled". If not necessary, you can disable forwarding without deleting the entry.
The item "standard service port" is intended only to simplify the selection of ports. When you select the desired service, their numbers will simply be substituted in the "service port" and "internal port" fields. The main services will be discussed below.

After all the settings are made, you should save them.
Port Numbers
Note that port numbers can be set from 0 to 65536.
On the computer, these ports are divided into the following groups :
If you need to select any port that will be open on the router for port forwarding, it is advisable not to use the system range without a special need. It is best in such a case to open ports on the router from the dynamic range.
Standard services.
To organize access to services, some routers help to select the correct port number automatically. Thus, when accessing the FTP port from the Internet, it is possible to redirect the request to the FTP service running on one of the local computers. Let's take a look at the main ones:
Firewall
After configuring port forwarding on the router, everything should work. But what to do if you still can not connect? In that case you should check the settings of anti-virus and Windows firewall on the computer to which you connect. Maybe they find the connections suspicious and do not give access. In such case write a rule in your firewall allowing you to connect to the given port.
There are two easy ways to get into the firewall settings:
- Type "Windows Defender Firewall" in the search bar. After entering the first few letters, the desired application is found.
- Run "firewall.cpl". To do this you must simultaneously press the key combination +, in the field open write the command and click "OK".
In the advanced options, select rules for incoming connections. There we create a new rule. Let's look at this in detail.
Here you can see the main configuration window of the firewall. Select the advanced options.

Double click on the "Rules for incoming connections" item. Then in the right column called "Actions" click on "Create rule…".


Select the desired protocol. In most cases this is TCP. Specify local port, for which we previously configured port forwarding on the router. You can specify several ports, separated by commas or a range of them separated by "-".


Write your own name for the rule. It is desirable to choose such a name that it can be easily found later if you decide to disable or modify this rule. You can leave a note in the form of a description for yourself to make it easier to understand later what this rule was created for.
Connecting to a router with a network cable (LAN)
This is very simple. Take a network cable, one end connect to the router in one of the LAN sockets (they are signed LAN, or Home Network). And the other end of the cable into the network card of the computer. It looks like this:
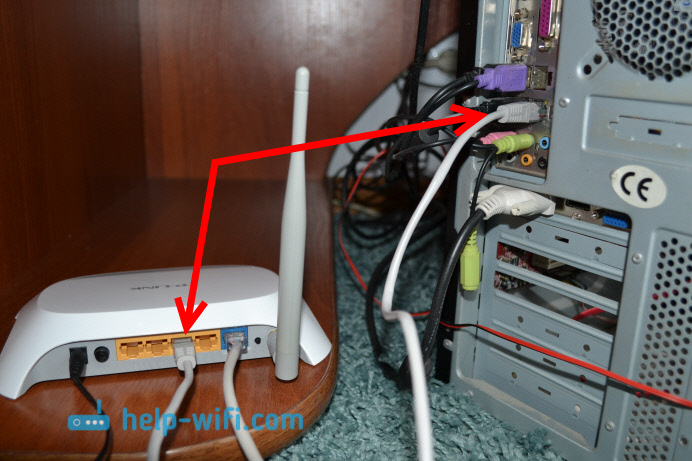
If you connect a laptop to the router, then we do exactly the same thing there. One end of the cable to the router and the other end to the network card of the laptop:

That's all the connection. If the router is on, the computer should immediately respond to the connection to the router. Connection status in the tray (lower right corner) will change.
If the router is connected to the Internet, and it is already configured, then most likely the connection icon will be like this:
![]()
And if the router is not yet configured (you are just going to set it up), or there are some problems in the computer settings, the connection status will be with a yellow exclamation mark. And without access to the Internet. Internet on the computer will not work.
![]()
If the Internet from this router works fine on other devices, but on the computer that we connected without Internet access, you need to check the IP and DNS settings for the local network connection.
No internet access with a cable connection
It is possible that after connecting the Internet will not work. The connection will be "No internet access", or "Limited" (in Windows 8 and Windows 10) . If the problem is not in the router (it distributes the Internet), then you need to check the settings on the computer itself.
Right click on the connection icon and select Network and Sharing Center. In the new window, select Change adapter settings.

Next, right-click on the adapter Right-click on the adapter and select Local Area Connection., or Ethernet, and select Properties.

And set it like in the screenshot below. You must set it to obtain IP and DNS addresses automatically.

After that, restart your computer, everything should work.
Professional routers and ZyXEL
Any professional-level router is equipped with enough Ethernet controllers. Therefore, any of the Ethernet connectors can easily be used as a WAN port, there is nothing to talk about. ZyXEL Keenetic routers have a similar feature if the firmware of the second generation is used. Going to the web-interface, just open the tab "Internet" – > "IPoE" and click on the line "ISP":
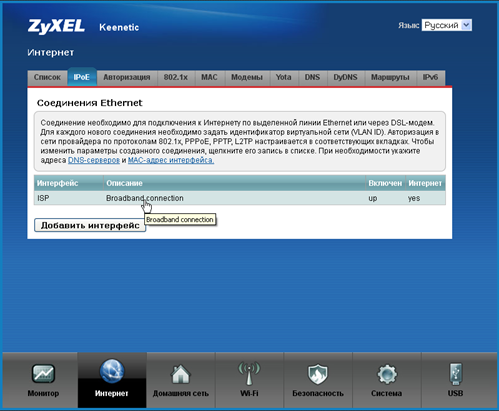
In front of you will open a tab, where one click selects which of the connectors should become a WAN-port:
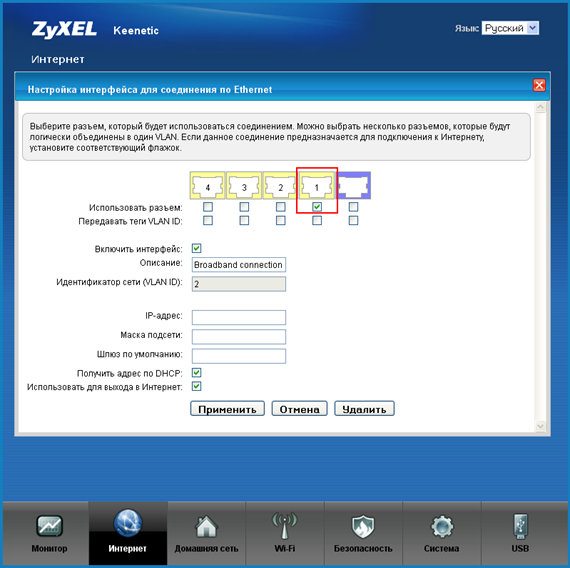
It would be silly if the first generation firmware didn't have these features. If your Keenetic router is of generation "1", just open the "Home network" -> "IP TV" tab:

Here, that is, on the mentioned tab, we select from the top list the option "Assign LAN connector". It remains to specify which of the connectors will replace the WAN port. Click "Apply" and connect the ISP cable to the LAN port specified in the bottom list.
For better safety, it is better to pre-set the checkbox marked "For receiver only".
ASUS, TP-Link, D-Link devices
As you understand, in some web-interfaces you have to specify the LAN-port dedicated to the STB-device. Then it is used as a WAN port. In more modern interfaces everything is arranged "honestly": here we just choose the socket to which the ISP's cable is connected. But sometimes both of these options are missing. This is almost always caused by the fact that the chipset has only two Ethernet controllers. In general, the repair is better to start with a search for information about the chipset.
D-Link: Combining ports 4, 5
The D-Link router interface uses a numeral designation for all hardware ports. We have to create a switch combining two elements: fourth, fifth. To do this, first get rid of the WAN connection in the "Connections" tab:
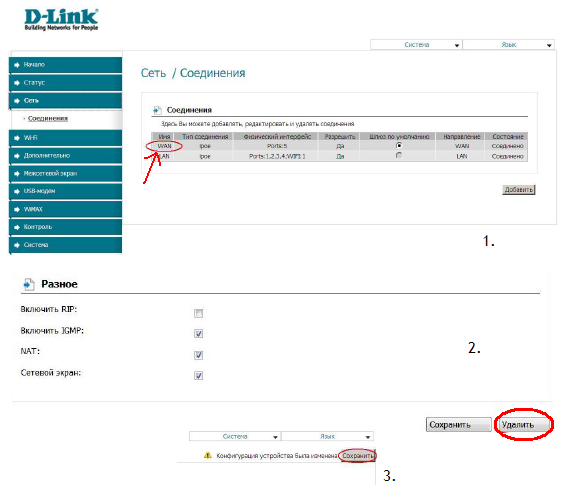
All further steps are done in another tab, called "Advanced" -> "VLAN".
So, when you open the "VLAN" page, you will see two lists. We need to regroup the interfaces the way we want:
Click on the "lan" rectangle, select the line "port4", click on "Delete port" and save the changes.
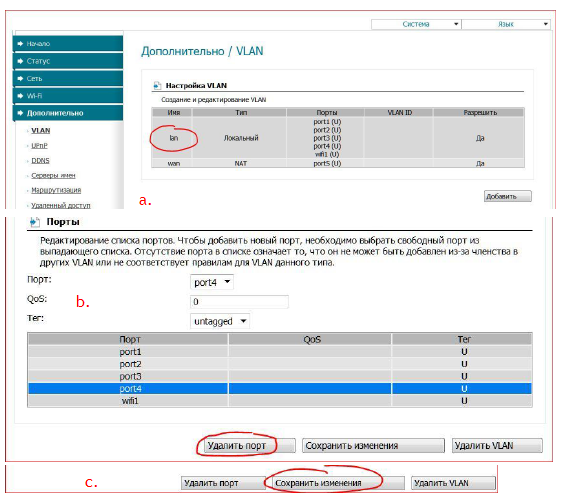
Click on the "save" button in the top right corner of the page, and after the reboot, click on the "wan" rectangle:
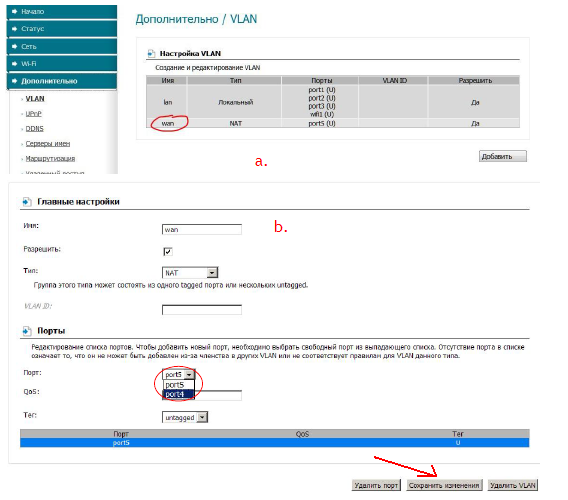
It remains on the tab that opens, find the "Port" list, select "port4" in it, and save the changes. After clicking on the "Save" button at the top, you can reconfigure the WAN connection on the "Connections" tab (click on "Add").
We have looked at how the WAN and LAN4 connectors are merged into the switch. However, on the start page you could select "IPTV Wizard" to specify which port is used for the STB set-top box.
Read More:
