Be careful when setting up channels 12 and 13. Some devices may not see them!
- How to enter the router settings: login by cable and Wi-Fi
- Where on the router the login password is written
- How to access the control panel via Wi-Fi from a phone, tablet or laptop
- Does not enter the settings possible causes and solutions
- What do I have to do?
- If it doesn't work
- Looking for a free channel
- Changing the channel on the router
- TP-Link – the old interface
- TP-Link – the new interface
- ASUS
- Step 3: choose a type of connection
- Step 4: setting up the wireless Wi-Fi network
- Calculating the MTU size
- The key to successful Wi-Fi router setup: the list of parameters to be checked
- A list of possible problems and how to fix them
- Factory Reset Router
How to enter the router settings: login by cable and Wi-Fi
Sooner or later, the router that gives out the Internet has to be reconfigured. For example, to change the name of the network itself or to make adjustments to the router settings. Providers also change over time. All modern devices have their own interface, through which the problem is solved quickly and without hassle. Such work takes a minimum of time, no additional gadgets are required either.
It is assumed that in advance the devices are connected to the local network. After that, you can start making adjustments.
- Users start an ordinary web browser.
- They type in the address of the router. Usually it is put on a sticker or specified in the purchase agreement, connections.
- If everything is normal, a special form for authorization appears.
You can use a numeric combination that corresponds to the IP of the device. Popular router login options are 192.168.1.1 and 192.168.0.1, but others also apply. After entering this combination, an authorization form also appears in the address bar.
You need to enter the login and password. Usually it is admin admin. Then comes the interface with the router settings.
Where on the router the login password is written
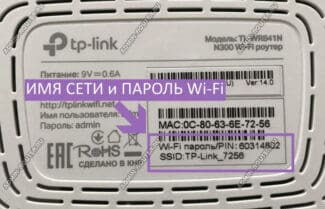
Often models are supplied with a factory password, which no one can change. They are specified on stickers placed on the bottom or on the back of the case.
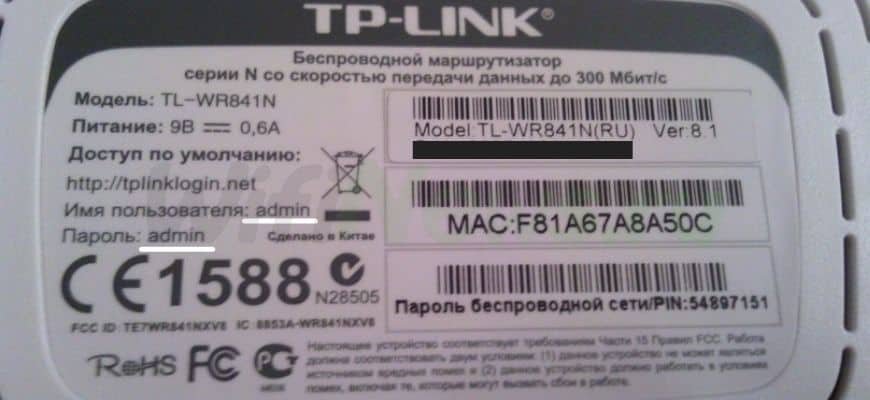
But many models ask users to make up their own password and login details the first time they log in to the router's control panel. If the user initially doesn't know the right configuration, it won't be possible to open the page without a factory reset.
How to access the control panel via Wi-Fi from a phone, tablet or laptop
In this case, too, there is nothing complicated. It is sufficient to follow this algorithm:
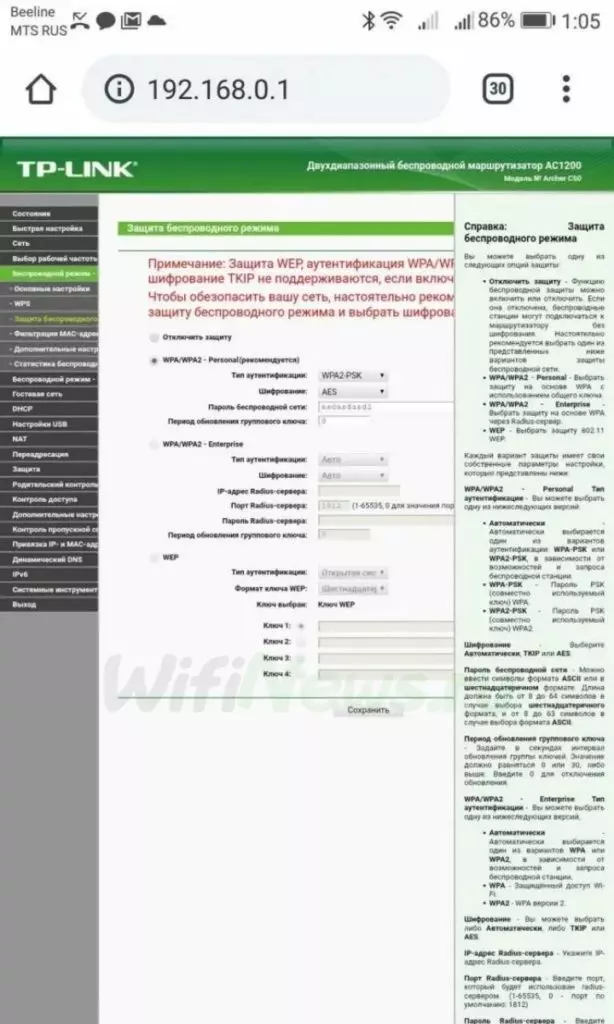
- First, we try to connect in standalone mode. We take a mobile device, turn on the network search. By default, it has the same name as the router model (e.g. TP-LINK). Connect to it as usual.
- Enter the password.
- If the network is not visible, it is worth taking a closer look at the router. Perhaps the wireless network has not been started. In such cases, press the special WPS button. It is located in the same place as the ports for connecting the wires. When prompted for a password, it is pressed.
- Again you study the list of available networks. We connect to the new connection that appears.
- Then you start the browser, in our case Mircosoft EDGE, enter the address, which was mentioned earlier 192.168.0.1. Then you get to the internal site of the developers or in the menu of the modem itself.
- Enter the username and password in English admin. And get to the internal pages of the router.
Recently, major manufacturers have started releasing special applications so that the router can be configured even faster. One offer that is currently available is MiWiFi from Xiaomi. But they do so only when new models are released. It is enough to search for the program in the application store (google play) for your operating system.

Does not enter the settings possible causes and solutions
There are several possible reasons why this happens:
- Accidental disconnection from the local network, or a complete lack of connection to it. Then additionally check the devices. The cable can be disconnected and reconnected. If necessary, use another one.
- Simultaneous use of two interfaces to connect to the router. One of them must be disconnected.
- Incorrectly entered address in the address bar of the browser. Usually they confuse the login address 192.168.0.1 with 192.168.0.I.
- Wrong password" error. If it doesn't fit, there's a good chance that something has been changed before. You will have to do a reset.
- Malfunction of the router. Sometimes this happens as well. Then you have to reset your router to factory defaults by pressing the Reset button.
What do I have to do?
Usually when we set up a router from scratch, we go through the following steps:
If your router has already been set up properly before, you only need to change the third step – reconfigure the Internet. To do this, you need to know how the ISP provides access. You can find this out either in your contract or by calling his hotline.
- PPPoE – you need a login and password.
- Dynamic IP – the Internet will start working as soon as you connect your router.
- Static IP, L2TP, PPTP – encountered less often, requires additional data such as IP-addresses, but this too is specified in the contract.
Ie. at this point you need to look up the contract and find out the type of connection and all the information you need for it.
If it doesn't work
If at any stage something does not work for you, there is a last resort – reset the router to factory settings, and configure everything from scratch.
- To reset your router to factory settings, you usually use the RESET button on the back of the device (flip it over and find it). You plug the router into the network, hold this button for about 10 seconds until the lights start blinking – you can start setting up from scratch.

- To configure from scratch, I recommend entering the exact model of your router in the search on our website – that way you are likely to get the most detailed instructions on configuring your specific model. Otherwise we have:
Looking for a free channel
To begin with, we need to determine which Wi-Fi channel is the most unloaded at the moment, and therefore which one we should choose. It is the one that will be the best for us at the current moment in time. How do you do it?
Whatever you choose, the channel window will almost always be the same:

Looked at by eye, and determined that in this case, the freest Wi-Fi channel is 5. That's what we'll use. A universal quick technique to check your environment and determine the best channel. And here is the same for inSSIDer, you can compare:

As you can see, it's not that hard to find out. The only thing that may discourage is that many channels overlap each other in the frequency range, creating additional interference. So you really have to choose the least busy ones. But you can always find one!
For theorists. List of non-intersecting channels:
Be careful about setting channels 12 and 13. Some devices may not see them!
Changing the channel on the router
Once you have selected the freest, you can go to the router settings and change the frequency of the channel to the chosen one. It is not difficult to do!
Warning. We can't list all settings for every router model in this article. But with the search on our site and the name of your model you will get specific instructions for your router! Here will be just general information.
- Enter the settings. Login address, username and password are found on the bottom of the router or clarify in the specific article on our website.
- In the settings go to the wireless mode parameters of the Wi-Fi network. If your router is dual-band, there will be separate settings for each 2.4 GHz and 5 GHz band.
- In the settings, look for the channel parameter – select it (usually the default is auto), do not forget to save the settings and restart.
The selected channel can always be changed in the same way. Do not be afraid to experiment!
To enter the settings, the following data is usually used:
Address: 192.168.0.1 or 192.168.1.1.
Login – admin
Password – admin or empty
Below are screenshots of the correct channel settings for different models. Surely you will have something similar.
For reference – in Russian our setting is called "channel", in English "channel".
TP-Link – the old interface

TP-Link – the new interface

ASUS

Step 3: choose a type of connection
Most providers automatically configure the type of connection of the router immediately after the connection of the Internet cable. To check this, open a couple of sites and see if they start loading. If they load, you should safely skip this point. If not, you have to configure them manually.
Now you need to deal with the type of connection to the network. There are the following options:
If the user remembers that there was a certain connection on the previous device – it is selected. If you can not remember for sure, you should open the documents again, but this time the contract for Internet connection. It should contain technical specifications. If, however, the contract is lost somewhere, the necessary line is missing or there is simply no way to find the necessary information, you can contact the provider's technical support service. Or you can go to the provider's website, to your personal cabinet. There, open the necessary section and find this information yourself.
Step 4: setting up the wireless Wi-Fi network
Now we have to deal with the configuration of the wireless network on the example of the TP-Link router. Setting up other router models is very similar to this, so no unique actions are required.
- First of all you need to go to 192.168.1.1 or 192.168.0.1 and enter your login and password (see Step 2).
- After entering the login and password you will be automatically redirected to the main page, where you should go to the tab "WirelessWireless mode". There you will find the sub-item "Wireless Mode Setting».
- Here you need to specify the region and come up with a network name – it will be displayed when searching for a wi-fi network. Other items are best left unchanged. Next, you should go to the tab "Wireless security"if you want to set a password on the wi-fi network.
- Here, select the recommended security option, which is WPA-WPA2 (other models have the option of WPA2-PSK(Other models have WPA2-PSK option; it's better to choose it, as it significantly increases security) and create a strong password. You should enter a password consisting of capital and small letters, digits and special symbols, if it is possible. Then select the tab "System Tools.System Tools» – «Password».
- Here you should create a new unique username and password for your personal account to ensure the security of your data. It is also recommended to write down this information and keep it together with the technical documentation of the router, or use a password manager like 1Password.
Calculating the MTU size
Incorrect parameter size has a number of consequences:
If such problems occur, it is worth checking the MTU, as routers have a function for automatically changing the value of this parameter. It is not uncommon for the value to change, worsening the overall state of the Internet connection.
To find out what MTU size is suitable for a particular router and connection:
- On your computer, go to the command line (Run) and enter the command ping. Example: ping -f -l 1400 yandex.ru. In this line, " -f " is used to prohibit fragmentation of the data packet, " -l " sets the size of the packet, 1400 is the amount of information transmitted in bytes, that is, the MTU value, yandex.ru is the site to ping.
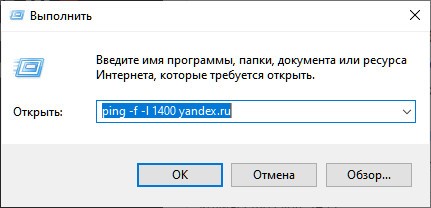
- Enter the command by changing the MTU value until a message appears saying that the amount of data needs to be fragmented.
- Once you know the number, add 28 to it before entering it in the router's settings. These 28 bytes are put on the packet headers and requests.
The key to successful Wi-Fi router setup: the list of parameters to be checked
As with any other job, for successful and problem-free Wi-Fi router setup, you need to prepare in advance – find the documents you received from the Internet service provider when you signed the contract, and in their absence, look at the official website of the company for a guide on how to configure the router and what network parameters to use.
If you think about it, most of the problems that arise during the setup of wireless Internet appear due to incorrectly set connection type and WAN parameters. This is the data provided by your ISP. Most firms prefer to work with a dynamic IP. It's a convenient type of connection that doesn't require additional settings. All important functions and parameters are accepted and saved automatically, and in some routers for this technology settings are set by default, i.e. turn on the device and immediately use the Internet.
Some users create a wireless network, give it a password, a name, but forget about the most important parameters. Even fewer subscribers know about MAC-address (what it is and why it is needed). Therefore a strong reminder(!) – check the binding and clone the MAC-address, if necessary.
These are the two main pillars on which a successful router setup rests. The most important thing about the router is the correct pairing with your ISP and network distribution, while wireless connection information such as the name or password are secondary tasks that can be easily solved after you have read the user manual of the device.
A list of possible problems and how to fix them
You should clarify the connection by disconnecting and connecting, with the wired version. If necessary, you must change the cable and reconfigure the router.
This often happens with new users. It is necessary to disconnect from one of them.
It is necessary to check the correctness of its entry with the inscription on the label. When it is not correct, it indicates that it has been previously changed. To enter the router, you have to reset its settings.
It is required to perform a deletion of its settings by pressing the "Reset" button.
Factory Reset Router
When there is an old device in use, it is likely that previous users have already changed the router settings. This is the reason for its failed connection. If it is impossible to find out the network password, you should reset them.
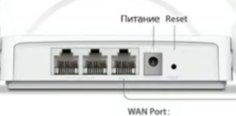
- You need to take a thin paper clip and bend it.
- Turn on the router and press the paper clip on the "Reset" button.
- It is necessary to hold it in this position for three to fifteen seconds to fix the press.
- This will reset all data (Wi-Fi network name and password) to the factory settings.
- After that, you need to enter the router settings again.
Thus, to properly configure and manage the router, it is not necessary to resort to the help of a specialist. This work can be done by yourself. It is enough to carefully study all the features of the process and follow the strict sequence of its implementation.
Read More:
