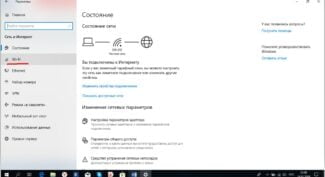
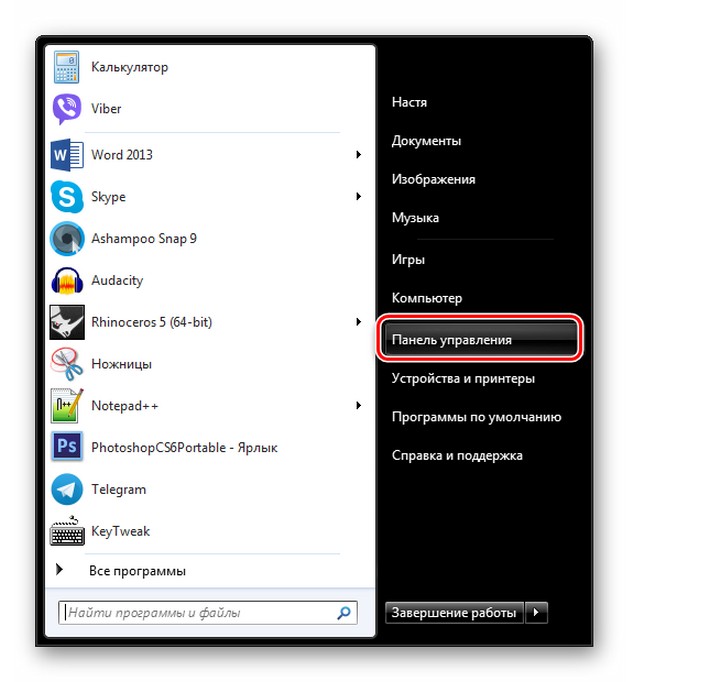
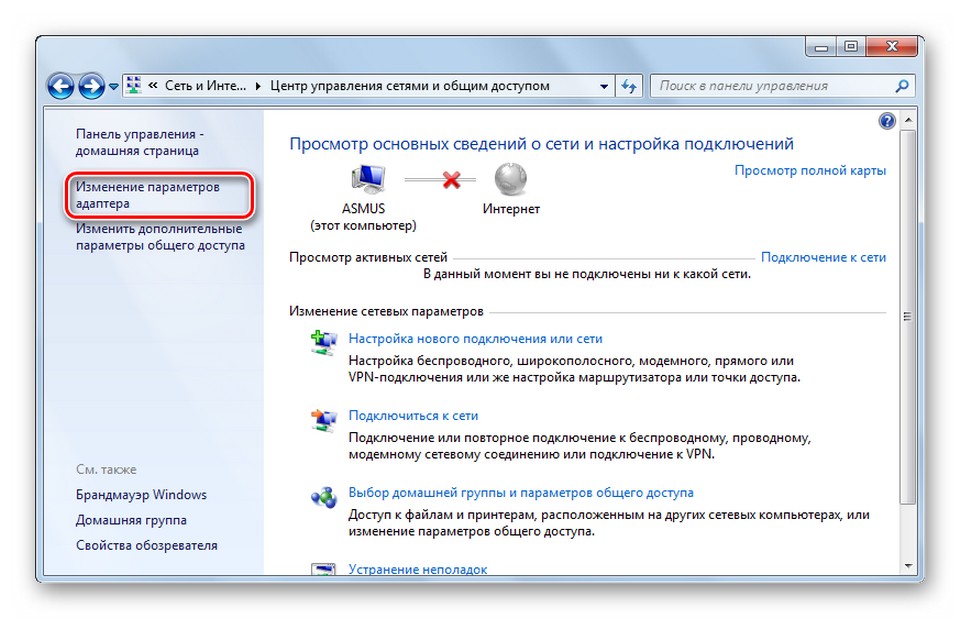
Go to "Network and Sharing Center", and go to "Change Adapter Settings".
- Driver for 802.11n Wi-Fi adapter, EDUP, Elisona, Kebidu, Chipal and other Chinese adapters. How to find and install?
- Connecting and configuring a Chinese 802.11n Wi-Fi adapter
- Do you have a driver for your Wi-Fi adapter on your computer?
- How to install/update the driver for the Wi-Fi adapter
- Way #1: in Windows without downloading any additional software
- Method #2: classical (if there is internet).
- Step 2: Install Drivers
- Step 3: Connecting the Internet
- Installing the TP-Link TL-WN822n Driver on Windows
- Setting up the wifi network adapter on the computer system
- Running on different OS versions
- Windows XP
- Windows 7
- Windows 10
- Method 2: "Network Connections".
- Method 3: "Settings".
- Preparing the Wi-Fi adapter to start the access point
- Wi-Fi adapter as an access point. Setting up in Windows 10, 8, 7
- Solution of possible problems
- Running an automatic diagnostic of the problem
- Resetting network settings
- Removing the network adapter driver (for advanced users)
- Technical Specifications
- Installing the driver and setting up the Comfast CF-WU715N
Driver for 802.11n Wi-Fi adapter, EDUP, Elisona, Kebidu, Chipal and other Chinese adapters. How to find and install?
Recently I bought on AliExpress two Chinese USB Wi-Fi adapters, about which I told in the article Wi-Fi adapter from China: choice, review, is it worth buying. And in this article I decided to raise one very important and for many painful question – finding and installing the driver for the Wi-Fi adapter from China. Which was bought from some foreign online store, like AliExpress, eBay, etc.
For the beginning I will try to explain, what is the difference between the Chinese Wi-Fi adapter, which most often does not even have the manufacturer and model, and they are usually called "USB Wi-Fi adapter 150 Mbps 802.11N. "(or something like that) and the branded adapter, which you can buy in our stores. I mean adapters from ASUS, D-Link, TP-Link, Tenda and other manufacturers we have. It is clear that there can be differences in quality, reliability, etc. But as for the drivers, which are most often needed for the normal operation of the Wi-Fi adapter, they are easier to find for brand-name adapters. Because a popular manufacturer has a website where you can download the necessary driver.
But if we have a Chinese wireless adapter that doesn't even have a normal name, it's not really clear where to look for these drivers. In my case, with the adapters was a disk with all the necessary drivers. But as far as I understand, such a disk with drivers is not always there, or those drivers that are on this disk are not always suitable.

I do not argue, there are Chinese manufacturers, equipment which is not represented in our market, but they still have their own sites where you can download the necessary drivers. For example, the manufacturer EDUP. They have a lot of different network devices. On the example of the adapter from EDUP we will look at the process of finding and installing the software.
Connecting and configuring a Chinese 802.11n Wi-Fi adapter
First I will show you how you can get around the complicated process of finding the necessary driver. Maybe we will get lucky and the computer will make friends with the adapters without much tambourine 🙂 .
Let's take the 802.11n adapter from EDUP as an example. I have one of these, so everything is proven by my own experience. There is also "easy idea wifi N", but everything there is identical to EDUP. Checked it out. So, connect the adapter to the computer. You can plug it directly into the USB port.

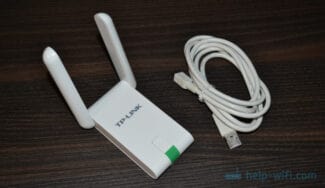
Or you can use a USB extension cable. You can use it to move the adapter higher for better reception. Just don't use a long extension cord, it might be a problem.
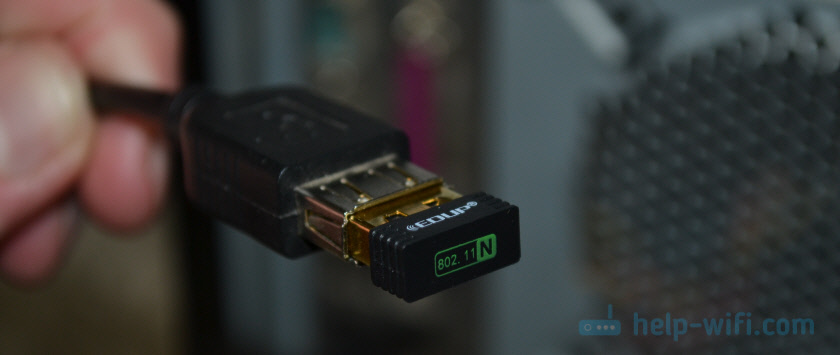
Of course, a lot depends on the operating system installed on your PC. Again, in my case both adapters worked immediately in Windows 10. In Device Manager they are detected as 802.11n USB Wireless LAN Card.

If the computer does not see the adapter, or rather can not automatically install a driver for it, then try to install the driver from the disk, which should be included. I had a disk with each adapter.

Usually the disk contains drivers for Windows, Mac OS and Linux. If there is a Setup.exe file on there, all you have to do is run it and follow the installation instructions. And if it's just a collection of different files in folders, you need to install it through the Device Manager. I will show you how to do it in the article below.
Do you have a driver for your Wi-Fi adapter on your computer?
This is probably the first questionI have to deal with when there are problems with connecting to Wi-Fi network.
Generally, when installing a new operating system Windows 11, 10 (8) – drivers for the Wi-Fi adapter, most often, are installed in the OS automatically (although they do not always allow you to use all the options of the device – but that's another issue).
With Windows 7 – the driver for the wireless adapter is often not installed, and it must be installed additionally from the disk (from the site of the manufacturer of your adapter).

? To help!
By the way, I cannot help but recommend in this article software for automatic driver updates (not only for Wi-Fi adapters).
To find out for surewhether there is a driver for your device – launch device manager. To do this, open control panel, then turn the view to "Large Icons" . , and then select manager. in the list.
Note: In Windows 10/11, by the way, you can right-click on the START button and select "Device Manager" in the context menu that appears.
How to open the Device Manager / by example of Windows 10
Next you need to open the tab "Network Adapters" tab. . In this tab, look closely at the following lines:
The example below shows that the driver for the Wi-Fi adapter is installed ( Note: Dell Wireless) .
For comparison Here's a screenshot below of what the Device Manager would look like if driver for Wi-Fi is not.
Notice that under the "Other Devices you'll just get "Unknown device" (the line with a yellow exclamation mark). By the way, you may have several such lines – if several drivers for different devices are not installed at once.
How to install/update the driver for the Wi-Fi adapter
Way #1: in Windows without downloading any additional software
In general, it is ideal if you have a disk with all the drivers for your hardware (laptops often drop drivers on the hard drive itself).
If there is no disk, then in some cases you can do with "little blood": in order to update the driver and you have the Internet – it is enough to press only 1-2 buttons in the device manager !
? Variant 1. When you open the device manager, in the top menu there is a button "Update Hardware Configuration" – click it!
The thing is that Windows, when it "sees" the hardware, for which there is no driver, will try to update it by itself (very often this method works.).
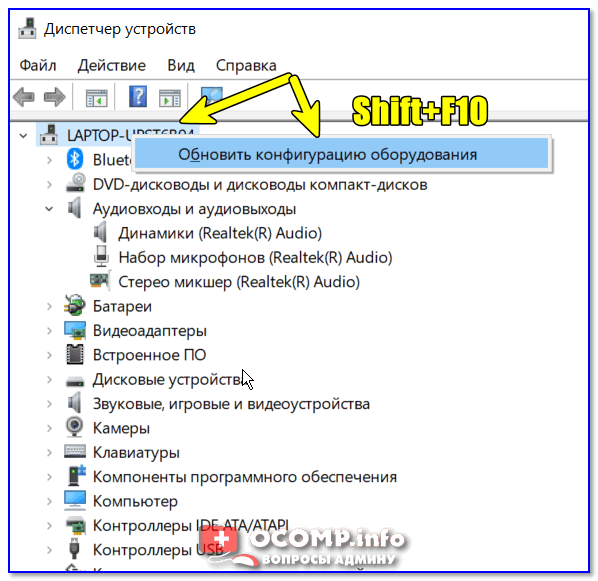
? Option № 2 In the Device Manager expand the tab. "Other Devices" tab of the device manager. , then right-click on the unknown device and select the menu "Update drivers. " .
Then select "Automatic driver update" and follow the instructions of the wizard (see screenshot below 👇) .
Method #2: classical (if there is internet).
To find a driver for any hardware – you need to know the model of this hardware (logical. ) . There are two ways to find out what kind of Wi-Fi adapter you have installed:
By the way .If you have a laptop, then you will need to know the model of your wireless adapter, even if you download the driver from the official site – the fact is that the same laptop model is often equipped with adapters from different manufacturers.
And when you go to the official site – you will see 2-3 different drivers at once.
One of the best programs to view your computer's characteristics is AIDA 64. There, to find out the model of the Wi-Fi adapter, you need to open the "PCI/PnP Network (see the line with the Wireless Network Adapter, in the example below it is the first line) .
Step 2: Install Drivers
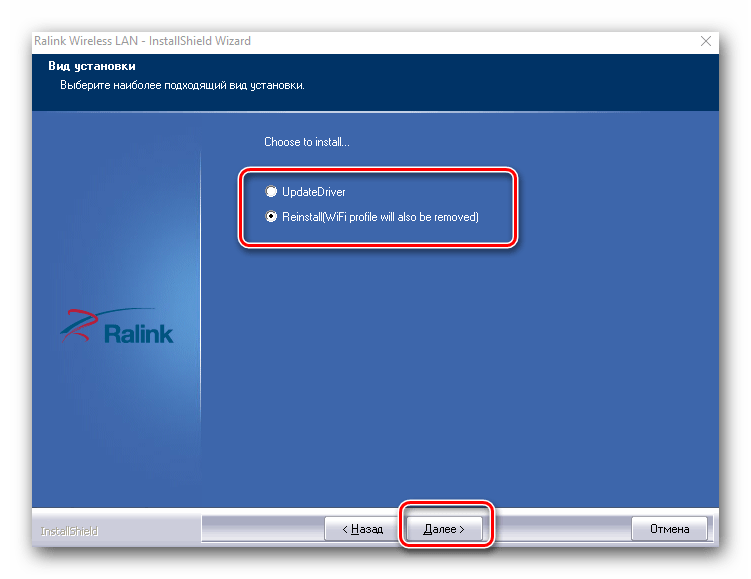
Many modern Wi-Fi adapters work in Plug and Play mode, that is, they are ready to use as soon as they are plugged in. This is achieved due to the fact that the operating system automatically searches for and installs drivers when new hardware is detected. However, this does not work with all network card models, especially if we are talking about USB types from the budget segment. In this case, you will have to manually download the driver from the official site, install it and check if the device works.

Step 3: Connecting the Internet
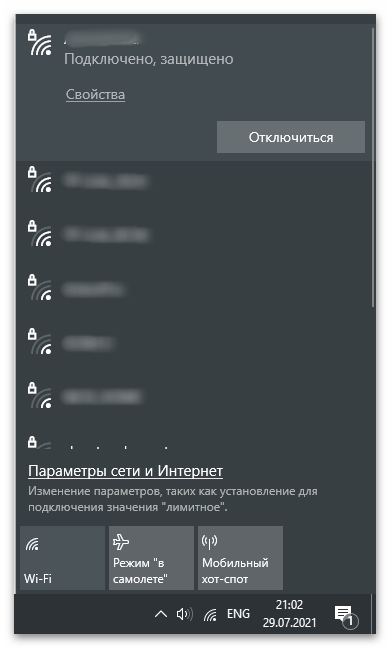
The final step is to connect the computer to the wireless network with the installed adapter. If you do not know how to perform this action, because you are new to the task at hand, follow the link below to read the topical information. It will show you how to find the Wi-Fi network you need and how to connect with or without a password.
Installing the TP-Link TL-WN822n Driver on Windows
In order to connect the TP-Link wifi adapter to a computer running the Windows operating system:
If autorun is disabled in Windows, you must run the driver installer for TP-Link TL-WN822 from the disc – "autorun.exe". In case you got the adapter not new and you have lost the disk, you can download the driver for the wifi adapter from the official site as well as the installation program itself.
The software on the disk is universal for several TP-Link adapter models, so to set up WN822N we choose it from the list.

Then we are offered either to install the drivers only or together with the utility. Generally speaking, you can only install drivers as Windows already has all the necessary software for working with wireless networks. But we will see what happens if you put everything together.

Setting up the wifi network adapter on the computer system
After installing the TP-Link TL-WN822n driver, the "Network" tab will open the application, where we will see a list of all the wireless networks available for connection. Choose the SSID of our router, enter the password, and voila – there is Internet on the computer

After connecting you can go to the tab "Status" and see all the data about the current connection: SSID, IP address received by computer from the router, channel wifi, MAC address of the access point, etc. Pay attention to the speed – here is a theoretical speed specified by the manufacturer, which has nothing to do with the actual speed.

Running on different OS versions
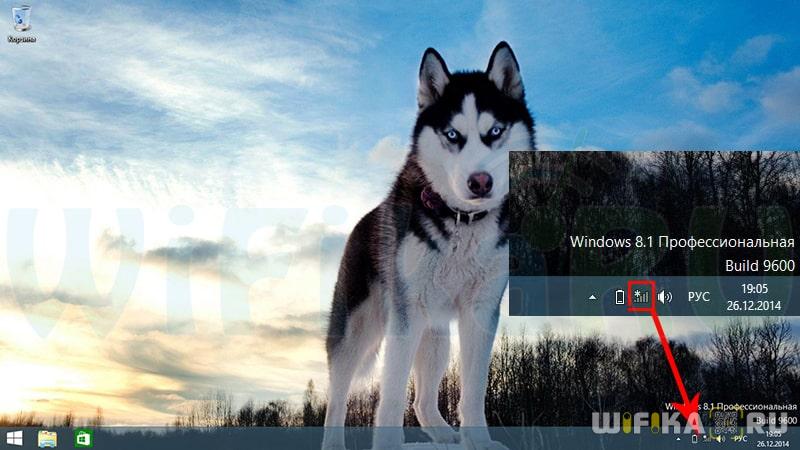
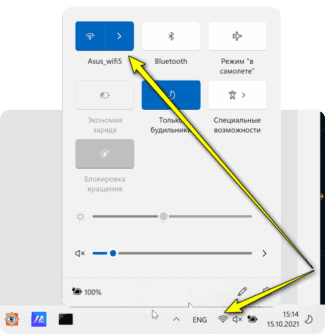
Usually after installing the drivers and restarting Windows, the icon for managing Wi-Fi appears in the taskbar. To connect to the Wi-Fi, you need to click on the icon, select the network, enter the security code and wait for the connection to the Internet.
However, in some cases, a person may encounter various problems – there is no icon on the taskbar, after connecting the Internet connection is not actually there, etc. In this case, it is necessary to connect manually. But to do this, you need to find the Wi-Fi connection settings.
Windows XP
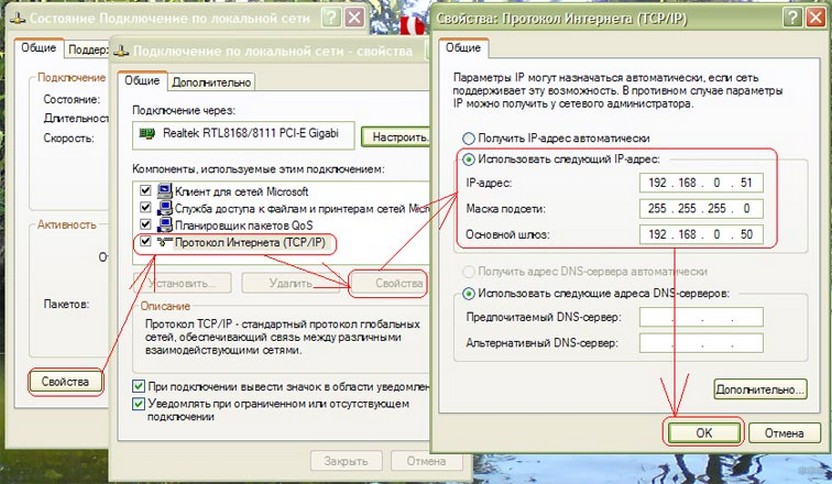
Set up Wi-Fi on a PC with Windows XP as follows:
- Go this way – Start, Network Environment and Connections.
- Item "Wireless connection", press PCM and choose "Properties".
- General -> Protocol -> Properties.
- Contact your ISP and ask them how to fill in the box that opens. In most cases, the technical parameters are automatically selected by the computer. However, sometimes you have to manually enter the IP address, DNS gateway, and other information. At the end, click Apply, but do not close the window.
- Open the "Wireless Networks" tab, check the "Use Windows" box, click the "Apply" button, select "Wireless Networks" and the network you want to connect to. Enter your security key and wait for 5-10 seconds.
Windows 7
Windows 10
Well, since we have a common topic, I'll describe at the same time how to enable Wi-Fi on your Windows 10 computer. No matter how you look at it, but now most of the users work with this operating system.
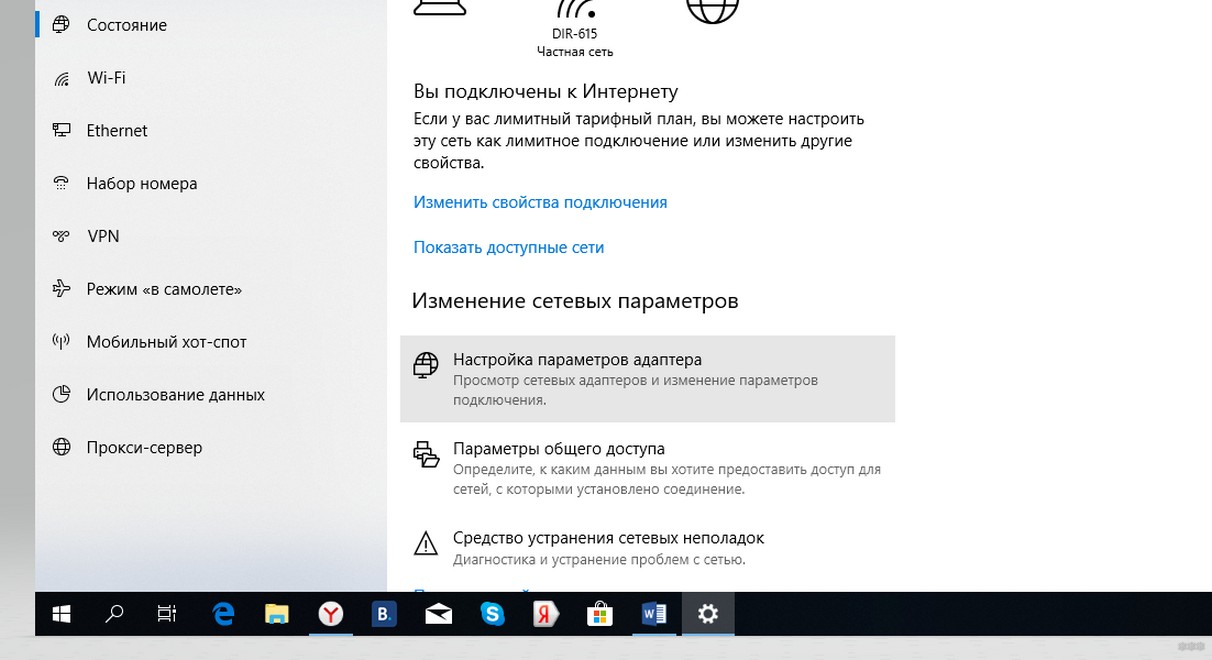

If the adapter is on, it is even easier to connect. Left-click on the Wi-Fi icon and select your network from the list of available connections. If this is your first time connecting, you will most likely need to know your security key. That's all the instructions.
Oh, and I forgot how to check if the wireless adapter is on. I will tell you:
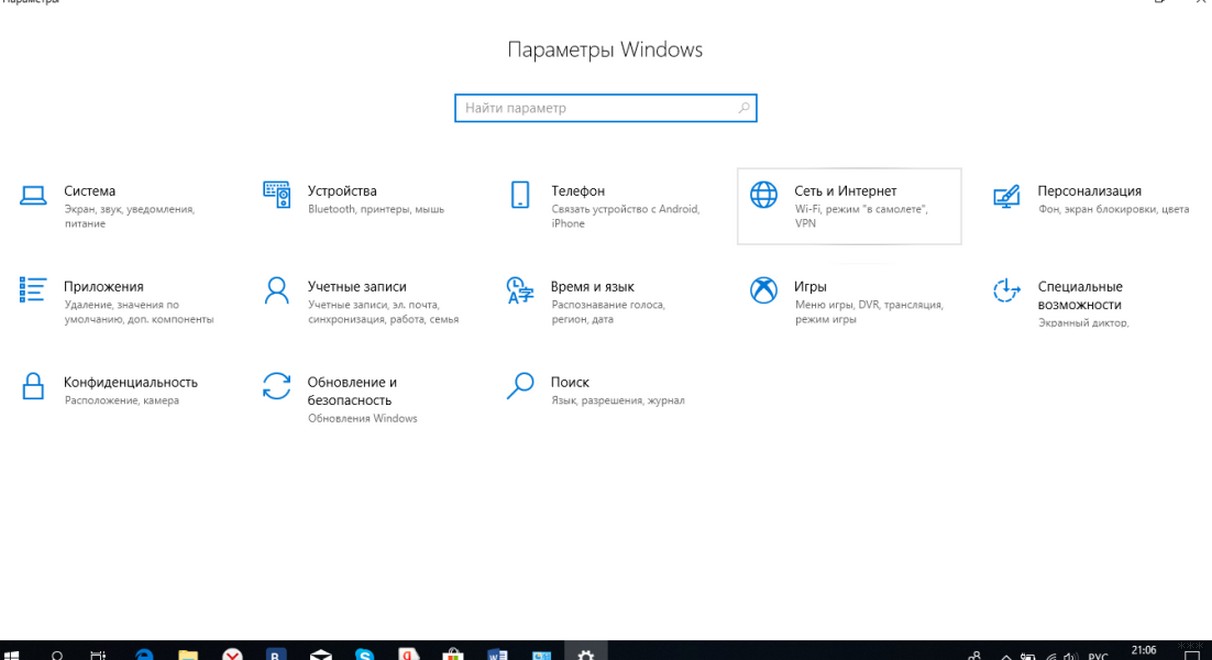


That's it for sure now. If you still have questions, be sure to post them in the comments! We'll figure it out. And I'll say goodbye. See you soon!
Method 2: "Network Connections".
You can turn on the wireless network adapter on your laptop using the system tools: To do this, just go to the Network Connections settings window.
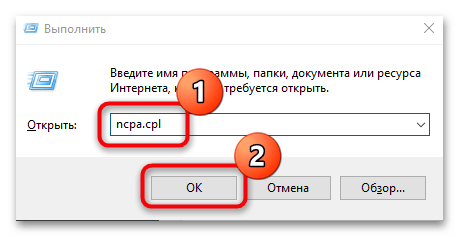
- Press the "Win" и "R"keys at the same time to open the "Run" dialog box.. In the line, type the command ncpa.cpl and click on "OK" BUTTON..
- A window will open with a list of all available network connections. A wireless connection is marked with a staircase icon and if it is grayed out, it means that it is inactive. Right-click on its name and from the context menu select "Enable" from the context menu..
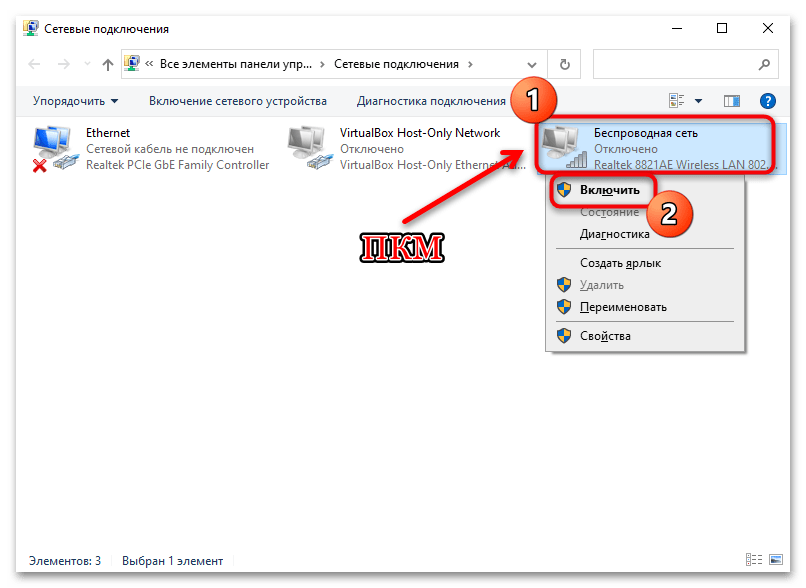
This method will work for all the latest versions of Windows.
Method 3: "Settings".
Windows 8 and up has a built-in "Preferences" tool is built in.which is designed to replace the classic "Control Panel". Not all functions have been moved there yet, but the network connection settings are available:
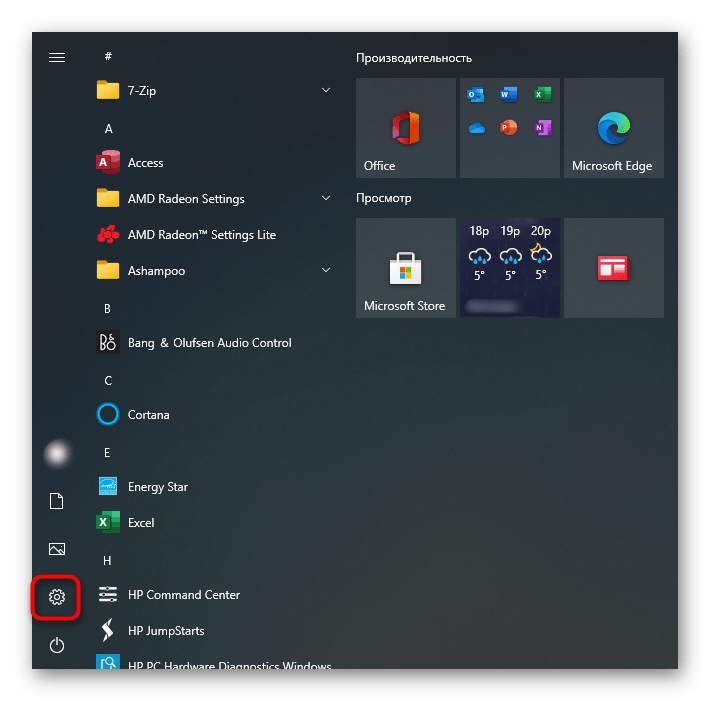
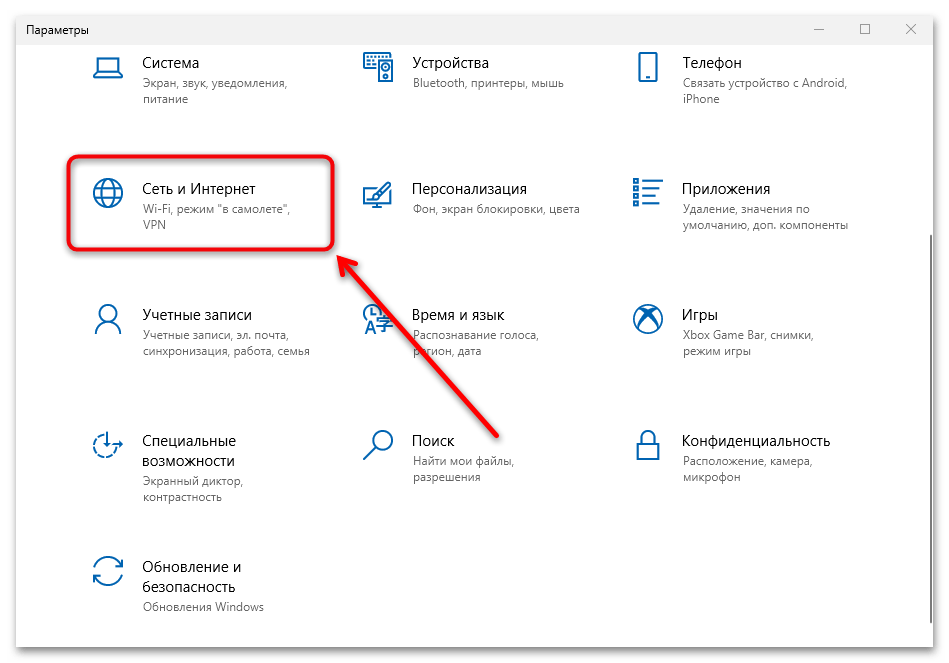
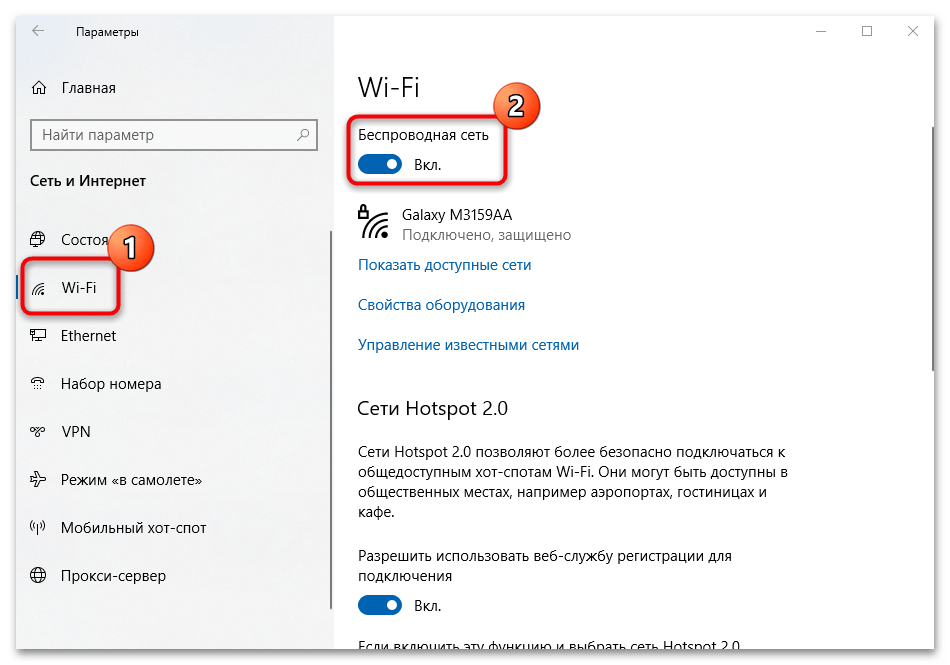
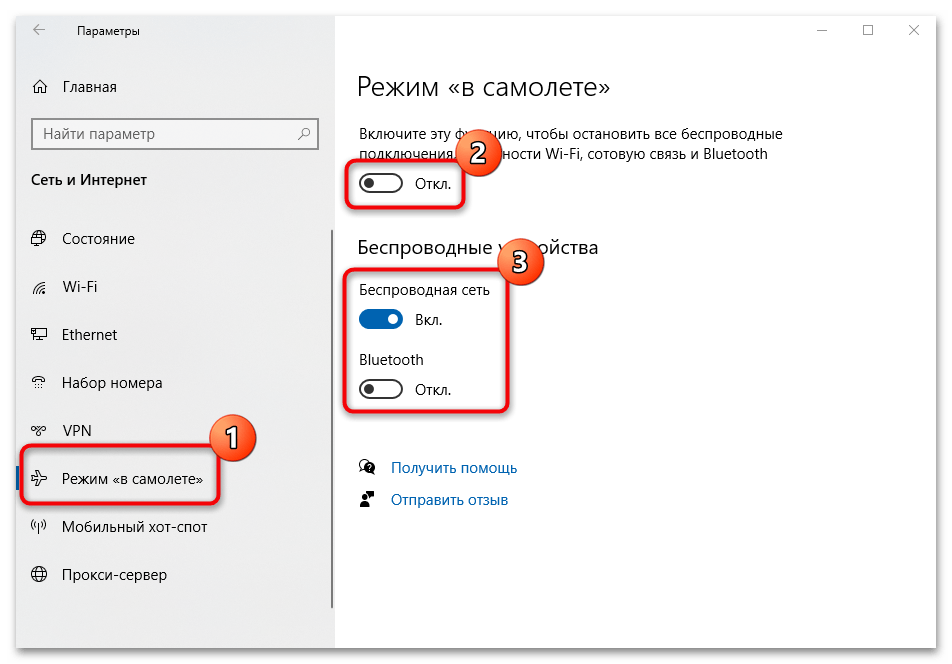
The wireless LAN adapter may not turn on because "Airplane Mode" is active.. Under "Settings" under "Settings", click on the appropriate tab, then deactivate this mode. Note that you can manage Wi-Fi and Bluetooth even when the mode is active, that is, the adapters will not turn off during "Airplane Mode".If you turn them on in this window.
Preparing the Wi-Fi adapter to start the access point
The most important thing is that the computer detects the adapter and installs the driver. I think this should be no problem. The drivers are on the disk with the adapter itself. If not, you can download the necessary driver from the adapter manufacturer's website for your model. Even an old adapter like the TL-WN721N worked in Windows 10 without any problems, and I was able to run the access point.
We will not go into all the nuances of the virtual adapter drivers, etc., just yet. We don't need that yet. It is enough that once the adapter is connected to the computer, it is detected and the Wi-Fi works.
If you like, you can use the command netsh wlan show drivers you can check if your wireless adapter supports running a virtual Wi-Fi network. Simply run the command at the command line. In the results, look for "Hosted network support." It should have "yes" next to it.

If there is no support, then update the Wi-Fi adapter driver. If the update did not help, then try the tips from this article.
With this sorted out. It remains only to execute a few commands, and you can connect to the wireless network, which will be broadcasted by the computer. Let's proceed with the configuration.
Wi-Fi adapter as an access point. Setting up in Windows 10, 8, 7
Commands we will perform in the command line. It must be run as an administrator. You can find the command line in the start menu, right-click on it and select "Run as administrator". Or, in Windows 10, you can simply right-click on the start menu, and select "Command Prompt (administrator)".

Next, the first command we set the name of our Wi-Fi network, and the password to connect to it. To do this, we need to run the command:
"help-wifi.com" – is the name of the network that will be distributed by the Wi-Fi adapter, and “11111111” – is the password. This data you can change. The password is at least 8 characters long.
Copy this command to the command line and run it. You will get a result like this:

With the next command we start the access point. To do this run the command:

This means that the Wi-Fi network is already broadcast, and you can connect your devices to it, using the password that was specified in the first command.
If after running the second command you get a message that "Failed to start a hosted network. The group or resource is not in the right state to perform the required operation", see tips on how to solve this problem at the end of the article, or at this link: https://help-wifi.com/nastrojka-virtualnoj-wi-fi-seti/ne-udalos-zapustit-razmeshhennuyu-set-v-windows/
We started the access point and you can connect to a Wi-Fi network. But the Internet will not work on the devices. It is necessary to open the sharing in the properties of your Internet connection. And we are going to do it.
Solution of possible problems
If after configuring the network driver there are problems, in most cases they can be solved by yourself.
Running an automatic diagnostic of the problem
Built-in Windows tools know how to recognize the cause of a problem and offer a solution to the problem. To run the tool "Troubleshooting" tool.The right-click on the network connection icon in the tray, then select the corresponding function from the menu that appears. 
A system window will open, through which you can monitor the progress of analysis and check the system for errors. If any are found, a built-in wizard will display them and suggest solutions.
A couple of popular errors that can be detected by this tool will be described a bit below.
Resetting network settings
There are some problems that the user can't find and fix on his own. In this situation, the best solution is to reset the network settings. This is a very simple procedure, requiring a few simple steps and a reboot of the computer. The next time you boot Windows, all settings are restored to their defaults, which removes local errors such as the inability to connect to (or even see) a computer connected to the same network, or even restores Internet access.
Removing the network adapter driver (for advanced users)
With in-house tools you can uninstall the network adapter, thus resolving some system errors related to the failure of the device. However, download the driver from the manufacturer's site first, otherwise after uninstallation you will not be able to access the Internet. To restore correct operation you will need to download and install the driver for the hardware. Our separate material describes in detail how to do this with the help of third-party solutions or through the official website of the component's manufacturer.
Technical Specifications
This is the most budget model from the line of this manufacturer, so it would be naive to expect something supernatural from it. But the technical characteristics allow to work stably and without problems with wireless connection inside a small apartment.
From the capabilities of this adapter it is worth mentioning that it can work not only in a standard client role, getting a signal via WiFi to your computer, but also as an access point, simultaneously receiving and distributing wireless signal. There is also a built-in WiFi Direct function. This is when devices connect to each other via wifi without using a router. If you buy two of these adapters and install them on different PCs, you can establish communication between them without setting up a traditional local network.
That is three in one – not bad for a budget model!

Installing the driver and setting up the Comfast CF-WU715N
Now let's see how to configure this small wireless adapter.
Insert it into the USB port, and the included disk with drivers for the adapter and configuration software in the CD-Rom. It is better not to lose the disk, because then it will be difficult to download the driver for the network adapter – Russian version, as well as any other, except for Chinese and English, the manufacturer's official website does not have. I searched long and hard by "scientific method", but I found the page of Comfast CF-WU715N model, but I didn't find any software in the download section.
So if you're afraid to lose the installation CD, I recommend to copy all the files from it to your computer's hard drive or flash drive.
After opening its contents we will see the folders which name says that there is all the software you need for Windows 7/8, Linux and MacOS.

We need to run the file 3070setup.exe. First of all we agree with the license agreement, then we choose the type of installation – only Comfast drivers or together with the proprietary application – the translation of the Chinese is a bit lame, but the essence of the content is clear.
If you do not plan to use your wireless adapter for WiFi Direct connections, the program itself to configure you can not put, as all connections to the network are made by standard means of Windows.

Once installed, you will see a distinctive wireless icon in the bottom panel of Windows icons. You can click on it and select your WiFi from the list of available networks.
