On all dual-band routers, both bands are enabled by default. If you do a router reset, it will distribute two Wi-Fi networks. The factory names of these networks (SSIDs) are usually listed on the bottom of the router on a sticker. The 5 GHz band network name usually has "_5G" at the end. But there are routers, such as Keenetic, that have a feature enabled that combines two Wi-Fi networks (in different bands) into one (two networks with the same name) . The devices see one network, connect to it and automatically choose the best band.

- How do I change the channel on my TP-Link router?
- Why is it important to change the channel on my TP-Link router?
- WHY CHANGE THE CHANNEL ON THE WI-FI ROUTER?
- What channel should you set in the router settings?
- TP-Link
- ASUS
- What is a Wi-Fi network channel and why change it?
- How do you find a free channel with inSSIDer, or WiFiInfoView?
- Why change the settings?
- The process of changing
- How to adjust the channel width on your router
- Answers to questions
- Choosing the channel frequency on your Upvel router
- What to do after changing channels
How do I change the channel on my TP-Link router?
Friends, now you will learn how to change the channel on your TP-Link router, and we will start by defining channels, width, basic settings, and generally tell you what they are for.
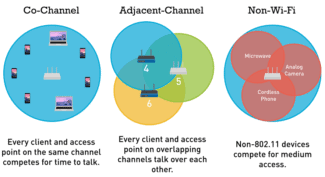
If your wireless Wi-Fi network has a bad signal or disappears, it could be caused by interference caused by other devices. Thus, most of the home network transmits signals in the 2.4 GHz frequency band; very often devices operating on the same 2.4 GHz frequency affect the wireless signal. Some electronic devices such as baby monitors, microwave ovens, and cordless phones may use the same frequency band. It is very easy for such devices to interfere with your wireless home network to slow down network connections.
Generally, the wireless networks that most people use have the same radio frequency. Homes that share walls with each other can cause interference between different home networks and result in a bad signal. The good part is that most wireless routers give you the ability to change the wireless channel. The different frequency helps routers avoid interference.
Why is it important to change the channel on my TP-Link router?
Most TP-Link routers use 2.4GHz for 802.11n and 5GHz for 802.11n and 802.11ac. There is also a choice of "Channel" on each frequency. The user can select from eleven different channels depending on what other networks are broadcasting on the neighboring network. Multiple Wi-Fi networks often overlap each other, resulting in a slow signal or no signal. By switching to a less busy channel, you can improve the speed of your Wi-Fi.
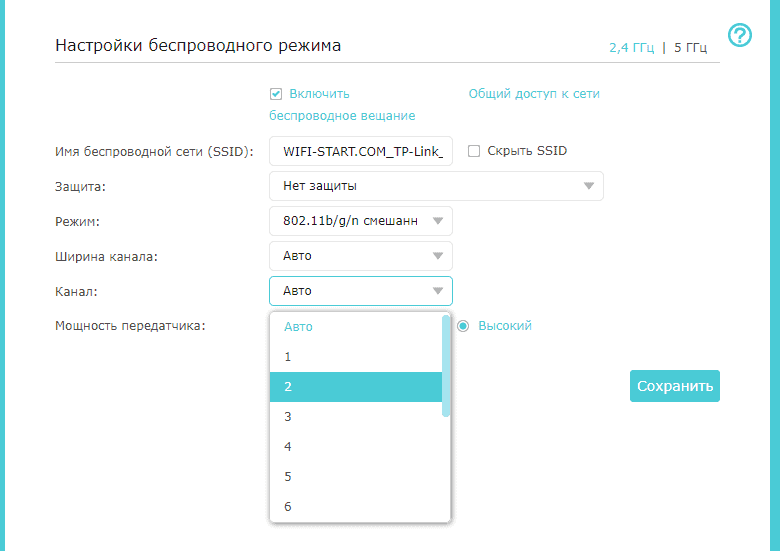
You can change the channel on your TP-Link router by logging into the web interface of your router. This is done by launching a web browser and entering the default IP address into the address bar. You can find the default IP address of your router in the printed manual that came with it, or by searching on Google. Using your default username and password, log in to your router's settings page.
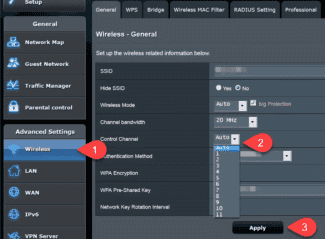
After logging in, go to Advanced Settings, select "Wireless", and then go to the page "Advanced" to change the channel in the drop-down menu. Most routers have this option under the menu called "WLAN". For the changes to take effect, your router may reboot automatically.
It is very important to see nearby wireless networks and their channel, as it gives you clarity to change your channel and see what other channels are configured for.
WHY CHANGE THE CHANNEL ON THE WI-FI ROUTER?
It's very simple. For instance if you have two routers whose signals overlap and are operating on the same channel, then all sorts of things can go wrong with those routers or, more precisely, with the wireless Wi-Fi networks. Such as a constant loss of connection to the router, low Internet speeds and a lot of different and incomprehensible problems.
I am often asked the question that the Internet works on devices only when they are close to the router (approximately within the room). And when you go further away, the devices hold the network, but the Internet does not work. I do not know the exact reason why this problem occurs, but it seems to me that the problem here is just strong interference. It is possible that there are so many networks that there are no free channels. Well, and technical problems with the router in this case should not be excluded.
Now take your laptop or phone and see how many wireless networks are available to you. The neighbors probably have routers, not only you have Wi-Fi :), although everything can be.
What channel should you set in the router settings?
If you do not have many, or no Wi-Fi networks nearby, then you do not have to worry about changing the channel. And set as you wish. But I still advise you to set a static channel, not Auto. Why? I don't know if this is true, but I have noticed that I have a stronger signal on channel 1 than with automatic channel selection. In case there are a lot of channels, or all 13 are full, then I advise to set the automatic search and select a freer channel.
There is a good program for phones with Android system, it is called Wi-Fi Analyzer. With it you can see which channel is free, which is busy, and how many are busy in total. Thus, you can determine the free channel and specify it in the settings of the router. I will describe how to use Wi-Fi Analyzer later in this article. Although the program itself is simple and straightforward.
TP-Link
First, you need to enter the TP-Link router settings or use the TP-Link Tether application for management from your phone (if your router supports this feature).
On routers with the new web interface, the 5 GHz band settings are under Advanced Settings – Wireless Mode – Wireless Mode Settings. There is a tab "5 GHz" where you can disable or enable the Wi-Fi network by unchecking/unchecking "Enable Wireless Broadcasting". You can change the network name, password, set the transmitter power, etc. If the network works fast and stable, I do not recommend to change the factory settings (except the name and password) .
There may also be Smart Connect settings. If it is enabled, the devices will see the same network and choose the range to connect to. The network name and password will be set the same for both bands.

On some TP-Link router models, the 5 GHz band settings look like this:

And on routers with the old web interface, these settings are under "Wireless Mode – 5 GHz":

And you can disable or enable the network on a certain frequency in the "Select operating frequency" section.
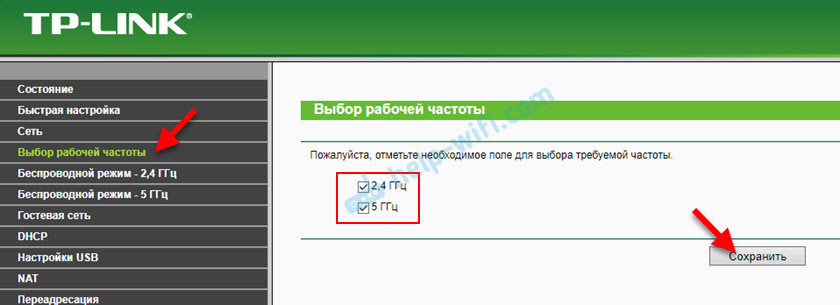
Just uncheck/check the box next to the desired frequency and save the settings. Don't forget to save the router settings after changing the parameters!
ASUS
It is possible to change the settings of the 5 GHz Wi-Fi network on the ASUS router in the web interface, in the "Wireless Network" section. There, in the drop-down menu, you need to select the frequency range "5GHz", set the necessary parameters and save the settings. If you don't know how to enter the settings of your ASUS router – see this article.
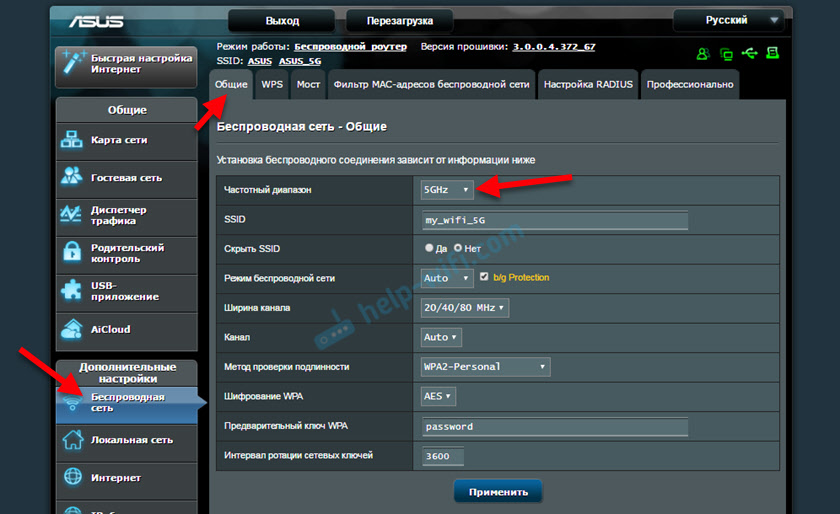
You can disable or enable 5GHz on the tab "Professional". Select the desired range and below near the item "Enable radio module" put "Yes" or "No".

What is a Wi-Fi network channel and why change it?
To better understand the situation, let's first understand what's what. At the moment, almost all routers broadcast wireless network at 2.4 GHz. There are already new ones that work at 5 GHz.But they are still few in number. They are expensive, and not everyone is ready to throw out their router and buy a new one, so that only the network was on a frequency of 5 GHz. This is understandable. So, on a frequency of 2.4 GHz, in Ukraine and Russia are allowed to use from channel 1 to channel 13. This means that every Wi-Fi network operates on channel 1 through channel 13. In America, for example, only 11 channels are allowed. Because of this, by the way, there are problems when connecting to wireless networks with devices that are brought in from America. They simply can't see Wi-Fi, which works on channel 12, or channel 13.
Typically, problems start when two (or maybe more) Wi-Fi networks are on the same channel. If you live in a private house, you're likely to have no other networks within the range of your Wi-Fi at all, and even if you do, they will be few and the signal will be weak. But in an apartment, there can be a lot of networks. And they very often get up on the same channel. Why? Let me explain. For example, you set up your router, and in the settings you choose a static channel, let's say channel 6. Your neighbor sets up his router and also sets up channel 6.

By default, the router is set to automatic channel selection mode. This means that when the router is turned on, it chooses a free (or less busy) channel. Reboot it, and it can already choose a different channel. Whether this thing works, I do not know, but I think that even with automatic selection to 1 channel can get several networks. Especially if there are a lot of networks. They simply have nowhere to go.
How do you find a free channel with inSSIDer, or WiFiInfoView?
If you open the list of free networks on your device (laptop, smartphone, tablet) and see a lot of networks available for connection, the best way to find a free channel for your network is to use special programs. The most popular, of course, is inSSIDer. It is free, the interface is in English, but everything is clear there. I also really liked the free, simple and small program WiFiInfoView (I recommend using it). I will now show you how to use these programs.
First, we will need to download inSSIDer. You can find it on the internet. To install the software, simply run the installation file from the package and follow the instructions. After setup, start inSSIDer (it will have a shortcut on your desktop). If I'm not mistaken, this program can also be installed on a tablet or phone that runs on Android/iOS. Look in the branded application stores.
For these two programs to work, you must have Wi-Fi enabled. The device must see the available networks. I wrote about setting up Wi-Fi on the laptop, in this article.
Run it means inSSIDer, and immediately go to the tab NETWORKS. You will immediately see in the table all available Wi-Fi networks and your network. If you are connected to it, you will see an asterisk next to it.

We need to look at the Channel tab or more precisely at the information that is displayed below it. It shows which channel each network is using.
As you look, you choose the free channel for your network. By the way, I forgot to mention: there are three channels which never overlap.. These are 1, 6, and 11, if they are not busy according to the program, then try to set them first. If the network works on channel 10 for example, it captures two more channels on each side. For example: 8,9,10,11,12. You may be asking why the program shows two channels in front of almost every network. 1+5, 13+9, etc. They write that this is because one channel is set manually, and the second selects the router for better coverage. I couldn't figure it out myself, but I checked and realized why two channels are displayed. This is because the channel width is set to 40MHz in the router's settings. Or, it is automatically selected and it set 40MHz. If you forcibly set 20MHz, then the channel will be displayed alone. Tested.
Why change the settings?
First of all, it is necessary to give a little clarification as to what a Wi-Fi channel is. Almost any modern router uses an antenna which radiates radio signals at 2.4 GHz, but the developers provide for the possibility of changing it in a small range. It is conventionally divided into 14 channels, which represent subfrequencies – to give a comprehensible analogy, you can think of old radios with scales of coarse and fine tuning.
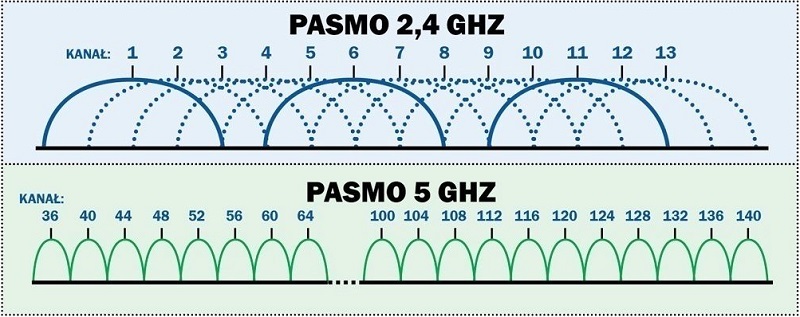
The Wi-Fi channels are designed to improve the performance of the wireless network in an extreme situation. Just imagine what would happen if several routers were installed in close proximity to each other, with each router set to the same frequency. The consequence of this would be interference, as well as a significant reduction in the range of connections to mobile devices. In addition, many users complain about the sudden disconnection of laptops and smartphones from the router, which causes a lot of inconvenience.
That's why each router should have its own Wi-Fi channel installed – this will help significantly reduce the number of interference and get rid of the problems mentioned. In this case, several routers can be a meter away from each other, each still communicating with its own members of the wireless network. That is why any user should know how to change the Wi-Fi channel.
The process of changing
To change any router settings, you will need to connect to the router's web client. If the device is already configured and working properly, you can do this directly through the wireless network. Otherwise you will have to use the wire with RJ-45 connectors supplied with the device. The base address for the connection is 192.168.0.1 and as an alternative a similar combination of symbols can be used where zero is replaced with one. This address is valid for 90% of devices – if entering it in the browser line does not give any results, you need to find the correct combination in the manual.

Login and password can be customized by the router user, but by default you need to enter the word admin in both lines to access any device. After accessing the web client, find the menu tab that allows you to change the Wi-Fi channel. In many russified interfaces it is called "Wireless Network", but you may also encounter the following options:
Usually such tabs contain many settings, so you will need to select from them two items that allow you to set the desired Wi-Fi channel. Just focus on the words "channel" or "Channel" to find a drop-down list with numbers and one box-switch where you can check the box. In the list, the channel number is set, but the switch is designed to select the automatic mode of the router. After selecting the channel you only need to reboot the device, using the system settings tab.
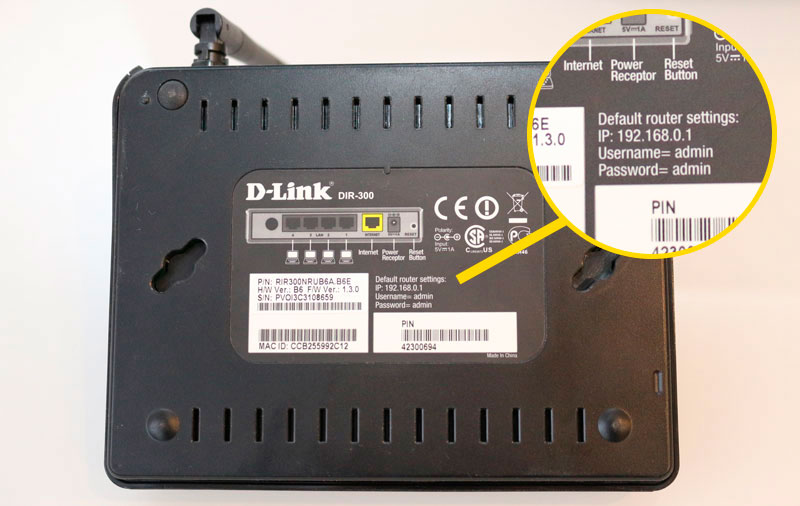
Instructions for different manufacturers of network equipment are a bit different, as well as the web-interface of the individual models of the same brand. Let's examine in detail how to get to the necessary router parameters on the example of certain brands.
How to adjust the channel width on your router
To configure the Wi-Fi channel width, you will need to access the administrative interface of your router. The steps may vary slightly depending on the router manufacturer and model, but the process is usually as follows:
- Enter the IP address of the router in the address bar of your browser. This is usually 192.168.0.1 or 192.168.1.1.
- Enter your username and password to access the router's settings. If you haven't changed them before, look for the information on the router label or in your documentation.
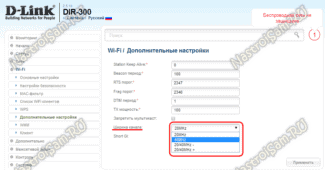
- In the router settings menu, find the section related to wireless settings (Wireless Settings).
- Select the desired channel width for each band (2.4 GHz and 5 GHz).
- Save your changes and reboot your router if necessary.
- Resolve Wi-Fi Channel Width Problems
A clear tutorial, using a TP-Link router as an example:
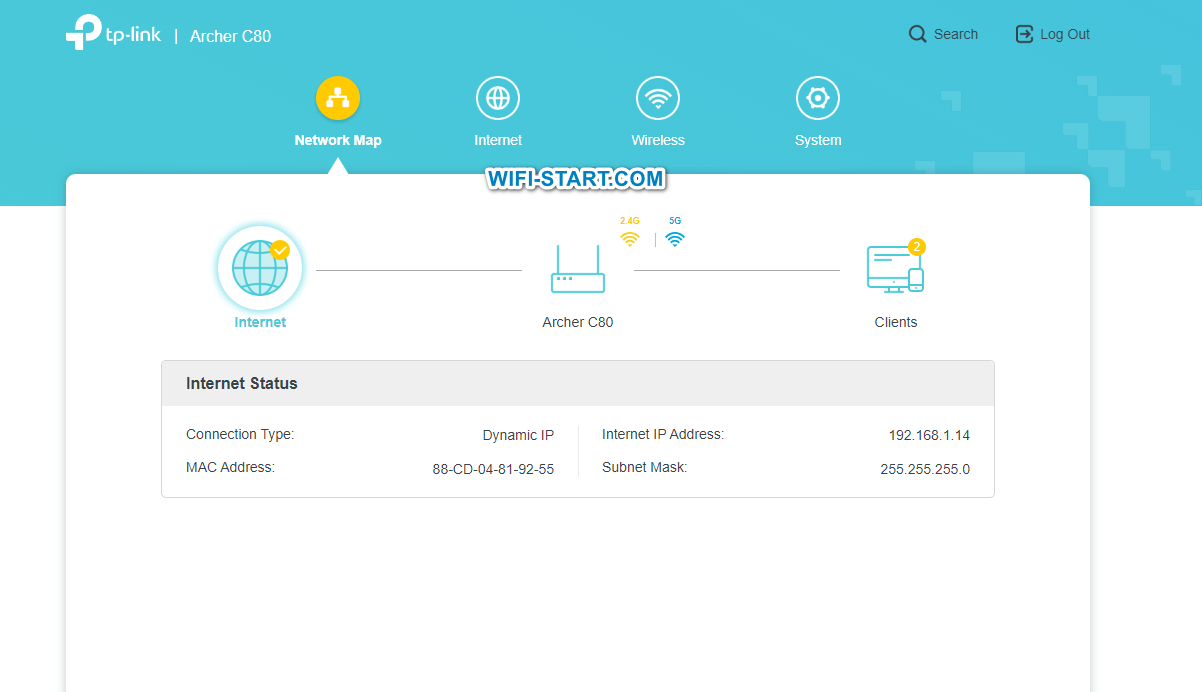
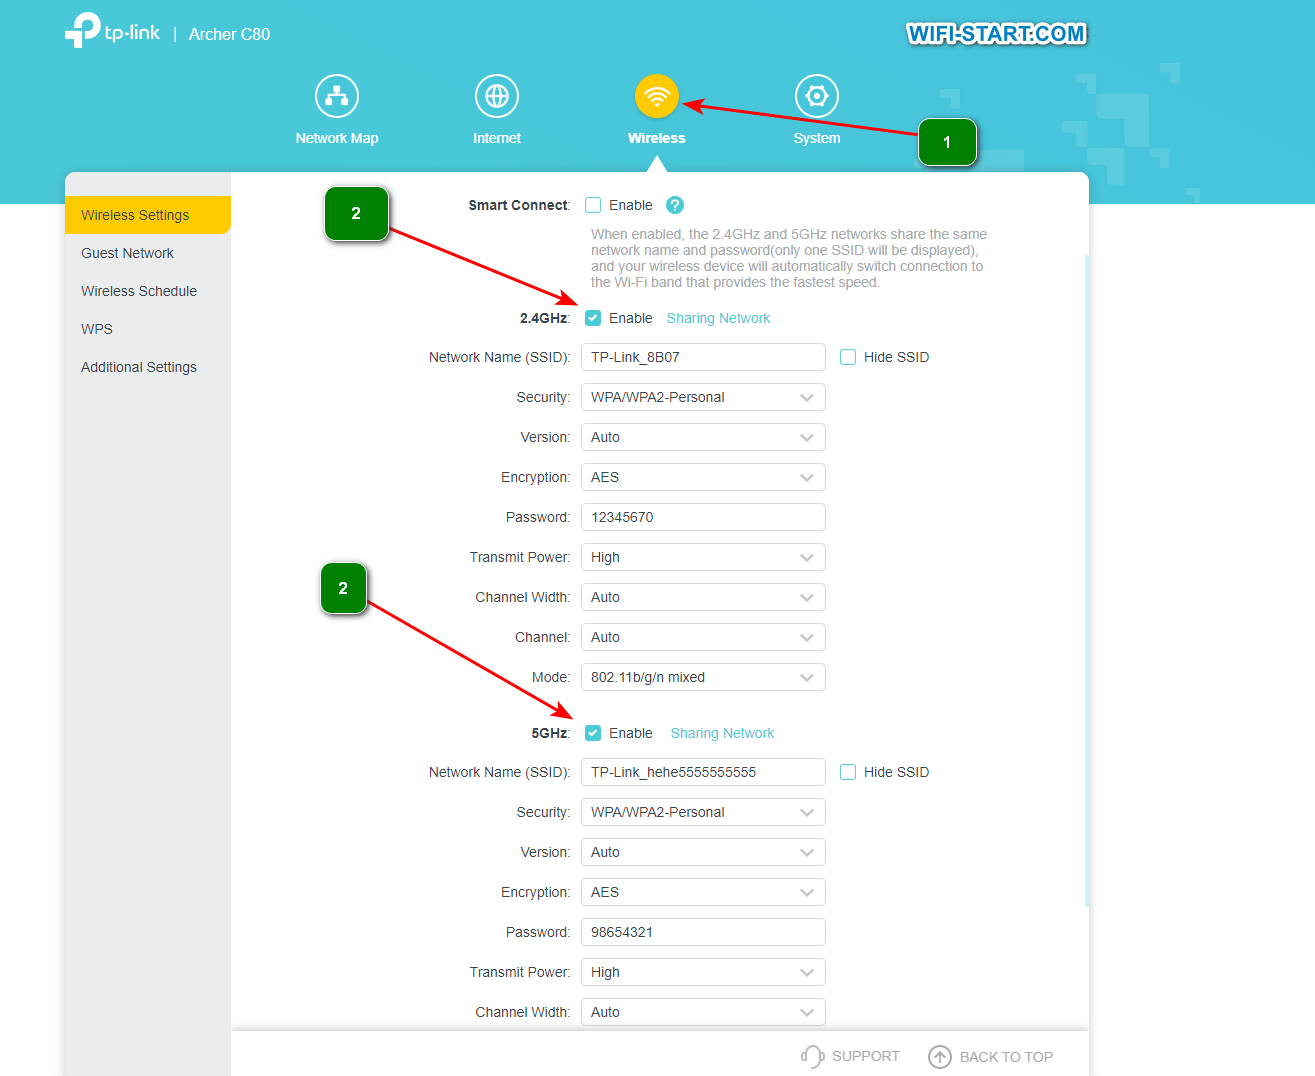
If you encounter problems, such as reduced speed, signal loss, or device compatibility, try changing the channel width. Start with the smallest width and gradually increase it as you observe signal quality and network performance. You may have to experiment with different channel widths to find the best option for your situation.
Answers to questions
Wi-Fi channel width determines the range of frequencies on which your network operates. The wider the channel, the more data can be transferred per unit time, which usually results in a faster Internet connection.
Channel widths can vary, including 20, 40, 80 and 160 MHz. Often routers operate on two frequency bands: 2.4 GHz and 5 GHz.
Choosing the optimal channel width depends on a number of factors, such as the number of devices on the network, their location, types of applications, and possible sources of interference. In general, it is recommended to use 20 MHz for 2.4 GHz, and for 5 GHz you can use wide channels (80 or 160 MHz) for maximum speed, if your home is not crowded with other networks that might cause interference.
To adjust the Wi-Fi channel width, you'll need to access your router's administrative interface and change the settings in the appropriate section of the wireless settings.
If you encounter problems, try changing the channel width. Start with the smallest width and gradually increase it, observing signal quality and network performance. You may have to experiment with different channel widths to find the best option for your situation.
Choosing the channel frequency on your Upvel router
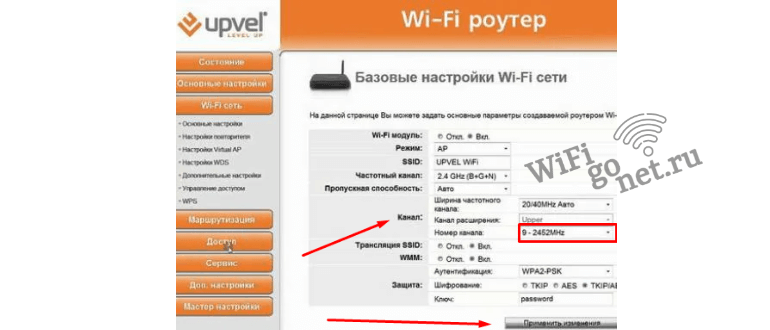
In the administration panel, go to the WiFi network settings. Here you can change the broadcast width and make the necessary channel correction. The default setting is autodetection, which must be replaced by the desired value of the parameter. There is no "Save" button for the results. The changes are made automatically.
Active development of wireless technologies is a consequence of the appearance of a large number of new manufacturers in the telecommunications equipment markets. You need not be afraid of possible problems with changing any parameters. In the pursuit of their market share, new companies will strive to make their administration panels as intuitive as possible, even for inexperienced users. Changing channel values will always be in the wireless settings tab.
What to do after changing channels
Having saved the new channel values of a WiFi network, it is recommended to check the changes first visually, then technically. If the connection speed has increased significantly and the ping when playing games or visiting web pages has decreased significantly, you can continue to use the router without additional changes.
Knowing how to change the channel on your router can greatly improve its efficiency. It is important to remember that over time other users may also change the settings of devices working nearby. In this case, it is recommended to repeat the instructions described above.
Read More:
