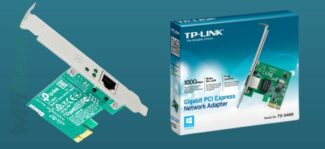
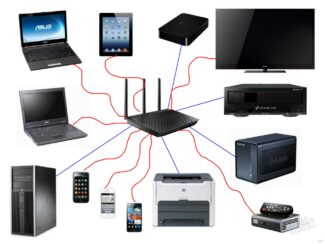
TP-LINK is most commonly used to create a wired connection to a TV or desktop computer. Most of the company's models use WSP mode.

- Improving your home router yourself
- The structure of a modern router
- Troubleshooting the inability to access the router's settings at its network address 192.168.0.1
- If the router settings are not saved
- Design and operation of the router
- Router software
- Operation modes of the router
- Router mode
- Additional Router Features
- More expensive models allow you to connect to USB ports a lot of devices:
- How to connect two routers to the same network with a cable
- Scheme 1: Connecting the router to the router via LAN ports
- Using your router as a repeater
- Do I need to turn off DHCP, WI-Fi and other functions?
- Disabling DHCP
- Disabling Wi-Fi
- IP Setting
- Bottom line and what do we need to do?
- Installing
- Connecting
- Step 1 – Power.
- Step 2 – the provider
- Adapter or client mode on your Netis router
- How to find available networks to connect the Wi-Fi receiver
- Creating a network of routers in a LAN-WAN cascade
- Wireless bridge based on WDS
- 1. For the master device in WDS mode
- 2. For secondary equipment
- Is it necessary to change the settings of the main router?
- Asus router WDS mode settings.
- Tp-Link router and its configuration for bridge mode (WDS).
- D-Link router in client mode, over Wi-Fi.
Improving your home router yourself
The most numerous class of routers are models with "average" characteristics. The majority of such systems, at the same time, are built on a modern element base. The idea is that you can replace something in the router to improve it. Consider what components the router circuit contains in order to decide what exactly needs to be "upgraded".
The router can be "improved" programmatically by installing alternative firmware. The authors of this firmware are trying to make everything work on standard hardware.
Hardware upgrade of the router is the installation of port connectors and increasing the amount of memory. The latter, by the way, is done at your own risk, since chip replacement is a complex operation, and the probability of success here is less than 100%.
The structure of a modern router
Consider the structural diagram of a router based on an SoC (System on Chip) chip. The processor is directly connected to the memory (RAM), ROM, Wi-Fi module and clock:
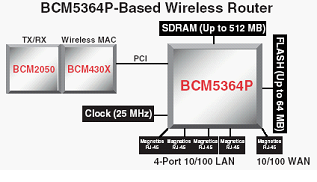
In reality, many SoC chips do not have at their disposal five LAN controllers (so, on the board will be soldered and a switch). In addition, there will be power circuit elements, different ports (USB, COM), buttons and lights:
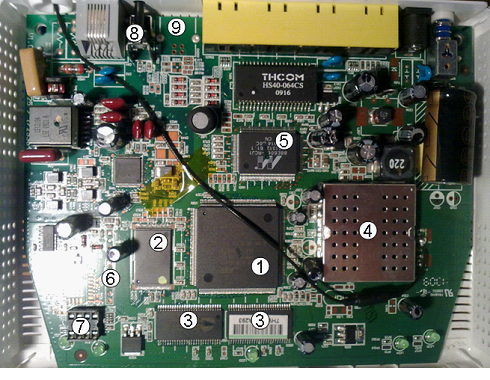
- The Soc chip containing the CPU
- Flash memory
- RAM (2 modules of 16 megabytes)
- Radio module (in this router it is either CX50221 or CX50321)
- Hardware switch
- Debug port
- SPI serial memory connector
- Control and reset button
- Contacts for USB port
You may notice that there are many interfaces (e.g. USB) soldered onto the board that are not being used. It is logical to start upgrading the router by installing the appropriate connectors. But the fact is that the problem may lie in the lack of software that supports the required interface.
In any firmware, made on the basis of Linux (which is used in most routers), there is support for the COM-port. In the router itself, most often, this port – also present. You just need to solder a couple of pins to the board:
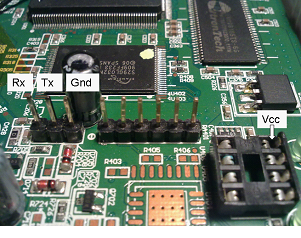
Rx and Tx – standard serial interface pins, Gnd – signal ground. Those who need voltage supply can get it from the SPI connector (but it is 3.3 volts).
Troubleshooting the inability to access the router's settings at its network address 192.168.0.1
If after typing the network address of the router in the address bar the router settings page will not open, then you should do the following steps to fix this problem:

- If the network card settings are correct, then you need to use the Run command (press the Win+R key combination), after that enter – cmd and press enter. Now at the command line, you must enter ipconfig.
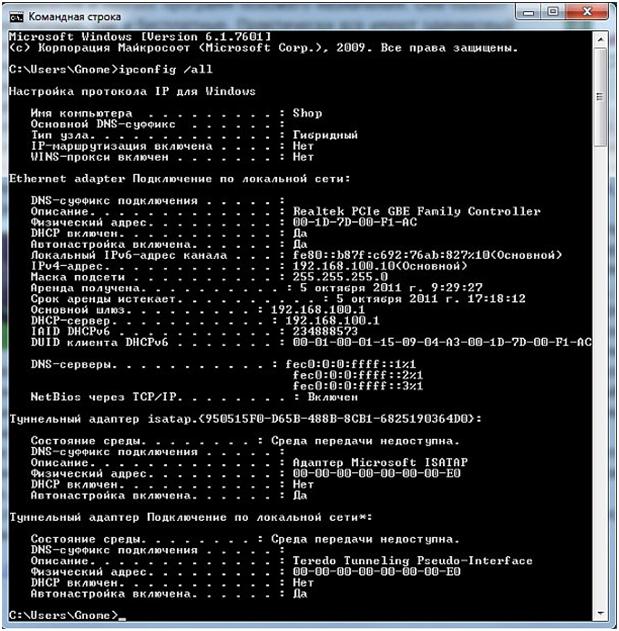
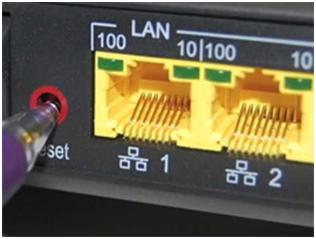
In the settings displayed, you need to see what value is against the inscription – Main Gateway. This address is used to access the router's settings. If the value of this address does not match the default value, perhaps the router has been configured for a specific network with its own requirements. If this is the case, you need to reset this value to the factory defaults. Sometimes this field may not have an address at all, in which case you should also reset the router. To reset the router, press and hold the Reset button on the router for a while. Usually five or ten seconds is enough. The hole in the button is quite narrow, so you can use a ballpoint pen, a needle, or a paperclip to press it.
If resetting your router doesn't help, disconnecting the ISP cable from your router may help. Pull the ISP cable out of the router's connector, and configure the router without the cable connected. You can then reconnect the cable to the router.
Also check the firmware version installed in the router. Check the latest firmware version on the manufacturer's website and update it if necessary. You can also check the drivers of your network card on your computer and reinstall them if necessary.
If the router settings are not saved
To troubleshoot the problem with not saving the router settings or if you cannot restore the settings from a separate file, you can try to perform these operations by opening a different browser. This method can help with other router faults as well.
There can be many reasons for this malfunction and they are all about the same frequency. Let's consider the main possible causes.
If your laptop does not display your router's network in the list of available networks, you need to check that the wireless network module is enabled. You can do this by looking at the adapter settings in the Network Control Center on your laptop. The wireless connection should be enabled. When it is off, it will be grayed out and you will need to enable the wireless connection. If you can't turn it on, you'll need to check if your laptop has a Wi-Fi switch and turn it on.
If, despite the fact that the wireless connection remains on, but shows the status – No connection, then you should check whether the correct drivers are installed for the Wi-Fi adapter and, if necessary, put them. Drivers should be downloaded from the site of the manufacturer of your equipment. This allows you to avoid possible problems with incompatibility of drivers.
In addition, you can try to go to the menu of the router and change the value for the settings there and change the parameter b/g/n to b/g. If this change helps, it means that 802.11n is not supported. You may also look in the same settings to see how the wireless network channel is set, and if it is set to Automatic, then select a channel from the list.
Design and operation of the router
In any house, any apartment, where there is the Internet and several computers, smartphones and tablets, in a word – a lot of Internet devices, then necessarily for simultaneous access to the network a router – a network device that combines all computer devices into a single whole.
But not many people know the router's construction and how it works. In this article, we will try to explain the basics "by hand".
Let's start with the device of the router.
Routers look very different but they all work on the same principle – having received a piece of information, either from the Internet or from the local network, it analyzes it and sends it exactly to the computer for which it was intended.
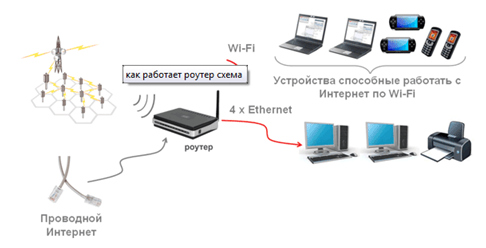
Naturally, if more than two computers are connected to the router, and it is a wired connection. In the case of wireless Wi-Fi transmission, the situation is somewhat different – everyone in the Wi-Fi network coverage area receives the information, but everyone ignores it except the recipient.
Computers in a wired network connect to the LAN ports of the router, located in most cases on the back side.
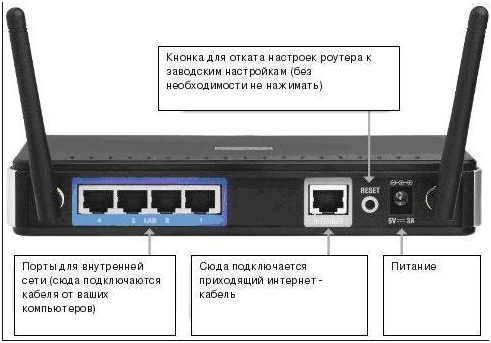
Inside the router is a small computer – a central processor, RAM and persistent memory, controllers that manage the wired and wireless network, and lots and lots of other electronics.
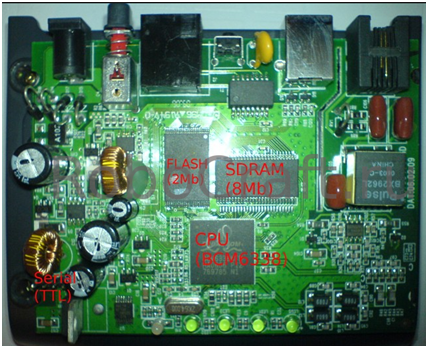
And, of course, the complex, sometimes multi-layered circuit boards that house the hardware components.
Router software
To make a router is half the battle, but you also need to have something to control all processors and chips, in other words the program code is needed. And such programs are called firmware, or firmware.
The operation of the router as a whole depends on the firmware. On the market there are many models with high quality hardware components, but "raw" unstable firmware, which reduce the router's performance "to nothing". Constant disconnections, hang-ups and instability of work – and it's all the fault of the software code. For this reason, the developers are constantly working on bug fixes and new versions not only improve the router, but also add new functionality.
Operation modes of the router
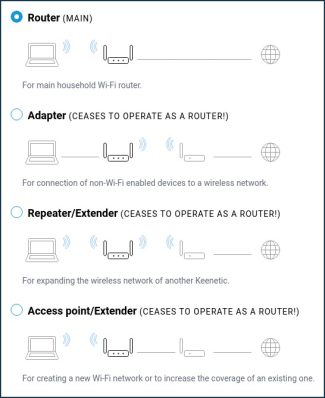
Again, depending on the firmware, the router can perform several functions, working in different modes. One mode is the access point.

In this mode, the router can only work if there is a Wi-Fi module. But in this mode the router has no IP-address, it is in fact a switch, only wireless. This means that all the settings for connecting to the provider must be made on the computer.
Router mode
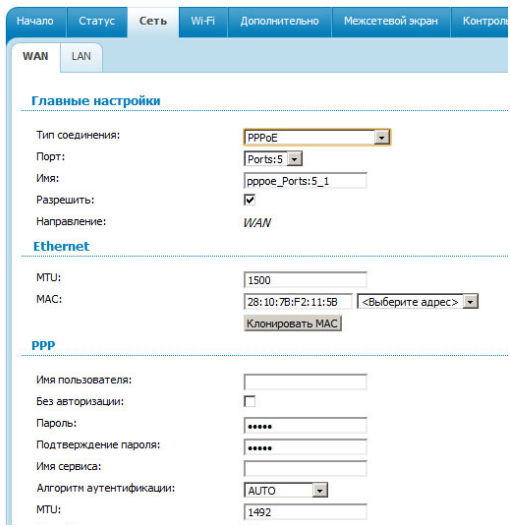
But there is a more convenient mode – router mode. In this mode, all the necessary passwords, logins, IP-addresses and everything else is written directly into the memory of the router, so it establishes communication with the ISP and configures access to the Internet.
Additional Router Features
Modern models of routers do not only organize the computer network, but also perform many additional useful functions. For example, they are equipped with USB ports.
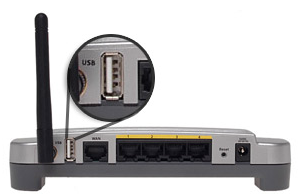
More expensive models allow you to connect to USB ports a lot of devices:
- USB 3G modems, the so-called "whistles". Usually for the additional Internet channel, automatically activated in case of connection breakdown of the main provider;
- External USB hard drives. All information contained on it is available to all computers in the network. It is very convenient because it saves space on the hard drives of computers;
- USB network printers, to which all computers on the network have access as well.
How to connect two routers to the same network with a cable
So, we have two wireless routers and we need to connect one to the other to physically create one local network. It is not possible to just connect the two devices with a network cable, because the scheme will not work without additional configuration. Before making these settings, we must decide on the connection scheme. There are only two schemes. The first one is LAN-LAN, i.e. it is necessary to connect the routers through LAN ports. This is the easiest and most convenient cable connection that will work in most cases. The second scheme is LAN-WAN, where the LAN-port of the first device is connected to the WAN-port of the second one. A rarer case is when it is necessary to divide one physical network into several logical ones. Let's consider each scheme in detail.
Scheme 1: Connecting the router to the router via LAN ports
The simplest scheme is to connect the router via a router by connecting its LAN ports with a cable. Thus the second device extends the network of the first and works in fact as an ordinary switch-switch combined with a Wi-Fi access point. The connection scheme looks like this:
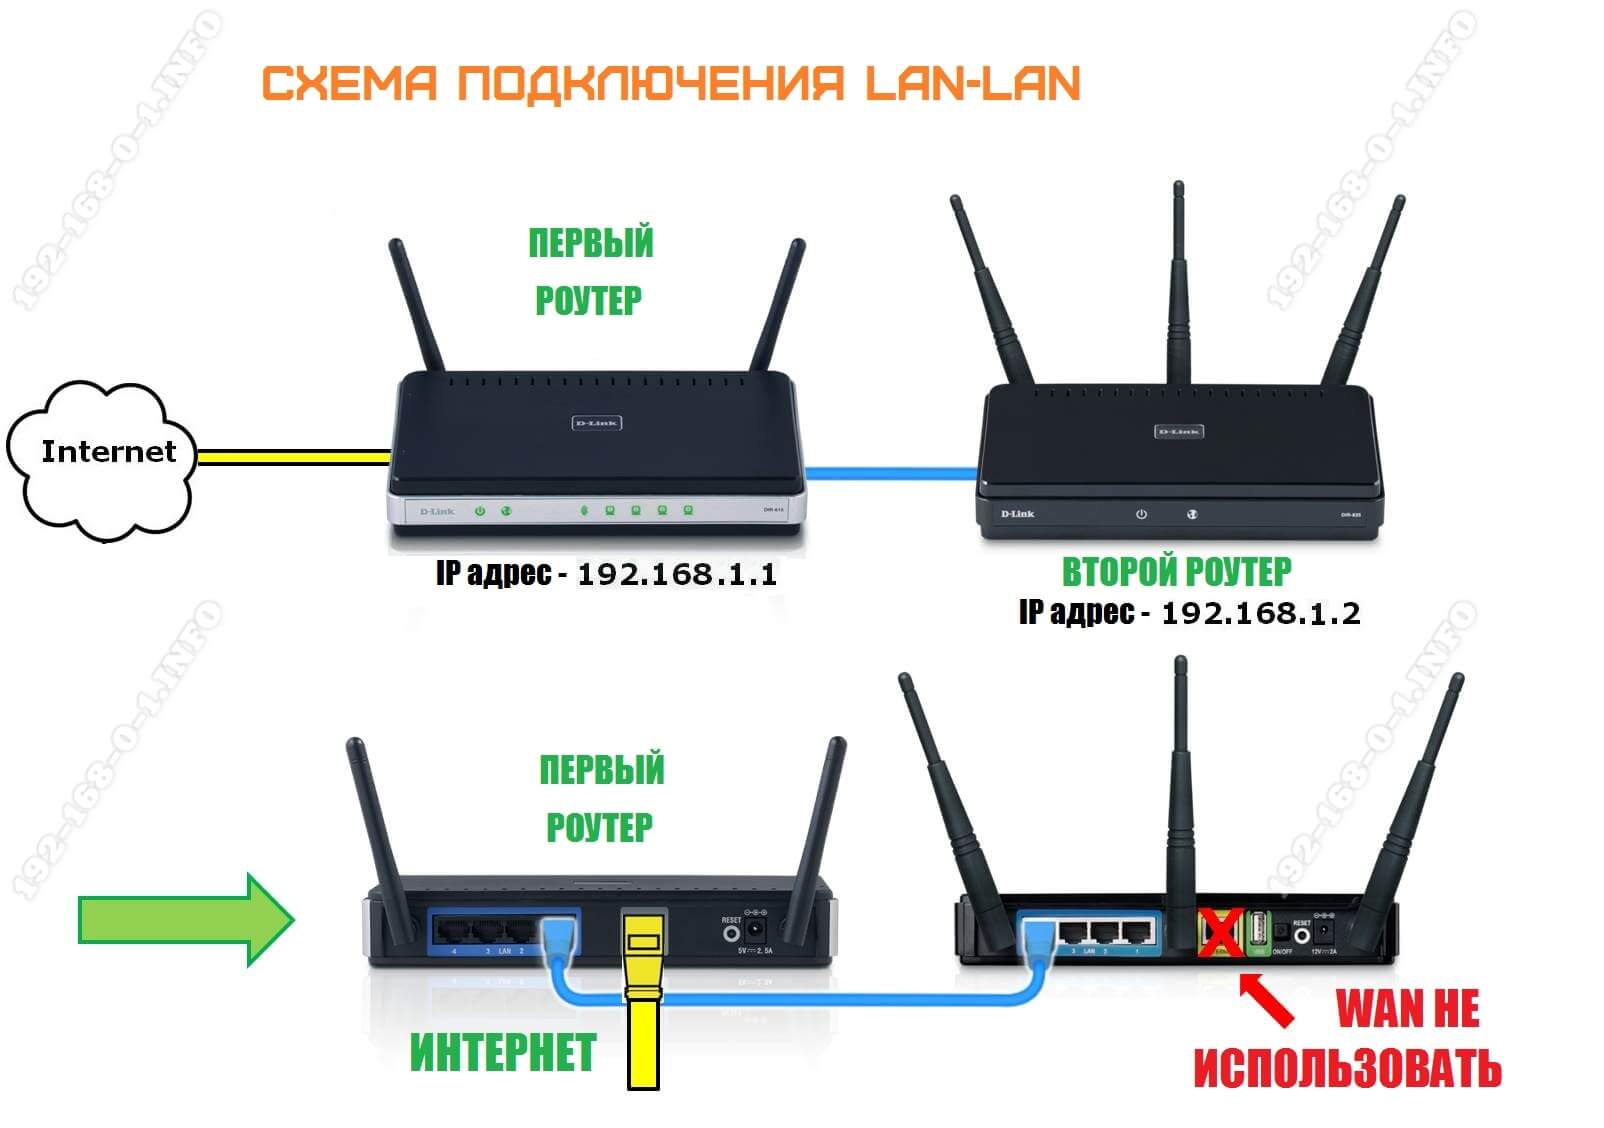
Both routers are connected to the same network both physically and logically – the segment is one. The first router manages the network – raises the connection to the ISP and distributes the Internet. It is the master in this connection. The client devices are given IP-addresses from the same router via DHCP. Please note that the WAN port on the second router is not used at all.
Attention! For such connection to work on the first router there is no need to make any adjustments – it has worked and will work as well.
But on the second router, there is quite a lot of work to be done. Moreover, it must be preconfigured and only then connected to the first one. Let's do everything step by step:
Using your router as a repeater
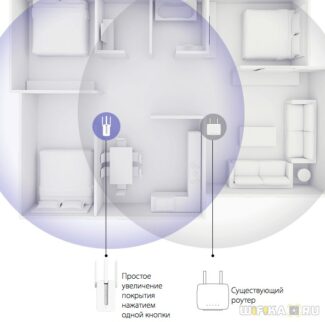
It is not always necessary to bother trying to connect a router via a router cable – you can do the same via WiFi. To do this, the second device must be able to work as a Wi-Fi Repeater or support WDS technology. The second router connects to the first one's wireless network and extends it to the range of its signal. This is what it looks like schematically:
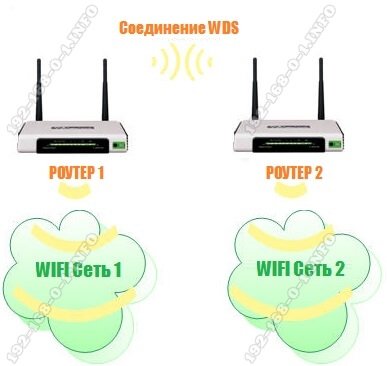
On the first device, we still don't change anything in the schematic. It works in the same mode as it did before, we will just connect to its WiFi and transmit the network further. Let's take a look at setting up the second router as a wireless repeater.
Unfortunately, not all modern routers support this mode. For example, my TP-Link Archer does not. That is why I will show you an example of repeater mode settings on Asus RT-N10U WiFi-router. The price of Asus RT-N10U is quite low and it is perfect for this purpose. The sequence of actions is as follows. Reset the settings with the Reset. After that you should enter the web interface of the device, using its IP 192.168.1.1.
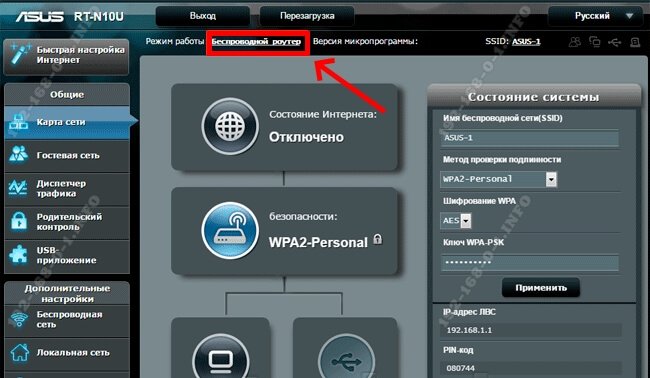
On the main page of the web interface, find the line "Operation mode". The default setting is "Wireless Router". Click on it and go to the page for selecting the mode of the device:
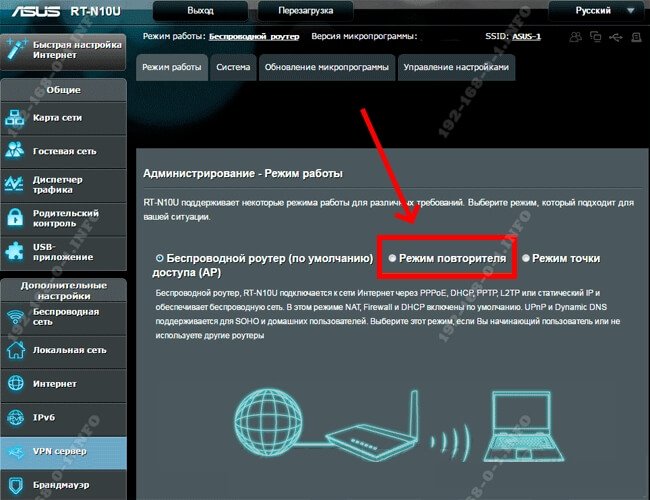
Here we need to check the "Repeater mode" box. Click on the save button.
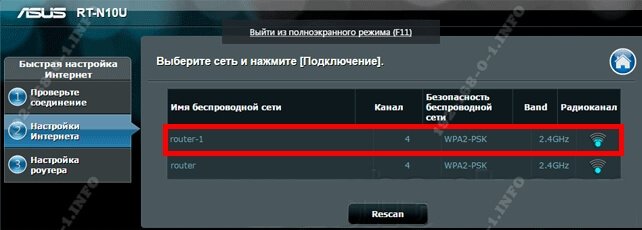
Then we should have a choice of available wireless networks:
Do I need to turn off DHCP, WI-Fi and other functions?
So, the first question, "Can I?" – we've answered. In general, if you connect any network devices to the router, the network will already exist right away. Now let's look at all the recommendations on the Internet. Let's go through the items that the "experts" on these sites recommend.
Disabling DHCP
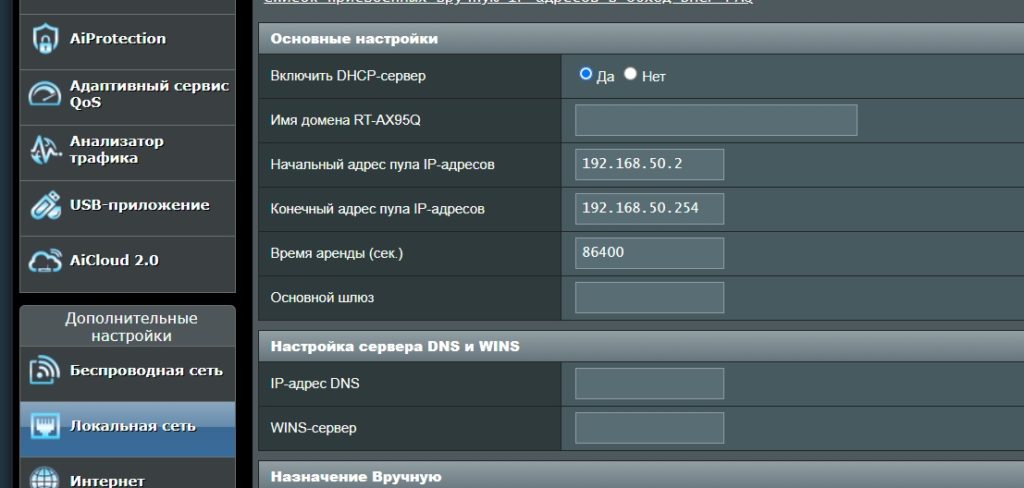
DHCP is a thing which automatically gives computers or other devices IP settings (address, mask, gateway, etc.). Without it, you have to manually assign IP addressing settings to each device. Do you need it? – I think not. So it's better to skip this point. If you want to be a real network administrator and feel like one, you can disable this feature.
Here are the instructions – it's written for enabling, but I think you'll figure it out.
Disabling Wi-Fi
Of course, the standard switch has no Wi-Fi. But maybe you can find similar models on the net. The question is: do you really need to turn it off? Let me remind you that the standard router usually has 4 LAN ports. It happens and more, but in more expensive models. That is, you can connect multiple computers and laptops.
But what if you need to connect an employee or family member, and there is no free LAN port. Let me remind you that Wi-Fi absolutely also connects the device to the local network. If you don't need it, you can disable it – see the manual. Again, phones or tablets, unfortunately, can not be connected to the LAN port.
IP Setting
This is where I almost fell off my chair. All these wretched writers, like in that broken phone, rolling over from each other, each time adding their little bit of nonsense. Which is why you end up seeing these damaging tips.
Bottom line and what do we need to do?
If you just need to connect the local network without Internet, just connect devices to LAN-ports, turn on the router and rejoice. LAN will work automatically. You can also connect to a local network via Wi-Fi.
If you already have a central router connected to the Internet, and you want to connect a switch to it to expand the network, you can connect to access point mode. You can also connect via Wi-Fi using WDS or repeater mode. On newer ASUS or TP-Link models you can extend the network over the air with Mesh.
As you see it is possible to use the router as a switch, but only indirectly. In other words we create local network via router or expand it by connecting to it with wire or wi-fi.
Installing
So, you unpacked a brand new router, it's time to determine its place in the house. Unfortunately, the range of the router is limited, so the best option for its installation is to place it in the middle of the apartment:
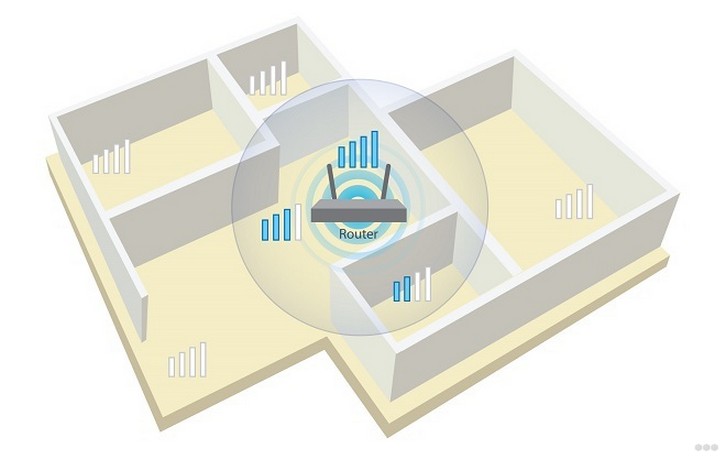
If you have one room – no problem. But if you have a lot – you put a router and walk around the apartment with your laptop or phone, measuring the signal strength so that there is enough signal everywhere. Choose the best spot, and there will be less hassle later on.
Another problem is to locate so that the ISP cable can reach your router without destroying the apartment. Usually, when laying the Internet master can immediately tell the master where to pull the wire – this is done just for better signal coverage at home. But if it is already there, you will have to adjust to it.
Additionally, you may need at this stage "assembly" of the router – often the antennas are unscrewed, and it would be necessary to screw them in.
Connecting
Here we come to the subject of our article. Let's look at the back of the average router in the world:
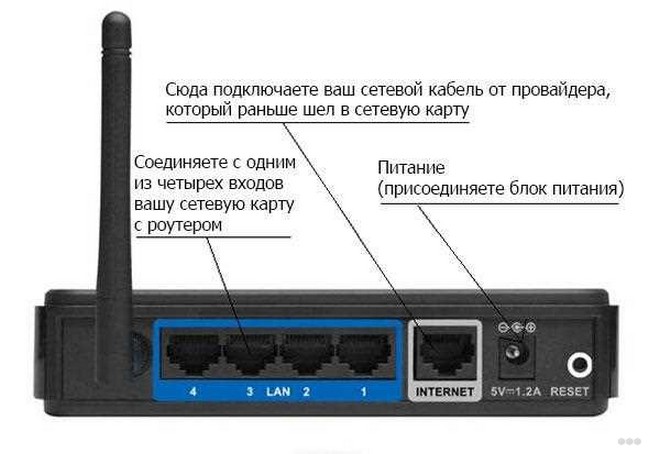
- LAN ports – highlighted in blue, but often also in yellow. The key difference is that they are signed as LAN, and usually there are several of the same color. The ports are used to connect devices on your home LAN – a computer or laptop.
- INTERNET or WAN port – the external network. This is where your ISP's cable comes in. Usually there is only one port and it is identified by a separate color (blue in most cases, the picture is chosen for contrast).
- Power. It can not be confused with anything else, through it connect the router to the power grid. There is also a separate button to turn on, if there is one, also do not forget to turn it on.
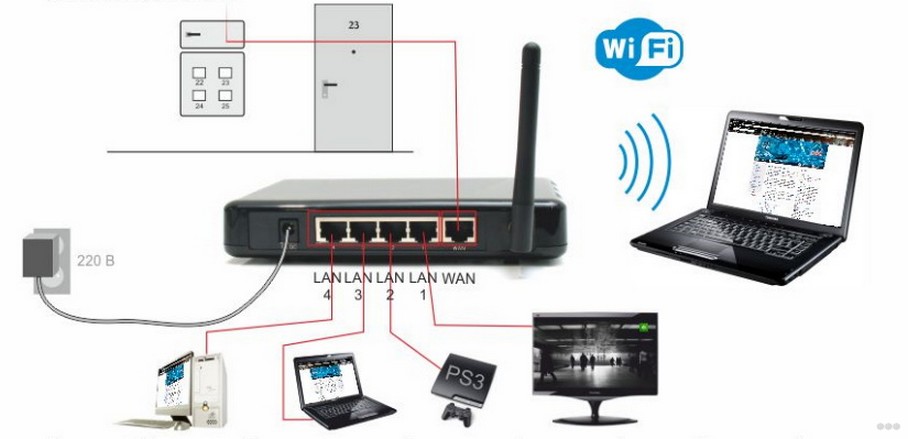
Step 1 – Power.
All steps are very simple, this is no exception. Plug the plug into the power jack on the router and plug the adapter itself into the power outlet. The router should have at least some lights on (usually the power and wifi lights blink).
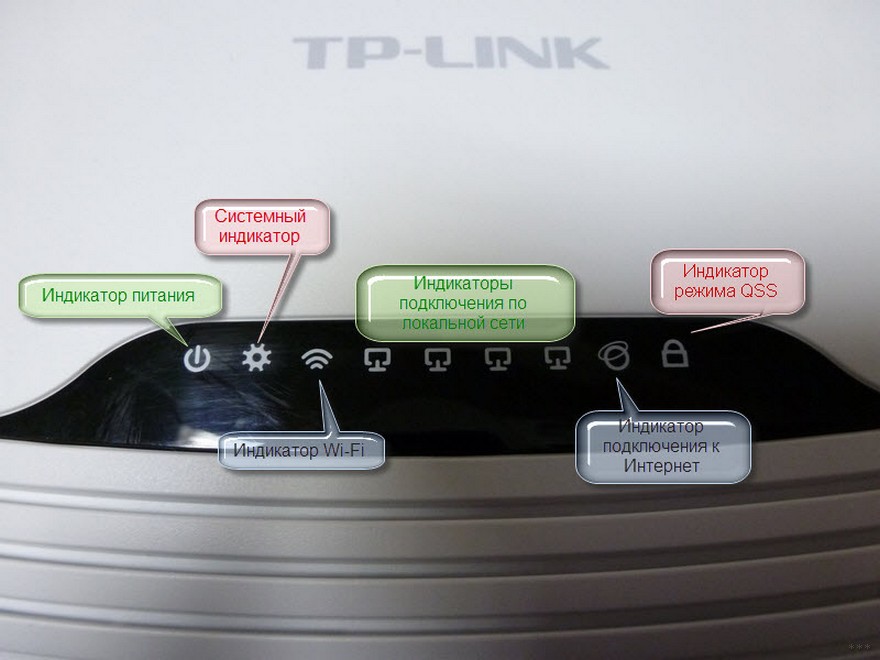
If nothing is lit – check for current. Maybe you did not connect it well? Are you sure it is there? Is the surge protector on, if there is one? And most interestingly, maybe there is also a button on the back of the router? Do not forget to turn it on.
After this step, the router should "come to life". Let us connect it further.
Step 2 – the provider
If you do not need the Internet on the router, you can skip this step. But usually people do need it. Remember that there is a special slot for this – WAN or INTERNET. That's where you need to connect!
Adapter or client mode on your Netis router
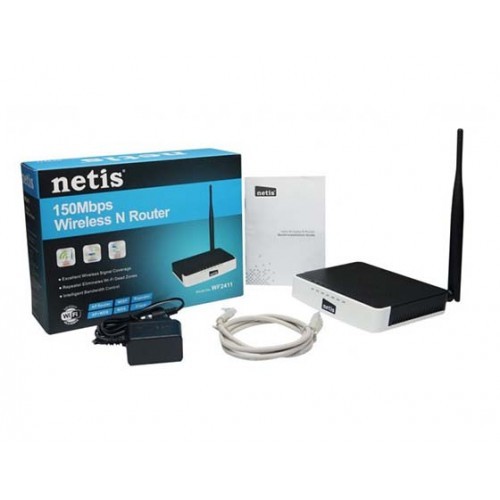
You can use your router as a Wi-Fi receiver, especially with Netis models. The best way to connect it is to use the "Client". Only after that can be set to transmit the Internet over the wire. It is also possible to connect the router as a repeater, which will be easier. We should focus on the first method.
How to configure the router in the mode, which is called "Client"? You just need to go to the settings, where you can do a few simple steps. Following the further instruction, you can get a working receiver, which converts wi-fi to wired Internet for TV and desktop computer.
To do this, you just need to go to the settings, which you select in the advanced menu, and select the command "Advanced».
After which you will get to the page with the wireless mode. Here, you should select the required Wi-Fi settings. A window will appear with a menu where you have to stop the mouse on the radio mode. Now it remains to click on the button with the word "Client". The last step is to click on the key "AP Scan».
How to find available networks to connect the Wi-Fi receiver
Here appear the available networks, with them you need to create a connection. To do this, simply do the following steps:
Now it remains to enter the password. This is the key to the wi-fi, which is distributed by the main device. By clicking on the button that saves the actions, it will be possible to start the process of rebooting the router.
After that the wired Internet will appear, which will be available to the TV and the desktop computer.
It is worth noting that when the Netis router is not working in the wi-fi mode, then it is better to transmit the internet over the wire. In the case where you want the router to transmit data simultaneously with wired data and via wi-fi, then the device should be configured in the repeater mode.
In order for the TV to receive the Internet, you must install a so-called "receiver" near the device for which the settings were made. Now you need to take the cable that is sold with the router. One end is inserted into the LAN port of the router, and the other end into the same one available on the TV or desktop computer.
Creating a network of routers in a LAN-WAN cascade
This scheme is preferred by most users, who initially do not understand whether they can connect another router to the router via cable. A proper bundle is a combination of two devices with a cord from a LAN socket to the WAN input. This approach will simplify the debugging of the Internet, which helps even beginners to cope with the task easily.
On a similar principle a tree-like wi-fi bridge is built, through which it is allowed to bind an infinite number of adapters working from one access point. The last device in the chain uses the settings of the previous one, which simplifies the task at hand.
The procedure comes down to activating the DHCP functionality on the primary device:
- The second device opens the web interface, with an IP address of 192.168.1.1.
- During the configuration of the second device its address is changed to 192.168.1.2. This condition avoids conflicts between the devices because of the same data.
- In the settings menu, near the block "connection type" you select DHCP (IPoE, Dynamic IP).
- Then the NAT checkbox is checked – "save".
The process ends by saving the changes you made. After the connection appears, you can start the work.
Wireless bridge based on WDS
Can I configure my router to receive Wi-Fi from another router? The network bridge is created with WDS support, for some users the process will be complicated. Expanding signal coverage requires adapters from the same manufacturer, to obtain stable communication without conflicts.
1. For the master device in WDS mode
Each device has its own configuration rules, but there is a general principle for the task.
The user has to go through the following steps to create a hub:
- Reconfigure the master apparatus to the provider, with the condition to receive and distribute the signal, set it in a certain area.
- The device is put in "connected" mode for the Internet.
- Then the web interface opens, you need to move to the settings menu.
- There find the block "configure wireless mode".
- Change the value of "automatic channel selection" to one of the less loaded: 1, 6 or 11.
Complete the procedure by clicking on the "connect" button.
2. For secondary equipment
The process is a little more complicated, adjustment follows an algorithm:
- It is necessary to change the initial IP-address of the equipment.
- Set a channel similar to the main unit – the same value is set in the corresponding box.
- Activate the bridge functionality by checking the WDS box.
- Designate the network name used by the master adapter – SSID.
- Enter the mac address of the primary device.
- Enter data about the variant of the key and identifier from the virtual line.
- After activation of WDS function the "search" subsection will appear on the display, through it all available options will be found.
- After selecting the actual direction click on the shortcut "connect".
- Then enter data about the type of key, password (from the main unit) and save them.
Before we begin the narrative about connecting two routers to one network, it is worth asking questions: for what in general use the connection scheme of two routers, and why they should be configured.
There are different cases. One of them is the need to extend Wi-Fi network coverage (although it is more desirable to use the recommendations and use repeaters in such matters, or routers that can operate in repeater mode).
With a router (or modem) that distributes the Internet installed and configured, everything is simple.
- It connects another router to the installed one (hereafter referred to as the dominant router), using a network cable or wireless network.
- Installing the router in the desired room, is also suitable for the option of placing it on another floor, where it distributes WI-FI further. This method is good for connecting to the neighbor's Internet. There is a charge for one connection, although the network is divided into two routers.
Tip: If you want to make a scheme solely with the idea of increasing the territorial coverage of the wireless network, you can use a router in repeater mode, which supports this function. Most devices have this feature by default:
As previously mentioned, routers can connect in two ways. It is worth analyzing each of these options in more detail.
- Connection over Wi-Fi network. Often this connection is called a bridge mode or WDS mode, by its nature it is the same. Advantages of WI-Fi are known to all – the network allows you to connect routers at great distances from each other. And cables do not get in the way. In addition to the significant advantage, there is a minus. Everyone is aware of WI-FI, and at least once in your life faced with instability. If there is no possibility to lay the cable, the installation of wireless connection is a good alternative. And not every router can support WDS mode (especially if we take into account the older devices).
- Connection With a network cable. An option that has shown its effectiveness in operation, functionality and reliability for many years. However, you often have to run the cable for quite a long distance, which can be quite costly and inappropriate.
Is it necessary to change the settings of the main router?
The answer to this question will be in the affirmative. A prerequisite for the functional work of the connection will be – to set the value in the settings of the distributing router static wireless network channel. For the first time you can use the value of 6.
Asus router WDS mode settings.
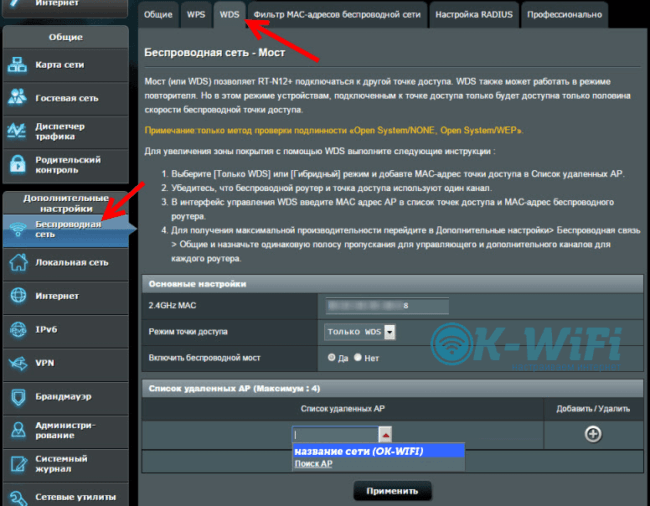
The peculiarity of WDS mode settings (or it is also called bridge mode) of Asus router is the use of two devices of the same firm Asus in the scheme. In a direct order in them should be written MAC-addresses, etc.
The Asus router setup will be discussed in more detail in the source https://www.asus.com/ua/support/faq/109839. Often Asus routers' WDS mode is advised to set it up in repeater mode. Clicking on the link will make it faster and more correct. If you have problems logging into your account, read the articles about logging into your Asus router and the instructions and fixes for 192.168.1.1 login errors.
Tp-Link router and its configuration for bridge mode (WDS).
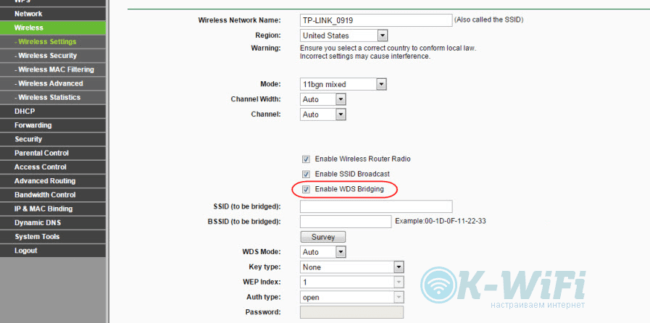
The scheme is a combination of routers: here Tp-Link routers of the same type are used as the main and attached router. The steps to configure them in this scheme are described in: Setting up a Tp-Link router in the bridge mode (WDS).
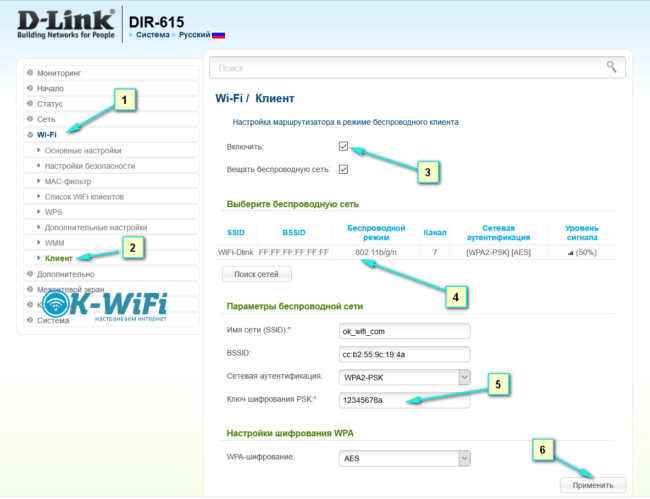
D-Link router in client mode, over Wi-Fi.
Here we will look at a pair of routers: D-Link – Asus. Asus router is dominant over the router which will further distribute the internet.
