In large cities, providers stretch fiber-optic Internet, the advantage of which is considered:
How to set up a router
Updated: 10.07.2017 Published: 2016 or earlier
Regardless of the router manufacturer (D-Link, Zyxel, ASUS and others), the configuration begins with the following steps.
If the router is not new and it already has someone else’s settings, you need to reset them. To do this, find the button on the back panel, which should be pressed with the rod from the pen. It is labeled “Reset”. Press it and hold it until all the indicators go out and light up again.
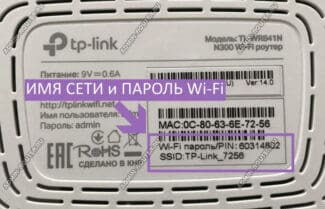
Connect your router to your computer. The easiest way to do this is to use the network cable that comes with it. If you don’t have one, or are setting up from a tablet or smartphone, you can connect to the router via WiFi. To do this, press the WPS button on your device (it will allow you to connect to the router for 1-2 minutes without entering a password), sit down at your computer and find the desired wireless network. The first time you set it up, its name will be something like this:

Click on the name you want and click the “Connect” button.
The computer should receive the network settings automatically. If it doesn’t, make sure the wireless network adapter gets an IP address via DHCP.
The process then depends on the manufacturer. In this manual, we will perform the configuration using a TP-LINK TL-WR841N / TL-WR841ND WiFi router as an example. Because the configuration is the same, it can be used for any other device.
TP-LINK
Open your browser and enter the IP address of the router. In TP-LINK’s case it is 192.168.0.1

Devices from other manufacturers may use 192.168.1.1 or 192.168.10.1.
A page should open where you need to enter your login and password. The default for the TP-LINK router is admin / admin. For D-Link: admin with blank password or password 12345 or 12345678. For Zyxel: admin / 1234 or admin / password. For ASUS: admin / admin. Also, the username and password can be seen in the manual, and sometimes – they are written on the bottom of the device.
Configure the connection to the Internet. To do this, go to the WAN section. On my device this is done as follows: “Network” – “WAN”.


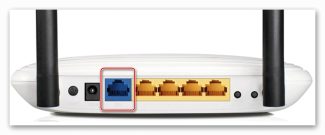
Connect the cable that comes into your apartment from your ISP to the network device – WAN port. On the computer from which you configured the router, the Internet should appear.
If the Internet does not appear, you need to call your ISP and tell them about the new router with the new MAC-address. They should change the binding of the latter, and within 15 minutes the Internet will work.
Setting up a router to connect to the Internet
How can I connect to the Internet? The solution to the problem starts with debugging the router using the administrator panel. Visually it looks like a website, login to it is carried out similarly.
You need to open the browser and enter in the address bar the address of the web interface of the adapter: 192.168.0.1 or 192.168.1.1.
If the data does not fit, the necessary configuration information can be found on the device or in its documentation.
The administration site looks different for each router model and you should find the sections in the panel:
- Quick Start – allows you to enter the necessary parameters for the Internet and wireless network step by step;
- wireless mode – it’s an extended page of Wi-Fi debugging, helps to change the name of the line and password, enable the guest mode, opens access to additional functionality;
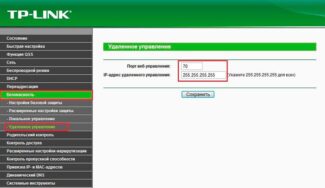
- security – allows you to change the encryption to visit the administration panel and prohibit changes from the outside;
- WAN – subsection for adjusting the connection settings with the service provider.
The built-in quick reconfiguration wizard copes with most of these items, but sometimes you have to change individual sections manually.

Connection stages
How to configure a wi-fi router? As an example, you can consider the process of change through a quick start. All modern types of routers are equipped with this functionality, the system itself asks for basic information, without focusing on secondary parameters.
The user has to prepare the following information in advance:
- type of connection – determines the way the customer connects to the Internet, the data is prescribed in the service contract itself or in its addendum;
- Login and encryption – information for logging into the network is in the contract;
- gateway – for some connection types the wizard asks for this parameter, usually the value is numeric and must be found out from the provider;
- SSID – the name of the subnet will later be visible in the general list of available inputs, to be prescribed by the user;
- Wi-Fi access key – it is requested from each device trying to join the line, it is better to choose a more complicated encryption, so that the neighbors would not use the free access for them;
- MAC-address – will be required if the service provider has created a binding to a particular equipment, the information is located on the body or in the panel of debugging, the information is necessarily reported to the provider.
How to connect a router to Wi-Fi
How can I connect my wi-fi? Subsections of the debugging of wireless remote communication allow you to perform certain actions:
- Changing the password, changing the subnet name, setting additional parameters. The user must not forget that when you are in the admin panel and connect to the adapter via wi-fi, at the moment of changing the authentication data, you will have to log out and make a new login with the changed parameters.
- Hide SSID – subnet name is displayed from the list of available ones, but you’ll have to enter the name manually to connect new devices. This option often fails and must be used with extreme caution: not all devices easily connect to a line that they can not see.
- Configure the radio frequency channel for a new subnet – not always a good choice on your own. Most devices automatically select the least busy one, preventing regular glitches and interference.
How to further configure the Wi-Fi router? There are two secondary settings in the wireless mesh section:
- WPS – represented by automatic connection protection technology, which has weaknesses and vulnerabilities. If the user does not want to let everyone who wants to use the free Internet, even in the presence of sophisticated encryption, it is better to deactivate this functionality. And do not enable it under any circumstances.
- Guest mode – suitable for those who prefer to give their friends access to the World Wide Web, but do not want to use the local network (through devices connected by cable and wi-fi). The option allows you to form a separate point with an independent key and name, which can be provided to outsiders.
- in the menu of the main adapter the network channel is changed, it is assigned an internal IP address;
- in the web interface of the second device its internal IP is changed;
- the “WDS” function is activated on both devices;
- Line detection activation is completed by choosing the correct SSID and joining, debugging the Internet distribution is not necessary.


