Configure all these parameters and move on to another access point.
- The 5 Best Wi-Fi Bridges for Organizing an Internet Network
- Selection Criteria
- Wi-Fi bridge for X km
- How to transmit wifi at a distance of 1 km?
- How to transmit WiFi at 5 km. or more?
- A brief description of the equipment
- Let's move on to the configuration
- WiFi access points and other equipment
- Wi-Fi Bridge Setup
- Setting up the first point in Access Point mode
The 5 Best Wi-Fi Bridges for Organizing an Internet Network
An assistant in creating a local network covering a large area can be a wireless bridge. With a pair of special devices, you can connect devices located on different floors of a private house, or at a distance of several kilometers. The best solutions for creating Wi-Fi bridges are listed in this 2022 ranking.
A bridge can be used to connect local networks. A network bridge can use Wi-Fi technology or connect using cables. Such devices are used in homes or offices. You can connect neighboring departments into one network or provide appliances remote from the router at home with a stable connection.
Wireless bridge is easy to install. It does not require cables that are difficult to run over long distances. For example, you may need to connect a surveillance camera or a neighbor's house in the countryside. Then special devices can come to the rescue. They will create a reliable secure channel that uses one of the standards described in IEEE 802.11 for data transmission.
There is an important condition for a Wi-Fi bridge to work – it is a clear Fresnel zone. There should be no obstacles in the path of the wave that will absorb some of its energy or cause additional interference.
Selection Criteria
The choice of device depends on the conditions of use. When the distance is short and you need to work in a heated room, even a pair of ordinary routers can be used as a bridge. For devices that work outdoors, moisture protection is mandatory. You should also pay attention to the temperature range specified by the manufacturer.
The network port is characterized by the maximum speed. This parameter can be 100 Mbit/s or 1 Gbit/s. The latter option is preferable for transmitting large amounts of data.
When selecting a bridge to create a long-distance connection, transmitter power and signal propagation characteristics are important. Manufacturers provide an approximate range and directivity diagram.
Another important parameter is the frequency range. Devices that are used as a bridge must be able to work with the same settings.
Wi-Fi bridge for X km
It is necessary to organize Wi-Fi bridge . at X kilometers.
Connecting remote objects to the network Internet has become real with the help of Wi-Fi-bridges . . A gas station, an industrial facility, a country house – all this and much more can be provided with a number of telecommunications services. Modern communication systems make it possible to overcome long distances, and the equipment needed for this is becoming cheaper every day.
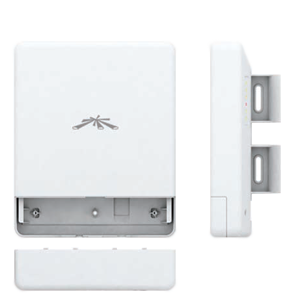
- With two Nanostation Loco M5 access points you can organize Wi-Fi bridge over short distances. The device is compact and capacious and can easily be attached to a pipe rack or building facade. Power Loco M5 – as low as 200 milliwatts and the integrated antenna has a gain of 13 decibels . However, the access point occupies its own niche in the wireless market: solving trivial problems Loco M5 is quite capable of solving trivial problems, and for a very reasonable price.
- The Nanobeam M5-400 features an "all-in-one" system when the transmitter and antenna are in a single housing. The point is lightweight and comes with a mount. Modification M5-400 has 400 milliwatts power and an antenna with a gain of 25 decibels In addition, the device has a gigabit LAN port which other Nanobeam varieties do not have. Therefore, it is possible to receive data with more , more than 100MBps , speed.
- AirFiber 24 is an ISP-grade device, with which you can build Wi-Fi bridge with up to 1.4 gigabit per second over a distance of 13 kilometers . The characteristics are quite impressive, considering the direct competitors – radio relay stations, the cost of which is incommensurably higher. AirFiber allows to solve the most serious problems whether it is a backbone channel of the company-provider, for example, in a populated area or a wireless bridge connecting large industrial facilities.
How to transmit wifi at a distance of 1 km?
To build a bridge we will need two of the simplest wireless access points. A good option is the TP-Link TL-WA5110G. What makes it so remarkable? The transmitter power of this access point model (hereinafter referred to as AP) is 26 dBm, which is many times higher than the power of any other AP for home use. The equipment is discontinued, but if you can find a working second-hand copy, feel free to buy it.
For the radio bridge we need 2 APs. One is configured as a normal access point, and the other as a client.

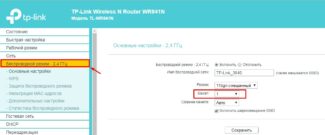
- SSID. Network name is set at will, you can not change the standard
- Region. Region does not play a special role
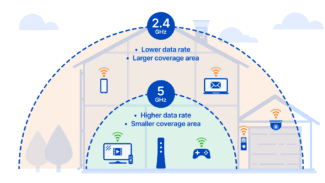
- Channel. It is desirable to choose a channel from 6 and above, so on "high" channels d 2,4 GHz, the air is less noisy
- Power. The power of the transmitter is set to maximum, i.e. 26 dBm and check the box Enable High Power Mode.
- Mode. Mode set to 54Mbps (802.11g), as the other in the list has less bandwidth.


SSID we write the same as on the first device (you can also click on Survey at the bottom of the page, there we will see a list of available devices and click Connect).

Do not forget to set different IP addresses on both APs (Section Network)!
With standard antennas devices connect confidently at a distance of 1 km in direct line of sight.
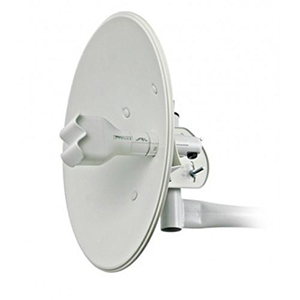
If you replace the regular circular antenna with a directional antenna (see figure below), you can significantly increase the communication range.

How to transmit WiFi at 5 km. or more?
If you're looking for a more serious option, the next part of this article is for you.
Ubiquiti is well known for its products for building wireless connections. The brand also produces equipment for "smart" houses, video surveillance cameras and more, but the first thing that comes to mind when you hear Ubiquiti is undoubtedly Wi-Fi equipment.
We will not talk about the entire line of equipment, and will choose only what we need.
A brief description of the equipment
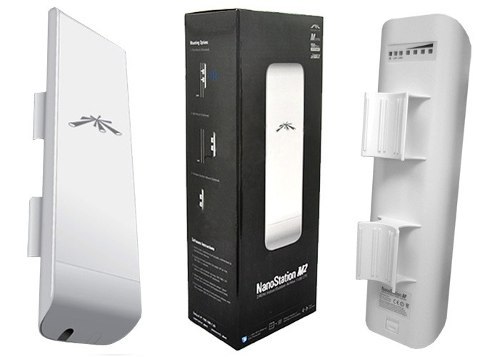
To build a bridge will be on the equipment NanoBrige M5 or NanoBeam M5.
- NanoBrige M5 is out of production, but it can still be found at some dealers, and the used version is full.
- NanoBeam M5 is a new development, it is similar to the previous model, but it has completely different stuffing. Faster processor Atheros MIPS 74KC, more RAM, now there are 64 MB of RAM on board. The gain of the external antenna has increased. The shape of the transmitter has changed. The design has also changed for the better. The installation is even easier and faster.
Both devices are positioned by distributors as equipment for distances of 5 km, but in practice the links for 20 km and more were launched with very good indicators of stability and throughput at such distances over 120 Mbps for Wi-Fi.
Below are the antennas themselves for long distance wifi transmission.


Let's move on to the configuration
Having configured the network interface of your PC, laptop for the network 192.168.1.0/24 and connecting the equipment according to the following scheme – we can proceed to the setting.

If your equipment is new, so to speak, "out of the box", then after entering in the address bar of your browser 192.168.1.20 and clicking on the transition – we should get to the authorization page, it looks like this:
WiFi access points and other equipment
Let's take a look at some of them in terms of range. If you are planning to build a wifi bridge at a distance of not more than 3 km in line of sight, then go model Ubiquiti NanoStation Loco M2, NanoStation Loco M5, NanoStation M2 – in ascending order of their range.
The following WiFi access points are already hitting up to 10 km – Ubiquiti NanoStation M5, NanoBridge M5 22dBi, NanoBridge M5 25dBi. The latter two with more reinforced antennas.
The distance of 20 km will help to overcome the models PowerBridge M3 and PowerBridge M5 with built-in powerful narrow antennas.
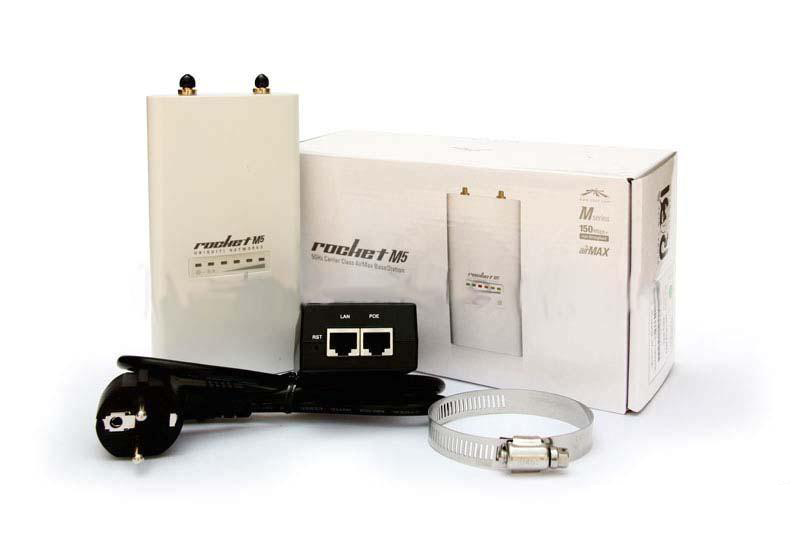
And finally, the maximum distance of up to 30-50 km you will cover with Ubiquiti Rocket M2, Rocket M5, Rocket M5 GPS (with coordinate synchronization). Also for a more stable reception they can be further strengthened by antennas – so, for a point Rocket M2, working on a frequency of 2.4 GHz, ideally suited RocketDish 2G-24, for Rocket M3 – Rocket Dish 3G, and for Rocket M5 – RocketDish 5G-30.
If there is no line of sight, the NanoStation Loco M900 will help for distances up to 5 km. Unlike most access points operating at a frequency of 2.5 GHz, in this equipment frequency range of 900 MHz, which helps radio waves to better circumvent obstacles.
In addition to the points themselves for outdoor installation you will need some more devices – this is the so-called lightning protection, which protects devices working on PoE technology (that is powered through a network cable) from dangerous voltages that can occur due to atmospheric phenomena.
Wi-Fi Bridge Setup
Once you have decided on the distance and selected a set of devices it is time to start setting up the bridge. I'll be showing you a Ubiquiti NanoStation M5 mid-range wifi access point, which works for 5km and supports up to 40 workstations.
Setting up the first point in Access Point mode
Connect the point to the lightning protection, and her to the PoE adapter (a device that allows you to supply power via LAN socket), which in turn through a network adapter is connected to the mains. Also in the PoE adapter in the LAN socket insert the patch cord, coming also from the LAN router, which is connected to the Internet.
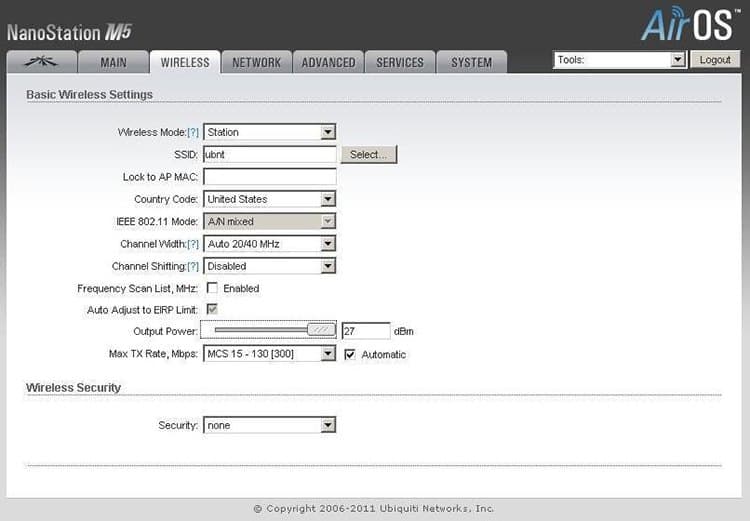
After that you can enter the address https://192.168.1.20 (it is indicated on the case or on the package) in your browser, authorize using the username/password "ubnt" and get to the main admin page, which displays general data and network status.

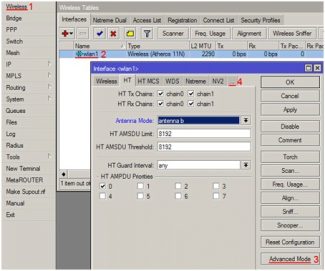
We need the WireLess tab, where we configure everything we need to work. There are already familiar items such as SSID, and Security (encryption type, login and password for connection) – I won't repeat, how to configure it is described in detail in the very first article about wireless connection.
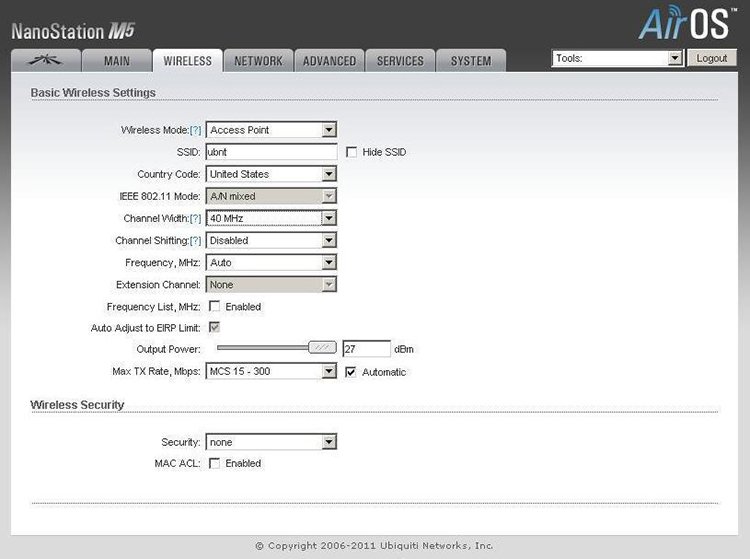
Now I would like to focus on the new main parameters.
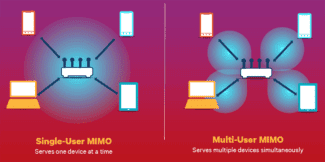
Wireless Mode – The role of this device is either Access Point or Station. We set one, main access point, into AP mode, and the second, client access point into Station mode. There is also WDS mode, which allows combining several devices into a network, but we don't need it now.
Read More: